
This is a Veteran Owned site
![]()
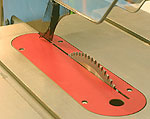 |
Fitting a zero clearance insert to accommodate a factory splitter is easy - and a good thing to do for your safety. Click image to enlarge |
Zero Clearance Inserts & Factory Splitters
Yes, they can live together!
Text & photos by Tom Hintz
Posted – 8-24-2006
A favorite excuse for not using the factory-supplied blade guard and splitter is that they are not compatible with zero- clearance inserts. Actually, they are and compliment each other well in terms of increased safety.
In this story we look at how a single layout line and a short, simple cut can enable using the full compliment of safety equipment that came with your table saw. The zero clearance insert in this story already has the blade slot cut in it and rather than go over that procedure, see our separate story –Installing a Zero Clearance Insert.
Also, before beginning the procedure below, make sure the zero clearance insert is properly installed and is adjusted flush with the table.
The Layout
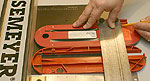 |
The only trick to the layout is being sure the inserts are even and square to each other. Click image to enlarge |
The only layout necessary is transferring the end of the splitter cutout on the factory insert onto the zero clearance one. To be accurate, make sure the inserts are square to each other.
Lay both the factory and zero clearance inserts on the table saw, splitter end towards you. The splitter end of most inserts has a pin projecting from the edge that prevents it from lifting when the saw is in operation. With that pin aimed towards us, the blank end can be placed against the saw’s fence or other straight surface to be sure the inserts are exactly aligned. I laid a square next to the inserts to be sure they were not angled to either side.
Laying both inserts upside down makes it easier to accurately draw the layout line from the very end of the factory splitter slot. The slot will be cut in the zero clearance insert with it upside down so the layout line needs to be on the bottom surface.
Using a square aligned to the end of the splitter slot in the factory insert, transfer that position to the zero clearance one. While the blade slot in a zero clearance insert is usually shorter than the opening in the factory version, we cannot shorten the splitter slot. In most cases, the full length of the splitter slot is needed to install and remove the zero clearance insert without having to remove the blade.
Setting Up the Cut
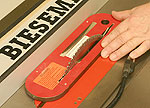 |
With the blade raised fully, slip the blade slot in the zero clearance insert (upside down) over the blade and set the fence to it just touches its edge. That insures the splitter slot will be cut exactly on line with the blade slot. Click image to enlarge |
Note: Make sure the saw is unplugged from the power source until you are ready to make the cut!
Install a blade with a normal, 1/8”-wide kerf. Using a good quality laminate-cutting blade will help limit chipout when making this cut. I used a Bosch PRO1080LAM – 10", 80-tooth laminate-melamine blade.
Also, install the factory insert and raise the blade as far as possible and still operate the saw. On some saws the blade washers or nut can make contact with the underside of the insert before it reaches the end of the height adjuster travel. Make certain the blade turns freely before moving on to the next step!
With the blade raised so high, the curvature of the cut is minimized. Because we are stopping this cut well before the hands get near the blade it is relatively safe. However, remember the blade is there and pay attention!
Place the blade slot of the zero clearance insert over the blade, upside down and lay it on the factory insert. Carefully adjust the fence so that it just contacts the side of the zero clearance insert and then lock the fence in that position. Lift the zero clearance insert off of the blade.
Making the Cut
 |
 |
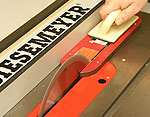
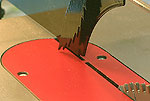
When making the cut (left) I used a rubber soled push block. Gently push the insert into the blade until it reaches the layout line. Shut the saw off and allow the blade to stop before removing the insert. There should be a 1/4"-wide or wider strip of material left between the blade and splitter slots (right) that will provide plenty of stability for the phenolic material. Click images to enlarge |
|
Note: Because the insert has rounded ends, using push sticks or handles can be dangerous. I used a rubber soled push block normally associated with a jointer. This style of push block makes it easy to maintain control of the insert throughout the cut and making sure the flat side stays against the fence.
When satisfied everything is correctly set for the cut, plug the saw in and start it.
With the zero clearance insert upside down on the table and its side against the fence, the blade should align with the blade slot, indicating it is in the correct position. Slowly push the insert into the blade until the cut reaches the layout line. Hold the insert steady at that point (don’t pull it back!), shut off the saw and allow the blade to stop completely before sliding the zero clearance insert away from it.
With every insert we or friends of NewWoodworker.com LLC have tried, a bridge of material at least ¼” wide (at the surface) remains between the blade and splitter slots. That material actually gets slightly larger towards the underside of the insert because of the curvature of the blade and making this cut with it upside down.
Despite having used zero clearance inserts modified with the splitter slot for at least several years, there has never been a failure between these slots. The phenolic material nearly all zero clearance insert blanks are made from today is very strong and the stress at this connecting strip is exceptionally low barring a major accident.
Check the Fit
 |
Your zero clearance insert is now ready for use with the factory splitter in place. this is a clean installation that will make your saw safer! Click image to enlarge |
Unplug the saw, remove the factory insert and install (and align) the factory blade guard and splitter assembly as per the instructions that came with your saw. Install the zero clearance insert and make sure it drops into position. (On some saws the blade has to be rather low to get the insert into its final position.) If the zero clearance insert fits, move on to the next check. If the newly cut slot binds anywhere, carefully open it up with a thin file or chisel as needed and recheck the fit.
With the zero clearance fit and installed, make sure that the blade spins freely by turning it with a scrap of wood, not by turning the saw on! Once satisfied with the blade clearance, plug the saw in and turn it on to confirm that everything clears. I stand to the side during this test just to be safe.
You can now use the factory supplied blade guard and splitter assembly with your zero clearance insert. Working together, they make your saw safer and cleaner cutting.
Have a comment on this story? - Email Me!
Back to the Tips & Tricks List
All written, photographic and drawn materials are property of and copyright by NewWoodworker.com LLC 2000-2019. Materials may not be used in any way without the written permission of the owner.