
This is a Veteran Owned site
![]()
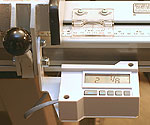 |
Installing the Digi-Fence is the easiest, most cost-effective way to drastically improve the accuracy of a table saw! Click image to enlarge |
Digi-Fence
Digital accuracy for the table saw
Text & Photos by Tom Hintz
There are two primary camps in woodworking when discussing the importance of precision at the table saw. The "close enough" faction is comfortable with the accuracy obtained using built-in tape-style indicators or a hand-held tape measure. The other group, of which I am a devout member, believe there is "no such thing as too accurate" and appreciate easy-to-use enhancements that increase the precision of their machines.
The Digi-Fence System, from Accurate Technology Inc. (Fletcher, North Carolina) tripped my "gotta-have" sensors and instantly became the focus of this NewWoodworker.com Tool Review, and a bunch of testing.
The Kit
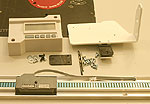 |
The Digi-Fence kit is very complete, including necessary screws and even a high-end drill and tap! Click image to enlarge |
The Digi-Fence System kit arrived in two packages. A simple box contained the display housing, bracket and hardware. The 55 ¾"-long digital scale rail and readhead was shipped suspended by specially cut foam retainers in a piece of 4"-diameter PVC pipe. Short of a major vehicular accident along the way, this packaging leaves little concern about shipping damage!
A nice surprise was finding a high-quality drill and tap, necessary for installing the digital scale to the underside of the Biesemeyer fence rail. Many manufacturers leave it up to the consumer to provide these needed installation tools or drop the cheapest versions they can find in the box just to say they provided them. The drill and tap that came with the Digi-Fence System worked great and following installation, were packed away for future use. These are not throwaway tools.
Display Capabilities
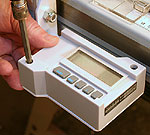
The LCD (liquid crystal display) screen has ½"-tall numerals that are easy to read from any reasonable angle, even with my eyes. Though I did not try using the Digi-Fence System in direct sunlight, the display was easy to see clearly in all shop lighting conditions we could devise.
The readout can be changed between metric, decimal and my favorite, fractional modes. Within the fractional mode, resolutions of 16 th, 32 nd and 64 th-inch can be selected.
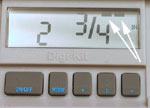 |
Those little bars (arrows) appear in the 1/16th and 1/32nd-inch scales, showing you are 1/64th-inch over the visible dimension for each bar displayed. Click image to enlarge |
Because the Digi-Fence System is so accurate, it knows when it is positioned between the displayed fractional readings. In the 16 th and 32 nd-inch modes, bars above the numerals, each representing 1/64 th-inch, show how far over the fractional dimension being displayed the fence is. In the 1/64 th-inch mode, the bars are not necessary and do not appear. The bars make the largest possible error to be 1/64 th of an inch.
These bars have confused some casual observers who cycled through the modes at trade shows and such and being unfamiliar with the meaning of the bars, figured the Digi-Fence System was skipping around. The fact is, when the bars are understood, each mode is spot-on accurate. Overall, the Digi-Fence System is accurate to +/- 1/64 th-inch!
While it makes sense to use the Digi-Fence System in the 64 th-inch mode, it might be easier to achieve some fractional settings in one of the other modes. In those cases, the bars show how far from perfect you have the fence. Bump the fence until the bars disappear and it is dead on.
Installation
 |
 |
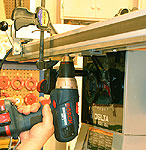
Drilling (Top) and tapping (Bottom) the holes for the digital strip was surprisingly easy. The quality of the drill bit and tap supplied with the kit made this job simple. Click images to enlarge |
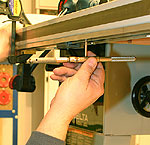
I began by installing the digital scale rail, as it appeared to be the toughest part of the process. Ten holes have to be drilled and tapped for the mounting screws (provided) that secure the digital rail to the underside of the Biesemeyer main rail. Actually, this process went much faster than anticipated.
Positioning the digital scale rail is very easy. Hold it under the fence rail butted against the angle iron mount. The right end of the digital scale should be flush with the end of the fence rail. Apply a few speed clamps (rubber jaw pads in place) with just enough pressure to hold the digital scale in place for drilling.
After center punching through the tapered holes in the digital scale, I used the included bit to drill the holes and then the tap to cut the threads. Both processes were surprisingly easy in part because the fence rail is made from mild, relatively thin-walled steel. After tapping, the included screws turned in easily and drew down flush with the interior rail surface.
Taking your time to center punch for the holes properly is important but rather easy with a large punch. The tapered holes in the digital scale rail actually center the punch. If you hold it square to the surface, the mark for drilling will be perfectly centered.
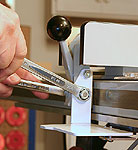
The Digi-Fence System kits include mounts and parts that are designed for specific fences. In my case, the bracket that holds the digital readout
 |
 |
 |
Installing the the display bracket (Top), base (Middle) and finally the display housing itself (Bottom) was very easy. Click images to enlarge |
box mounts to bolts that secure the fence handle and mechanism. Turn the nuts off, slip the Digi-Fence System bracket onto them and replace the nuts. The holes in the bracket were properly spaced and it slipped onto the bolts with no alteration.
Installing the display unit requires removing its cover and drilling out two holes through which the supplied screws are inserted to secure it to the bracket. This process sounds worse than it is. Opening the display case does not involve any wires or loose pieces. Remove the two screws and lift it off the base.
The holes to be drilled are inside short bosses molded into the plastic that make this a foolproof task. After drilling, set the base on the bracket, install the screws to secure it and then re-install the display housing itself.
The last part of installation is sliding the readhead under the plastic arm on the display bracket that actually connects it to the fence. A detent in the plastic arm snaps over a pin on the readhead, letting you know it is positioned correctly. Plug the wire from the readhead into the display unit and installation of the Digi-Fence System is complete.
Including stopping for photos and notes, installing the Digi-Fence System took me just under an hour.
Calibration
Before using the Digi-Fence System, it has to be told where it is in the world, particularly in relation to the saws blade. There are two methods for doing this, both of them simple and fast.
 |
Calibrating the Digi-Fence is fast and painless. Two simple methods are described in the instruction manual. Click image to enlarge |
The fastest and slightly less labor-intensive method is to slide the fence over so it just touches the blade. Press the "Zero" button on the display box and you are done.
The price for that ease and speed ranges between none and slight, the difference completely dependent on if the fence was just touching the blade, close to it or pressing against the blade hard enough to flex it. With a little care when positioning the fence, this calibration is very accurate.
The more precise method is to cut a strip of wood and measure it (the piece from between the fence and blade) with digital calipers. Use the + or – buttons on the keypad to correct the reading to match that on the calipers and the Digi-Fence System should be dead on.
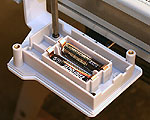
It should be noted that the Digi-Fence System must be calibrated whenever the batteries (2 AA's) are changed or the readhead is unplugged from the display unit, such as when the fence is removed from the saw. This is not a big problem because of how quickly it can be re-calibrated using the method with which you are most comfortable.
In the Shop
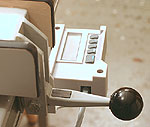 |
When installed, the Digi-Fence sticks out less than the fence locking handle. Click image to enlarge |
One of my initial concerns with the Digi-Fence System was how far the display bracket would protrude from the saw. After installing the unit, I noticed that the handle on the fence sticks out further than the display bracket so that is a moot point.
The fact that all of the Digi-Fence System components are out of the way and the fence itself is left un-touched makes adding it to your saw painless. All of your jigs and fixtures work as they did before and there are no new techniques to learn other than reading digital numbers rather than a tape.
Before you do anything else, adding the Digi-Fence System cures a very common problem with tape and cursor fence-setting systems. Parallax is a phenomenon where what you see may not be what you get. Unless your eyes are centered directly over the cursor line, it can appear to be directly over a number but is actually to the same side of it as you are. The amount of this error is directly related to the angle at which you are viewing the cursor and its height above the tape. It is not difficult for parallax to create errors in the 1/8" to 3/16"-range.
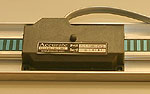 |
Mounted under the fence rail, the readhead and its track are what tell the fence where it is with an error of no more than 1/64th-inch! Click image to enlarge |
The Digi-Fence System has no such problems because the readhead does not suffer these angular discrepancies and displays the correct dimension on the screen. As long as you can see the numerals, your angle to them is irrelevant.
Using the Digi-Fence System is very easy. Programming the display is a no-brainer and allows the user to select the type of measurements they want. I also have found that being able to change the resolution between 1/16 th, 1/32 and 1/64 th – inch can be handy when plans call for a piece measured in one of those resolutions. When a plan gives you a dimension ending 32nds of an inch, the Digi-Fence System makes it easy (and fast) to make that cut precisely.
Being able to zero the Digi-Fence System anywhere on the saw, combined with its ability to read into negative numbers provides some interesting possibilities. Ripping thin strips from a large piece of wood is just one that can be done far safer and with extreme accuracy.
Say we want to cut ¼"-thick strips, using a standard kerf (1/8"-width) blade. With the Digi-Fence System, we can make this cut, dropping the cut off piece to the left of the blade and keep the large, safer piece against the fence.
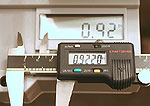
 |
Because of how easy the Digi-Fence is to calibrate anywhere on the saw and its ability to read into negative numbers, cutting thin strips with exacting consistency is easy. These strips, checked with a digital caliper, vary less than 0.002" among the four. Click image to enlarge |
Make a cleanup cut on the wood to establish the initial size, press "Zero" on the Digi-Fence System. Bump the fence to negative 3/8," lock the fence down and make the cut. A perfect ¼"-thick strip. Press the "Zero" button again and repeat the process for as many strips as you want, or can safely cut from the piece. No conjured up jigs or trying to cut such a thin strip between the fence and blade.
When done cutting strips, measure the last piece that was between the fence and blade, punch that dimension into the Digi-Fence System and it is calibrated for normal use again.
Throughout testing, the Digi-Fence System held its accuracy without needing re-calibration unless the fence was removed from the saw. After the initial calibration, I dialed in a 1" cut and saved that cutoff piece. After making dozens of cuts at other dimensions I reset the fence to 1" and cut another piece. I used a digital caliper to measure each and found a difference of less than 0.002". Considering that the first piece lay in the shop for two days, exposed to a substantial increase in humidity, that small difference is nothing.
Conclusions
If getting the most accurate cuts possible on your table saw sounds like a good way to step up the overall quality of you projects, the Digi-Fence System is something to be considered. Between the extreme accuracy and the ease of operation, The Digi-Fence System will step up the performance of your saw in a big way.
Digi-Fence System kits are available to fit many popular saw models. Check the Digi-Fence System web site at the link below for available kits and specifications.
The Digi-Fence System kit for my 30" Biesemeyer commercial fence costs $249.00 (2-11-2006) while some other versions for other makes and models run up to $299.00. Certainly not chump change but if accuracy is important to you, it is a good investment.
Digi-Fence System kits are available direct from the manufacturer. See the web site listed below for more details.
Visit the Accurate Technology web site (www.digi-kit.com) – Click Here
Have a comment on this review? – Email Me!
All written, photographic and drawn materials are property of and copyright by NewWoodworker.com LLC 2000-2019. Materials may not be used in any way without the written permission of the owner.