
This is a Veteran Owned site

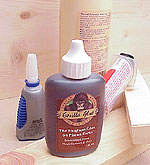
Gorilla GlueStrong, 100% waterproof, versatile and misunderstoodText & photos by Tom Hintz I first used Gorilla GlueTM about five years ago while building a rose trellis made from very wet pressure treated wood. I realized my standard yellow glues were neither outdoor rated or going to bond well with wet wood. Remembering the 100% waterproof claim I read on the label I picked up some Gorilla GlueTM and gave it a try. After five years that included several ice storms, a three-year drought followed by over 50 inches of rain this year (so far) and the often brutally hot North Carolina summer heat, the trellis remains in tact. All joints were secured by Gorilla GlueTM and a couple 3/8"-long brads. Though the brads deteriorated quickly leaving only the Gorilla GlueTM to hold the joints, there have been no failures. Since that project, I have used Gorilla GlueTM sparingly, considering it primarily an outdoor adhesive. Since reading more about it, I have been using Gorilla GlueTM for a much larger range of projects with very good results. After seeing several forum discussions and receiving a slew of questions about Gorilla GlueTM, many based on misconceptions, an in-depth look at this adhesive was in order. Strength
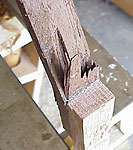
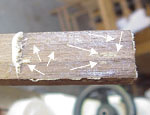
Gorilla GlueTM has many attractive capabilities, not the least of which is being exceptionally strong. The label touts Gorilla GlueTM as "The Toughest Glue On Planet Earth," a claim I have not been able to refute. The strength of Gorilla GlueTM actually makes it difficult to quantify in woodworking situations. I can say that when properly applied to a good fitting joint, Gorilla GlueTM was stronger than any of the many wood species adhered with it. For this story seven test glue ups using various combinations of woods were made. I applied varying amounts of Gorilla GlueTM and allowed them to dry overnight. When fully cured, all of the test assemblies had one end clamped in a vise and then I pulled on the other end until something failed. Certainly not scientific testing procedures but revealing none the less. Three of the pieces broke outside of the glue joint. Two fractured parallel to the glue joint bringing a considerable amount of wood with it. In all of these cases, it was clear the wood failed, not the Gorilla GlueTM. Two of the test pieces actually showed evidence of breaking IN the glue line. Both of these test pieces had purposely been given a very light coat of Gorilla GlueTM. It appears between the minimal amount of glue and the clamping pressure the further reduced the amount of adhesive present at the joint, there simply was not enough Gorilla GlueTM present to create a good bond. I did notice that at points where deep pores in the wood trapped additional Gorilla GlueTM, wood was pulled from one side of the other. The assumption here is that with a sufficient amount of Gorilla GlueTM applied to a proper fitting joint adhesive failure will be the last of your concerns. Wetting the Joint
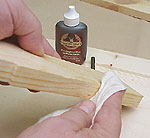
The major difference in the use of Gorilla GlueTM when compared to most other adhesives is the need to introduce moisture to one or both of the surfaces being joined. Unlike most other adhesives, Gorilla GlueTM actually benefits from moisture during the curing process. How to apply that moisture is a common point of confusion judging by the emails and related topics on some woodworking forums. The instructions say to moisten one of the pieces being joined and apply Gorilla GlueTM to the other. This works well with softer woods and those with moisture contents in the 10 to 25% range. When working with hardwoods we can encounter two situations that may require applying moisture to both surfaces. Many of the hardwoods we use in woodworking are very dense. Applying moisture to both sides of a joint helps open the pores of the wood and enhances the grip Gorilla GlueTM can attain. We also have to remember that the hardwoods we buy are often stored indoors to protect them from rain and humidity. This can mean they have a moisture content lower than expected, sometimes as low as 5 to 7%. Adding moisture to both sides of a joint in these situations helps Gorilla GlueTM form a strong bond.
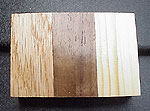
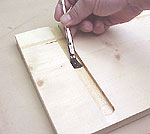
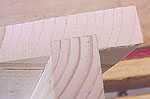
A hand sprayer that produces a fine mist or a dampened cloth can be used to wet the wood. The important thing is to avoid soaking the wood to the point of having standing water on the surface. I have found it easiest to use a wet cloth, wipe the surfaces needing moisture and then let the water soak in until the surface shows no beaded or standing moisture. It seems letting the moisture soak in encourages the Gorilla GlueTM to get a deeper "bite" in the wood, resulting in a very strong bond. When joining wood that has obviously been exposed to moisture, such as pressure treated materials often are, and the wood feels wet already, no further moisture need be applied. In these situations, I have found it a good idea to leave the pieces in the clamps for at least four hours and waiting a full 24 hours for the Gorilla GlueTM to cure completely before stressing the joint. ColorThough Gorilla GlueTM appears dark in the bottle, it dries to a light tan color that effectively camouflages the glue line in most species of wood. Laminating pieces of red oak, walnut and pine showed how visible the glue line actually is. Whether bare or finished, the glue line is very difficult to pick out. The color of cured Gorilla GlueTM tends to match most natural grain tones sufficiently to make the interruption of individual grain lines the most noticeable indication of a lamination. Application, Expansion and Foaming
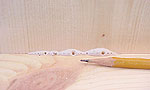
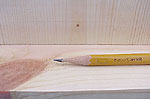
One of the interesting properties of Gorilla GlueTM is that it expands 1 to 3 times its original size during the initial stages of curing. This expansion increases coverage meaning less Gorilla GlueTM is necessary to achieve the same coverage of other glues. Judging how much Gorilla GlueTM to use is learned through experience, just as with how much yellow glue to apply. A puzzling concern with some woodworkers is cleaning up the foam "squeeze out" that often escapes from a joint as Gorilla GlueTM expands. Some believe this foam is difficult to remove when in reality the task is much easier than virtually any other adhesive, including the yellow glue most of us use. While testing Gorilla GlueTM for this article I intentionally overloaded some joints, allowed the foam to expand out and cure for at least 24 hours to insure it was completely hardened. In each case, most of the foam scraped off easily and the remainder sanded away easily. Applying stain or other finishes over the area showed there was no contamination of the surface that affected their application or appearance. Gap Filling
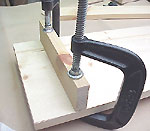
A surprising number of woodworkers believe the expansion/foaming action means Gorilla GlueTM is designed to fill gaps despite there being no such assertions in any Gorilla GlueTM labeling or literature. Gorilla GlueTM does fill some gaps as it expands, but it is a cosmetic effect only because the foam itself has little strength. Good joint fit remains necessary to take advantage of the remarkable strength of Gorilla GlueTM. ClampingIt is necessary to clamp pieces joined with Gorilla GlueTM to prevent the foaming action from separating them and weakening the joint substantially. There really is no trick to clamping when using Gorilla GlueTM. The clamping pressure should be sufficient to hold the pieces together snugly without forcing too much glue from the joint. Label instructions call for 1 to 4 hours of clamp time and that seems to work in the situations we encountered. There is a misconception about the power of the foaming action when Gorilla GlueTM cures. Clamping is required to maintain the position of the pieces and assure full adhesion, as with virtually any other adhesive, but that is all. There are no "Superman" qualities within the Gorilla GlueTM containers that will overpower your clamps in a single bound. Shelf LifeLike any adhesive, Gorilla GlueTM begin curing in an opened container if normal precautions are not taken. The culprit is air and the moisture it contains becoming trapped within the bottle that causes premature curing. When you finish using the Gorilla GlueTM, let it stand upright for several seconds to allow the glue to drain from the spout. Then slowly squeeze the bottle to bring the glue up to the tip of the spout, eliminating as much air as possible from the bottle before replacing the cap securely. Storing the glue upside down also helps by confining any remaining trapped air to the bottom of the bottle, not the spout area. This way any curing or thickening of the glue occurs in the bottom of the bottle where it is out of the way for future use.
I drilled a hole in a piece of scrap large enough for the cap to make a stand that holds bottle upside down in it. The last precaution is to store the bottle out of direct sunlight that can expand any air in the bottle or glue, forcing the cap off. I keep my Gorilla GlueTM in the refrigerator when not in use. Since I began using these simple procedures I have had no problems with premature curing. Gorilla GlueTM is available in many sizes so you can buy the one that best fits your usage rate. Between proper storage and buying the right size for your needs, there should be very little if any waste. Overall ImpressionsThe benefits of using Gorilla GlueTM in outdoor or other high moisture applications is a no-brainer. The strength and ease of cleaning up squeeze out should have woodworkers considering Gorilla GlueTM for many jobs that have traditionally been the domain of yellow glues. Using Gorilla GlueTM entails a small learning curve, primarily in getting used to how much to use. Conditioning yourself to apply water to a glue joint may also take a little time. In my shop, there will probably always be situations where yellow glue remains desirable but the qualities of Gorilla GlueTM make it an alternative that is being used with increasing frequency. The ease of cleaning up squeeze out along with virtually no impact on finish application makes Gorilla GlueTM a good choice for many hardwood projects. |

All written, photographic and drawn materials are property of and copyright by NewWoodworker.com LLC 2000-2019. Materials may not be used in any way without the written permission of the owner.