
This is a Veteran Owned site

INCRA LS Positioner Super SystemProof-positive that accuracy and versatility need not be complicatedText & Photos by Tom Hintz In the world of router table fence systems, the Incra LS Positioner Super System is at or near the top in a number of categories. Despite the high-tech design and extraordinary accuracy, the Incra LS Positioner is simple and nearly foolproof to use. For many, the hardest part of learning to use the Incra LS Positioner Super System will be getting over the intimidation instilled by its high-tech appearance. I have heard from several woodworkers who were concerned about learning the skills necessary to use the Incra LS Positioner. The fact of the matter is that if you know the alphabet and can count to 20 or so, you have already mastered the core skills needed to use the Incra LS Positioner. Initial ImpressionsThe Incra LS Positioner Super System looks first rate from the ingenious design to the extensive use of precision aluminum extrusions and the traditional high-quality manufacturing for which INCRA is known. While the Incra LS Positioner does look complicated, that is an illusion created by the very design features that make it extraordinarily easy to use. With a little hands-on experience, the mystery disappears and the possibilities become intriguing. Instructions and Assembly
The instruction manuals and sheets for the various components are well written, easy to understand and supported by high-quality photos and line drawings. Following the procedures as described makes assembly and initial adjustments of the Incra LS Positioner an easy task. Assembly time is surprisingly short because the Incra LS Positioner comes with the major components already assembled. Assembling those components and the remaining pieces goes quickly thanks to a logical sequence and precise parts fit. Though detailed instructions are provided for checking and adjusting the fences to be sure they are square to the table, I found mine to be perfect right out of the box. The total assembly time for the Incra LS Positioner Super System in my shop was well under 2 hours, including all setup checks. After extensive use during evaluation, all major components were re-checked and found to have remained perfectly aligned.
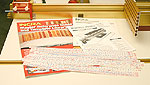
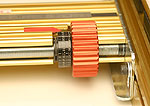
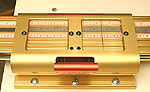
Super Sized Reference ManualThe Incra LS Positioner Super System comes with a 17"-tall by 11"-wide Master Reference Guide and Template Library featuring step-by-step instructions for making a wide range of joints. The majority of this manual is devoted to full-scale drawings of the 51 joint styles (both sides of each joint) and is used often when working with the Incra LS Positioner. A 51-piece set template strips is included that slip into grooves in the carriage arm. The graduations on the template strips, combined with the lead screw to make up the heart of what makes this system so accurate and easy to use. LS (Lead Screw) System
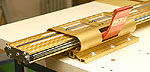
The secret of both the accuracy and ease of use of the Incra LS Positioner is the patented lead screw that runs the full length of the carriage arm. The clamping mechanism in the base is machined to correspond with the lead screw threads and automatically indexes the fence in 1/32" increments when engaged. The graduations on the template strips are based on this spacing, making it almost difficult to cut a bad joint. Place the appropriate template mark under the cursor line, engage the clamp handle and the mechanism automatically indexes the fence perfectly. The only way to mess this up is to not put the line under the cursor. Despite the fine resolution, it is easy to see if the template line and cursor are off by only one increment. Pay attention and the cuts are going to be perfect every time, plus can be repeated with the same level of precision.
A micro-adjusting dial makes refinements as small as 0.001" in the initial setup a simple matter of turning it one click. With the exception of an undersized router bit, the micro-adjusting dial is normally used only during initial setup to align the bit and fence properly. After that, the auto-indexing of the clamping system takes over to position the actual joint-forming cuts perfectly with no further fine adjustment. The clamping mechanism in the base has three positions. With the handle fully down, the carriage is free to allow positioning the indicator lines on the template strips under the cursor line. Raising the handle to the first detent locks the carriage and engages the fine adjustment dial. With the handle in the full up position, the carriage and fine adjustment dial are locked out for making cuts. As I would discover later in the evaluation process, the micro-adjusting feature can save the day. Fence Systems
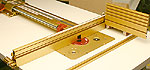
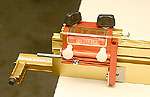
The Incra LS Positioner Super System actually has two fence systems. The Pro II fence is attached directly to the carriage arm and the Wonder Fence piggybacks onto it. The capabilities of these two fence systems combine to make virtually any table routing task easy and very accurate. The Pro II fence is 28"-long, 3"-tall and made from a single piece of aluminum extrusion. The face is machined flat and has a 1"-square opening at the center. This small opening is designed primarily to accommodate joinery bits while providing the maximum amount of uninterrupted fence for catch-free operation.
When used with the included right angle and Shop Stop fixtures, the Pro II fence makes joinery cuts accurate and simple. The Pro II fence also has an extendable 13" stop arm on the outfeed side, complete with its own scale. When not in use, this stop can be removed, flipped over and reinstalled out of the way. The two-piece Wonder Fence consists of two 14"-long by 3"-tall and 2 ¾"-deep sections that can be positioned independently. This provides the split-fence capability required for larger diameter bits often associated with edging operations. The left section of the Wonder Fence uses the hollow interior of the aluminum extrusion to pass dust to a 2 ¾"-diameter outlet port at the outboard end. The dust port is on an elbow that can be positioned as needed for easiest connection to a common 2 ¾"-diameter hose. Both halves of the Wonder Fence are mounted on wedges that allow them to be adjusted to be parallel to each other or with the outfeed side lightly out from the infeed fence for jointing operations. The wedges have graduations that make it easy to create offsets as small as 0.002." As with the Pro II fence, the right angle and Shop Stop fixtures can be used with the Wonder Fence. Right Angle Fixture
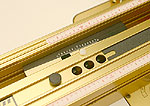
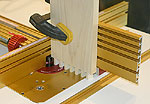
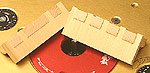
The right angle fixture consists of two aluminum extrusions that are precision cut to produce a very accurate 90-degree surface to the fence. This fixture hooks over the top of either the Pro II or Wonder Fence to keep it aligned during use. Two (outside) of the three nylon screws across the mounting flange help maintain alignment while the third (center) screw is primarily for locking the right angle fixture in place should that be needed. Applying light pressure against the fence during use is natural and keeps the fixture perfectly aligned. The base rides on two 1 1/8"-tall by 5 1/8" long and ¾"-thick plywood runners that slide easily on the table/plate surfaces and provide a sacrificial material for when the bit is encountered. The base extrusion has a wide surface that allows using a foam-bottomed push block for maximum safety and control. The face of the right angle fixture is a 9 7/8" by 4 7/8" extruded plate that provides a substantial surface for clamping work pieces during cutting operations. Shop Stop
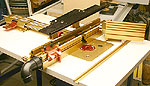
To make repetitive or stopped cuts easy, INCRA includes their Shop Stop. It can be positioned anywhere on the Pro II or Wonder Fence, locking into the 1/32" serrations on the back of both fences. Infinite fine tuning of the Shop Stop position is available using a limiter screw on top and an extendable rod at the bottom. A stop arm is also included that comes in very handy when cutting half-blind dovetails and similar joints. In the ShopNote: We tested the Incra LS Positioner Super System mounted on a Woodpeckers, Inc. #RT2743, 27" by 43" table package that is pre-drilled for the Incra LS Positioner. The table was fitted with a Woodpeckers Precision Router Lift holding a Porter Cable 7518 router motor. The Incra LS Positioner needs some room to make use of it's full size range so whether buying or building a table, keep that in mind. While there are no specific router power demands to use the Incra LS Positioner, the woodworkers creed of more is better still applies when the budget allows.
From opening the Incra LS Positioner box the first time I felt some pangs of intimidation because this unit looks very complicated. As soon as I began assembly and setup, the simplicity built into the Incra LS Positioner becomes apparent. This is an exceedingly easy tool to use if you follow the directions and let it work as it was designed to. The only problems I experienced came when trying to out-think the Incra LS Positioner and again when an undersized bit was used. Though exceptionally well made and designed throughout, the real genius of the Incra LS Positioner is in the lead screw and template strips. From centering the stock to aligning the individual cuts, the lead screw and templates make it almost difficult to cut bad joints. In fact, the only ill-fitting joints I made resulted from an undersized bit and another when I dialed in a correction the wrong way. Neither problem was the fault of the Incra LS Positioner.
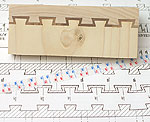
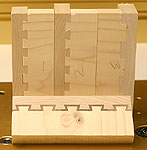
Within the 51 different template strips are joints that will handle virtually any job or stock width. Charts in the template book clearly explain the relationship between joint types, stock width, thickness and bit design. The range of material sizes listed shows there will be very few, if any, compromises on project dimensions needed to use the Incra LS Positioner. While the Incra LS Positioner is a "fixed" joint machine, the joint charts make it easy to determine a starting point that produces even partial joints at either end. In addition to the wide range of joint styles in the 51 templates, modifying many of them to produce an even more personalized look is relatively simple. With a little experience, the Incra LS Positioner becomes much more than a simple fixed-width joinery machine. Making half-blind dovetail joints is almost ridiculously easy with the Incra LS Positioner. A very simple - and fast - procedure for setting bit depth that prevents having to cut and then re-cut full joints to get a good fit. Another important point is that once set, that height works with several joints that use that bit. During testing, I set the bit height once and then cut five different but perfect fitting half-blind dovetail styles without touching the bit height setting. Even the famous INCRA double dovetails are cut using one height setting.
Through dovetails are only slightly more difficult but yield perfectly cut joints in a wide range of patterns. Though it was obvious with every joint cut that the Incra LS Positioner is extremely accurate, this point was driven home when cutting simple box joints using what I thought was a ¼"-diameter straight bit. No matter what I did, the joint was too tight. Finally, after reading the instructions again, the bit itself was measured and found to be 0.005" undersize. This is a small discrepancy but the accumulated error across the joint made it very tight. Using the micro positioner dial I added a 0.005" correction and re cut the female side of the joint and it fit perfectly. To be sure the same joint was cut three times with identical results. I tried using a 0.004" correction and the resulting joint was noticeably tighter. One of the nice things about the Incra LS Positioner is basing everything off the solid Pro II fence that remains square to the carriage arm. Even adding the Wonder Fence pieces still gives you a flat face that is square to the movement of the arm. When fence changes are needed, you simply dial them in without concern over the fence being crooked to the miter slot or bit.
The Wonder Fence greatly extends the capabilities of the Incra LS Positioner both in terms of the bit sizes that can be used and the cutting procedures. I found that for joinery cuts, the Pro II fence alone was usually best. For edging the work, the Wonder Fence added bit clearance and dust extraction to make those tasks easier. The jointer capability of the Wonder Fence works very well because you can quantify the amount of offset so accurately and not worry about the fence halves going out of alignment with each other. It is a short-bed jointer, but an effective jointer nonetheless. ConclusionsThe Incra LS Positioner Super System is extraordinary in its innovating design, quality manufacturing and ease of use. Even the beautiful but intimidating-looking double and double-double dovetails are remarkably easy to make because of the automatic accuracy built into the Incra LS Positioner and its template driven system. To make the Incra LS Positioner even more attractive, add a very short learning curve to the plus side of the checklist. The biggest thing you will have to learn is to let the Incra LS Positioner Super System work for you. Master that and all that remains is sitting back to watch everyone marvel at your newfound joinery skills.
Do you have a comment about this page? - Email Me! |


All written, photographic and drawn materials are property of and copyright by NewWoodworker.com LLC 2000-2019. Materials may not be used in any way without the written permission of the owner.