
This is a Veteran Owned site
![]()
 |
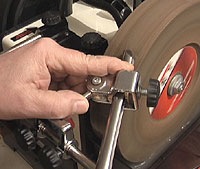
The JET GJ-1 Gouge Jig makes sharpening complicated fingernail gouge profiles fast, easy and repeatable. Click image to enlarge |
JET GJ-1 Gouge Jig
Consistency made easy
Text & Photos by Tom Hintz
Posted – 12-19-2006
Sharpening bowl and spindle gouges is crucial to their performance. The problem has always been creating a truly sharp edge with a consistent bevel angle from one side to the other, and being able to replicate that shape. Achieving that consistency makes these tools easier to learn and to use. The JET Gouge Jig makes this complex grinding task simple and very accurate.
Setup
The two-piece design of the JET Gouge Jig makes setting it up an easier task. As with any gouge jig, establishing the correct setup for your gouge and the configuration of the bevel is the most time consuming. Once established, writing those settings down, or making a simple setup block allows returning to those settings quickly. The flexibility of the JET Gouge Jig adjustments allows matching virtually any existing bevel or developing your own.
 |
 |
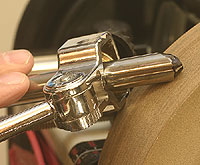
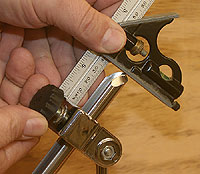
(top) Setting the initial exposure is easy using a simple combination square. (bottom) Adjust the Support Arm so the nose of the gouge is flat on the stone. Click images to enlarge |
It is important to remember that gouges present a tiny amount of surface area to the grinding stone. That means that material removal is accelerated, particularly when grinding at the nose. You will find that grinding the “wings” for longer periods, particularly on fingernail gouges than the nose will help keep the bevel and shape consistent.
This small contact area also makes it likely that the gouge will dig into the grinding wheel with the Support Arm in the vertical position, the stone turning into the edge. With the Support Arm in the horizontal mounts, the wheel turns away from the edge, making sharpening more easily controlled and far less dangerous to the wheel itself.
First, mount the JET Gouge Jig on the gouge and set the initial exposure. JET suggests starting at 2 ¼” for spindle gouges and 1 5/8” for fingernail-style bowl gouges. I found these settings to work well but they may have to be changed slightly, especially if you have developed your own angle/wing configuration.
Next, set the knuckle. Here again, basic suggestions are using the first graduation for spindle gouges and the second or third for fingernail bowl gouges. This setting may have to be fine-tuned as well a bit later.
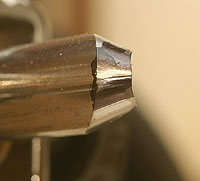
Install the pivot block on the Support Arm, it’s V-shaped receptacle facing up and towards the grinding wheel. With the point of the JET Gouge Jig in the pivot block, adjust the Support Arm distance until the nose of the gouge is flat on the grinding stone. This process is easier if the bevel is colored with a permanent marker. Turn the wheel with the gouge held against it to see if the scratch pattern is centered on the bevel. If not, adjust the Support Arm as needed.
 |
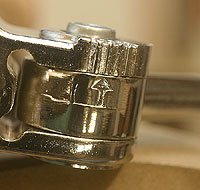 |
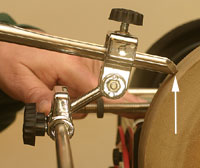
(top) Coloring the bevel and checking the scratch pattern is a very accurate way to confirm the setup. (bottom) The knuckle setting controls how the wings are ground. Click images to enlarge |
If the angle of the bevel is to be changed, use the JET Angle Measuring Device (AMD-1) to set the JET Gouge Jig up. Remember that if substantial grinding is needed to achieve the new bevel angle, it may be necessary to adjust the setup slightly when the bevel is almost fully ground. See the review of the JET Wet Sharpener for more on the Angle Measuring Device.
Roll the gouge so that one side of the bevel is on the stone and repeat the colored scratch test. Adjusting the knuckle may be necessary to get the “wings” flat on the stone. Keep in mind that changing the knuckle angle will normally require re-adjusting the Support Arm to get the nose of the bevel flat on the stone again.
If the gouge had been sharpened by hand or with a less accurate jig, the wings of the bevel may not lay flat on the stone until after the tool is fully ground on the JET Wet Sharpener, using the JET Gouge Jig. In this case, you will have to settle on the best scratch pattern and use that setup to grind the tool to establish the full bevel.
Setup Block
To make returning to the setup for your gouge faster, make a simple wooden jig. Leave the JET Gouge Jig and Support Arm as they were when the gouge was sharpened.
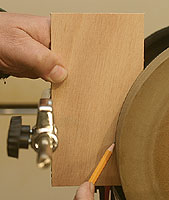
Hold a piece of scrap wood against the side of the stone wheel, one edge touching the Support Arm. Trace the wheel shape onto the wood and cut that shape out, leaving the line. Fine-tune the cutout with a rasp or sandpaper until it just slips between the Support Arm and the grinding wheel.
 |
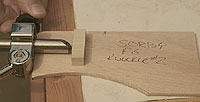 |
(left) Making a simple wooden gauge saves lots of time later when setting up for this gouge in the future. (right) Adding a block to the gauge makes setting the precise exposure needed for that tool very fast. Click images to enlarge |
|
Hold the tip of the gouge on the setup block, the face of the JET Gouge Jig against its edge. Either draw a line marking the end of the gouge, or better, glue and brad a small piece of wood on the jig to act as a stop. Label the setup block with the knuckle setting and what gouge it was made for.
When that gouge needs sharpening again, using this setup block to set the Support Arm distance and the gouge exposure in the JET Gouge Jig is very fast. Color the bevel with the permanent marker and do the scratch test to confirm the setup.
In the Shop
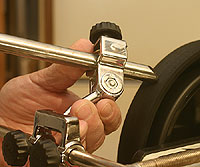 |
The GJ-1 can also be used at the honing wheel to perfect the edge. Click image to enlarge |
When I first saw the JET Gouge Jig, I wondered about the two-piece design and how stable it would be in use. After using it a few times, I found it to be very stable and easier to use than others I have tried.
Setting the JET Gouge Jig up for my fingernail bowl gouge was easier than I anticipated. I had been using another specialized gouge jig and while the wings were close, they were not perfect so I had to reshape them somewhat on the JET Wet Sharpener which took roughly 10 minutes. I made a setup block based on that setup and returning to those settings has proven to be very quick with few if any further adjustments necessary.
Between using the setup block and the speed at which the JET Wet Sharpener removes material, resharpening my gouges has never been more accurate or faster. The consistency of the JET Gouge Jig has made my gouges very predictable in that they work the same way every time, allowing me to become familiar with their “feel” at the lathe. That has meant fewer catches, smoother surfaces and greater confidence when trying new shapes or techniques.
Conclusions
See It Work! |
 |
The JET Gouge Jig (GJ-1) is well-made and easy to use. If you use spindle or bowl gouges, this is a must-have accessory for the JET Wet Sharpener that will make life at the lathe easier and more predictable. Being able to create a consistent, ultra-sharp edge is great. Being able to replicate that specific set of angles each time makes your tools predictable and that lets you concentrate on being the creative person we all know you are.
With a street price of $59.99 (12-17-2006) the JET Gouge Jig (GJ-1) is a value-laden, long-term investment. This is one of those buy it once, use it forever tools that you will appreciate having every time it is needed.
Have a comment on this review? –Email Me!
Pricing Link |
Back to the JET Wet Sharpener jig reviews list.
All written, photographic and drawn materials are property of and copyright by NewWoodworker.com LLC 2000-2019. Materials may not be used in any way without the written permission of the owner.