 |
The best miter guide you can buy got better.
Click image to enlarge |
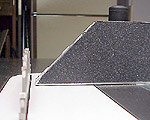
Osborne's EB-3 Miter Guide
The Best Gets Better
Text and photos by Tom Hintz
Occasionally, the second version of something can be a disappointment. Manufacturers have been known to add bells and whistles more to justify a price point than to improve the functionality of the product. Osborne's EB-3 suffered no such calamity. The EB-3 has been upgraded with several useful new features, including increased capacity, and virtually no price increase.
New with the EB-3 is an easy-to-use calibration adjustment, a third guide bar expansion slot, a fence/flip stop extender and adjustable miter fence to blade distance. Like the EB-2, the new version is reversible for use in the right or left miter slots. The non-slip abrasive facing and detents for several pre-sets for commonly used angles made the jump to the EB-3 with small, well-planned variations.
As with the EB-2, the EB-3 is impressive in its top-flight workmanship and materials. The EB-3 is now manufactured for Osborne Manufacturing by Excalibur Tool in Pickering, Ontario, Canada. Excalibur brings increased manufacturing capacity and capabilities that help keep up with demand while maintaining strict quality standards. As testament to their confidence in the quality of the EB-3, Excalibur gave it a lifetime warranty.
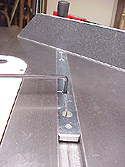 |
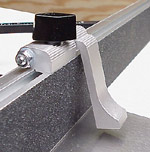
A third guide bar adjustment slot was added towards the front of the bar to maintain accuracy with the tool partially retracted from the slot. The Allen wrench for adjusting is included.
Click image to enlarge |
Guide Bar
The EB-3's guide bar is 21 ½-inches long and machined to 0.740-inches wide to insure compatibility with Craftsman (and others) table saws that have miter slots slightly narrower than the standard 0.750-inch width. Adjusting slots machined into the guide bar allow it to fit both undersized and standard width slots with exceptional accuracy.
A third expansion slot has been added to the EB-3, designed to add stability when the miter guide is partially withdrawn from the slot, as when starting a cut with a wide board. Rather than place the slot at the center of the guide bar's length, it was located farther forward so it remains fully in the miter slot when needed most.
Setting the guide bar to fit your miter slot is as easy as it is important. Small turns of the adjuster screws (the Allen wrench is supplied) produce a fit so precise you may discover small inconsistencies in the width of your miter slots. I found just such a situation with the miter slot on my Jet contractors saw. The variance was very small, two 0.002-inch narrow areas but the accuracy of the EB-3 found them immediately.
The narrow portions of my miter slots produced "hard spots" when the adjusted guide bar was slid back and forth. I wrapped a piece of ¾-inch-thick wood with fine 200 grit emery paper and worked it back and forth in the miter slot at the narrow spots. Only a few passes were necessary to clean the slot up, allowing the EB-3 to operate smoothly through the entire length of the miter slots.
The guide bar comes equipped with a t-slot washer at the tip to prevent lifting. For those with saws that do not have the t-slot, this washer is easily removed and the guide works normally.
Fence
The EB-3 features an all-new fence system, crafted from an equally new aluminum extrusion. The fence, in its retracted mode, is 24-inches long and 2 ½-inches tall. With the new extension at maximum length, the fence reaches to an amazing 42-inches and can be locked at any point within that range.
The new fence extrusion was necessary to accommodate not only the extension but also a new fence-to-blade adjustment capability. Two large knobs free the fence so it can be located closer to or farther from the blade as needed. The instructions warn to maintain at least 1/8-inch of clearance between the fence and blade for safety; and that should be taken to heart. If you feel a need for less than 1/8-inch clearance, you need to rethink your procedures, and your regard for your personal safety.
The same knobs that allow lateral fence positioning also make reversing the EB-3 for use in the other miter slot easy, fast and tool-less. Remove the two knobs and the fence comes free. Loosen the angle-locking knob, separate and swing the angle arm to the other side and re-assemble. That's it.
The same quality flip-stop from the EB-2 rides atop the EB-3 fence. It can be locked in place virtually anywhere in the 42-inch range making repetitive cuts fast and very accurate. When not needed, or for squaring one end of a board before cutting to length, the flip-stop easily rotates up out of the way.
The EB-3 comes with the abrasive fence surface in tape form rather than factory installed as on the EB-2. With the EB-2, you had a choice of a smooth aluminum face or the abrasive face. The EB-3's new fence features make it one-sided so Osborne leaves the decision on whether to apply the abrasive surface or not to the user.
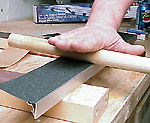 |
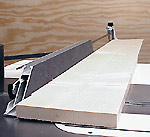
Putting the abrasive tape on the fence is very easy. I used a dowel in place of a j-roller to press it down.
Click image to enlarge |
For me, there is no decision to make. The abrasive covering makes holding the work piece securely to the fence easy, which makes all miter guide operations more accurate and safer.
The abrasive tape is rather stiff which makes installing it wrinkle-free easy. The instructions say to use a j-roller to insure a good, flat bond with the fence. I did not have a j-roller but found that a piece of large wooden dowel, rolled firmly on the abrasive face does the job well. Make sure you clean the fence surface with alcohol before putting the abrasive tape in place.
The EB-3 also comes with an adhesive backed right to left scale tape that can be applied to a special runner on the fence. I suggest that you use the EB-3 for a while before applying this scale. Get comfortable with a fence-to-blade distance, and then apply the scale tape.
 |
 |
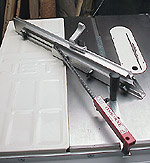
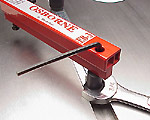
A new easy-to-use calibration adjustment (Top) has been added.
The preset angles are now found with a trigger-style button. (Bottom)
Click images to enlarge |
Triangulation Arm
The heart of the Osborne EB-3 is the triangulation arm that makes this the most rigid miter guide you can buy. Even Osborne could not improve on triangulation, but there are enhancements.
The EB-3 arm was changed from finished aluminum with black markings to anodized black with easier-to-read white graduations. The scale runs a full 45-dgrees to either side of zero. After checking the alignment to my miter slot, I tested the accuracy of the graduations at various points within its range. All were exact, and repeated just as accurately.
The EB-2 had an "always on" spring-loaded detent that clicked at each of the preset angles. The EB-3 has a button that you press like a trigger to engage the preset angles. The more common 0 - 15 - 22.5 - 30 - 45-degree angles, on both sides of zero, have detents. A locking knob secures the arm at any angle within its range. A nice chart has been added to the guide bar that gives you the degree setting necessary for creating object with various numbers of sides. I tried most of them, they all worked nicely.
At the rear (user end) of the triangulation arm is a new calibration eccentric that allows perfecting the alignment of the EB-3's fence to your miter slots. I used a 14-inch artists square to dial my EB-3 in; a process that took literally seconds to complete. It should be noted that I first had to adjust the fence out of alignment, as on my saw it was dead on right out of the box.
The calibration process is the only procedure on the EB-3 that requires the user to supply a tool. You will need a ¾-inch open-end wrench to use with the supplied Allen wrench for the calibration adjustment.
Overall Impressions
To be honest, I was a little skeptical of the EB-3 initially. The EB-2 I had been using was such a good tool, I wondered if the EB-3's new features would make a significant difference, or if they might compromise accuracy. Those concerns proved to be unfounded.
The EB-3 is every bit as good a tool as the EB-2, and the new features do a good job of expanding it's capabilities. The accuracy is dead-on, repeatable and rock solid at any setting, just like the EB-2.
The fence extension gives a solid, more comfortable feel when working with longer boards. The work piece is still actually secured at the main fence, but having the extension farther out gives a better sense of stability as the wood goes through the saw.
I have used the EB-3 in a few projects so far and the extension feature has come in handy more than I anticipated.
I had to cut several 10 by 39-inch-long pieces of plywood and used the EB-3 for all but the rip cuts. All these pieces fit into rabbets perfectly and the box made from them came out square with no "adjustments" necessary. That tells me when you ask for 90-degree cuts from the EB-3, that is exactly what you get.
When reviewing the EB-2 I wrote, "If you do not have the Osborne EB-2, you are not working as accurately as you could be. Period." I feel the same about the EB-3.
The EB-3 will make your woodworking more accurate and safer. With a street price between $165 and $180 the EB-3 represents a significant cash outlay, but one that is easily justifiable if accuracy, repeatability and safety are considerations in your shop.
For more information see: www.osbornemfg.com
Do you have a comment about this page? - Email Me!
Back to the Tool Reviews List
|