 |
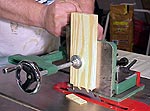
Using a jig like this is the safest, and most repeatable way I know to cut tenons.
Click image to enlarge |
"Knock-Off" Tenoning Jig
Text & Photos by Tom Hintz
Being a faithful viewer of the New Yankee Workshop, I had developed a strong attraction to the tenoning jig Norm used during many of his shows. Not only did it appear to be very functional and safe, it looked cool to me.
When I bought my Jet contractors table saw at the local Woodcraft store I noticed they had two versions of that very jig. One carried the name of a major woodworking tool manufacturer, the other a different color, and a lower price. With them side-by-side, the only differences I could find were the color and price. Being adventurous, I bought the lower priced version.
This tenoning jig will work with stock up to 3 ¼ inches thick and whatever length your ceiling will permit. You can also cut tenons from 0 to 45 degrees on both axis, separately or at the same time if you are really brave.
 |
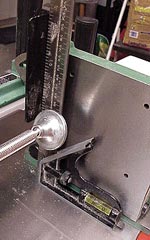 |
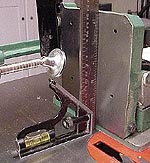
Squaring the jig to the table is easy with a combination square. The jig has simple adjustments to make corrections if needed.
Click images to enlarge. |
When I unpacked the tenoning jig I found what I assume is the other difference--the instruction manual. The lower priced version apparently saved all the money they could when generating and printing what they call a manual. However, not all is lost. This is a relatively simple tool to use and I was able to figure everything out.
Assembly is rather straight forward as most major pieces come pre-assembled. The rest can be deciphered from the photos. Most of the setup is also rather self-explanatory. You have to check the main and rear vertical supports to be sure they are 90-degrees to the table when fully upright. Simple adjustments and scales are provided for both. My jig required minor adjustments of both axis to bring it into perfect alignment.
The more difficult, and hard to find, adjustment is getting the main body parallel to the miter slot. After close scrutiny of the badly faded photos in the "manual," and some poking around, I found two screws buried in the base that have to be loosened to make this adjustment. The front screw is easy as it's hole is always accessible. Getting to the back screw is a bigger secret.
The knob used to adjust the left-to-right position threads into a bushing in the base where it is retained by a pinch screw. You have to loosen the pinch screw, turn the adjustment knob to retract the threaded bushing completely, and then slide the base to full right. Look down into the hole and you can see the second base adjusting screw.
Loosen the front and back adjustment screws and align the base to one of the miter grooves. Tighten both screws and check the setting to be sure nothing moved. Re seat the bushing, tighten it's
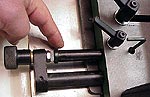 |
This is the trick to finding the second base screw. Release the pinch bolt (small handle by allen wrench) and back the threaded bushing out with the fine adjustment knob. Slide the base to full right and the screw is visible in the hole where I have the allen wrench in this photo.
Click image to enlarge |
pinch screw and the jig is ready to use. I would suggest making a couple of test pieces and checking dimensions to be sure your tenons are consistent in thickness. If not, the jig is still not properly aligned.
Using the tenoning jig is easy. I start out by making my shoulder cuts on the table saw (or radial arm saw) to the proper depth, and then set the jig to make cheek cuts that are a bit oversized. This jig features a fine thread adjuster that lets you sneak up on the exact tenon thickness.
Once you have the right setup, you can cut tenons quickly. If you have several pieces that need identical tenons, this jig will cut them in short order.
There are a number of ways to cut tenons, some safer than others. For me, the tenoning jig is the safest, plus it provides exact repeatability.
One of the nice things about this jig is the cost as opposed to function. It works like all tenoning jigs of this design but costs less, sometimes considerably less.
You decide! |
