
This is a Veteran Owned site
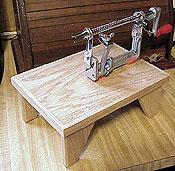
Apple Peeler BenchText, photos & design by Tom Hintz When my wife came home with a modern version of an age-old mechanical apple peeler, she pointed out a drawing that accompanied it. The artwork showed the peeler mounted on a small bench, which of course, was available at a ridiculous price. A condition of my equipping my wood shop is that no such items will ever be purchased again. They will come from my shop. I had a sufficient quantity of oak and oak plywood scraps to make the bench, which meant there would be no additional cost for this project. The artwork did not provide dimensions but by referencing points of the peeler, I could make a reasonably close guess. Of course, there would be modifications to tweak the design to our liking. I increased the size of the bench top and added more material to the legs, which I made slightly taller than they appeared in the illustration.
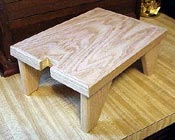
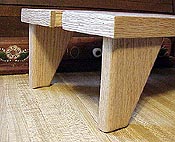
A piece of ¾-inch-thick oak veneer plywood ten inches long and seven inches wide was cut for the bench top. Using my tenoning jig and table saw ¾-inch-wide by ¼-inch deep rabbets were cut along both long sides of the top. These would both help locate the legs and provide a little additional glue surface for strength. I decided to cut an inset in which the peeler frame would fit. This was simply to make getting the peeler installed at the center of the bench automatic. The cutout turned out to be one-inch by one-inch. The legs are made from ¾-inch-thick red oak. They are four-inches tall and taper from three-inches-wide at the top to one-inch-wide at the bottom. The legs were cut to length at the power miter box. I drew a line for the taper on one leg, cut that freehand at the band saw, then using it as a pattern, traced the taper on the remaining legs. I used the belt portion of my Delta sanding center to true the taper cuts. The legs are glued and screwed to the bench top in the dados. The long face of the legs face out on the long sides of the bench for the most stability. This is where His Normness would say the taper gives the piece a sense of lightness. I was going for the maximum glue surface and a small contact patch so the bench would resist rocking if the surface on which it is used is not perfectly flat. Plus, it looks cool. The raw edges of the plywood bench top are banded with ¼-inch-thick by ¾-inch-wide oak strips. The corners were mitered at the ten-inch miter box, not an easy task as it turns out. Strips this size tend to vibrate just enough to cause severe chip-out occasionally. Using a scrap of pine as a backer behind the oak virtually eliminated chip out.
The oak banding is glued and brad nailed to the edges, holding the top edges just proud of the bench surface. With the banding slightly above the bench surface makes sanding the entire surface flat without breaking through the thin oak veneer plywood much easier. After sanding, the peeler bench was turned over to my wife, Beth, for finishing. Beth applied three coats of Danish oil then set it aside to dry thoroughly. Two coats of water-based polyurethane completed the project. Note: I know a flock of emails will arrive if I do not give the source of the apple peeler machine. Beth got it through a home party featuring items from The Pampered Chef, 350 S. Rohlwing Rd., Addison, IL, 60101-3079. We do not have a phone number to them. Do you have a comment about this page? - Email Me!
|
All written, photographic and drawn materials are property of and copyright by NewWoodworker.com LLC 2000-2019. Materials may not be used in any way without the written permission of the owner.