
This is a Veteran Owned site

 |
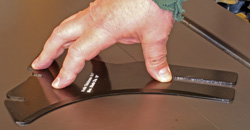 |
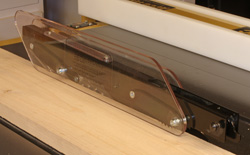
(top) When set up properly, factory blade guards are easy to use and offer another level of protection for the operator. (bottom) Making sure that the splitter/riving knife itself is flat is important. The anti-kickback pawls and the blade guard itself work off of the splitter. Click image to enlarge |
Setting Up Factory Blade Guard Systems
Alignment is crucial to safety and ease of use
Text, photos and video by Tom Hintz
Posted - 2-10-2010
Frustration with factory table saw blade guards is uncomfortably common today. Unfortunately, new woodworkers hear or read misleading remarks labeling factory blade guards as "dangerous" or "worthless" and some within another generation of woodworkers take potentially debilitating chances in a hobby meant to be fun.
Naturally, the truth about factory blade guard / splitter assemblies lies somewhere closer to the middle of the road. A lot of the frustration with these factory pieces comes from improper installation and setup. No blade guard/splitter system is absolutely foolproof and none can protect you from everything. When they work properly they do add a layer of protection that helps separate you from the spinning blade. There is value in that.
Splitter/Riving Knife Setup
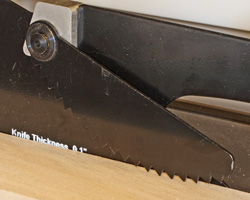
Though designed to work differently, the splitter and riving knives are aligned the same way. The riving knife is slightly shorter than the blade so that it can be used for grooving type cuts. In all cases that I am aware of splitters and riving knives use the same mount on the table saw so the adjustments should apply equally to both designs unless specified by the manufacturer.
 |
 |
The splitter/riving knife must be centered on the blade, (left) not "cheated" to one side or the other. See your instruction manual for how adjustments are made to the position of your splitter. This mount on my Powwermatic PM2000 (right) has setscrews built into it that let me dial the splitter/riving knife into perfect alignment in a couple minutes. Click images to enlarge |
|
On most saws the blade guard and anti-kickback pawls are mounted directly to the splitter plate which in turn mounts the whole assembly to the saw. That means that for any of these features to work properly, the splitter plate has to be oriented correctly. The alignment of a riving knife is equally important.
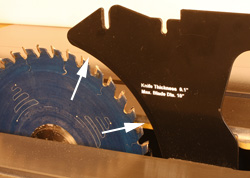
First, be sure that the splitter/riving knife is flat. This can be checked by simply laying it on the cast iron surface of your table saw and looking for gaps or rocking. Some splitters have integral mounting pins or bosses for the blade guard or anti-kickback pawls so in those cases holding a good straight edge against both sides will reveal bends or warps. If you find a bend, carefully remove that deviation by gently bending it back the other way until it is flat.
Align with the Blade
Both a splitter and riving knife must be positioned directly behind the blade and parallel with the blade vertically and horizontally. These plates are slightly thinner than the blade they are designed to work with so the wood can slide over them without catching on the leading edge. Some splitters and riving knives even have a tapered leading edge to help guide the wood onto their surface.
 |
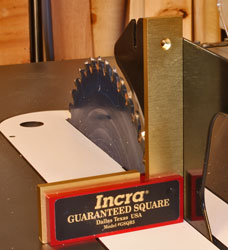 |
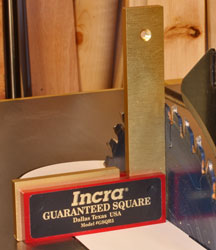
Checking that the blade (left) and splitter/riving knife (right) are really at 90-degrees is important to smooth operation also. Click images to enlarge |
|
When the splitter/riving knife is installed correctly the gap between its leading edge and the blade will be consistent from the top to the table surface. Every time you install the splitter/riving knife, take a look at this gap to be sure that you didn't accidentally install it at an angle.
Check the instruction manual for the correct splitter/riving knife adjustment procedure on your saw. These vary from using shims within the splitter/riving knife mount, shimming the entire mount to adjustment screws built into the mount itself.
We want the splitter/riving knife centered behind the blade. I know some people cheat the splitter/riving knife towards the fence side of the blade but that can lead to problems. Remember that wood can want to bend inwards on the kerf as it is cut. If that freshly cut edge catches on the splitter/riving knife you have three choices of actions to choose from and only one is right. You can hold the wood where it stops, shut the saw down and wait for the blade to stop - the right choice. Or, you can try shoving the wood through the catch or withdraw the wood and in both cases hope that it doesn't get kicked out. Both of the later choices are very wrong.
 |
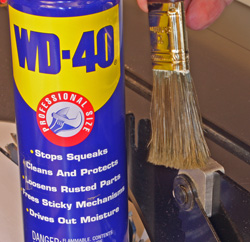 |
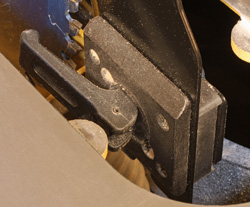
The anti-kickback pawls (left) must be straight and operate freely. Cleaning the pivot points occasionally (right) and adding a drop of lubricant will help keep your safety systems functioning correctly. Click image to enlarge |
|
Use straight edges laid along the side of the blade and look for a consistent gap between the straight edge and the splitter/riving knife. Be sure that the straight edge is in full contact with the body of the blade and not one or more teeth. Depending on the thickness of the splitter/riving knife the gap between them and the straight edge may be rather small so pay attention and get a good look before making any adjustments.
Take your time and adjust the position of the splitter/riving knife so that the straight edge shows an equal gap on both sides of the blade. Also, the gap should be consistent across the full width of the splitter/riving knife.
Using a good square, adjust the blade (in its highest position) so that it is 90-degrees to the table surface. Then check the splitter/riving knife to be sure that it also is exactly 90-degrees to the table surface over its full height.
Anti-Kickback Pawls
The anti-kickback pawls are simply a pair of steel plates on spring-loaded pivots, one on each side of the splitter. A row of angled teeth formed into the lower edge of these plates let the wood slide by in the normal direction but if it tries to back up - like as a kickback begins - those teeth instantly dig into the wood and stop it. When this happens it can be frightening but these simple safety pieces do a very good job of stopping and holding the wood, preventing a possible injury.
The anti-kickback pawls must be free-swinging on their pivots and the springs functioning properly to maintain the downward pressure against the wood. Check to be sure that the plates are not bent, swing parallel to the splitter and that they swing freely.
Blade Guard
 |
 |
The gap between the blade and the splitter or riving knife (left) should be consistent. Note how the riving knife here (right) is slightly shorter than the blade so that it can be used for grooving type cuts. Click images to enlarge |
|
The design of the blade guard varies considerably from saw to saw and particularly among price points. The more expensive machines generally have a better blade guard design but all of them offer some protection from contacting the spinning blade if used correctly.
The blade guard is mounted on some type of pivot so that it can ride up over the wood as you slide it towards the blade. Check these pivot points to be sure they are clean and free moving. One of my old saws accumulated enough dust at the pivot point that the blade guard would hang up a little. All I had to do was brush the dust buildup from the pivot, add a drop of dry lubricant (after it dries) and the guard returned to working perfectly.
The blade guard usually swings through an arc as it moves up and down on arms. Make sure that those arms are not bent and that the guard moves up and down fully without binding on the splitter or anti-kickback pawls. Occasionally clean and lube the pivot points to be sure it continues to move freely.
Video Tutor |
Some blade guards are made from molded plastic that could have flash along the edge where the wood slides beneath it. A light sanding along that edge will smooth away any remnants of flash and keep the wood from hanging up.
While you are checking things, take the few seconds required to wipe the dust from the inside of the blade guard. Gaining that little bit of visibility also translates into safer operation - and it is free.
Keeping your splitter/riving knife system aligned and operating properly takes very little time but increases your safety at the table saw substantially. Because it is aligned correctly the blade guard system is simple to use and effective. No blade guard system is perfect and none can protect you from everything that can happen on a table saw. However these systems do offer a good level of protection from common injuries sustained at the table saw. Use your blade guard system whenever possible and keep it maintained.
Have a comment on this story? - Email Me
All written, photographic and drawn materials are property of and copyright by NewWoodworker.com LLC 2000-2019. Materials may not be used in any way without the written permission of the owner.