
This is a Veteran Owned site
![]()
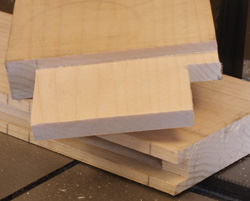 |
The haunched tenon is considered by way too many woodworkers as difficult to make. It's not if you are willing to give it a try a few times to get the idea. Click image to enlarge |
Making Haunched Tenons
Relax, it’s practice and technique, not magic
Text, photos and video by Tom Hintz
Posted – 7-27-2011
Some of the emails I get on haunched tenons have a downright fearful tone to them. That little jog in one side of a tenon really intimidates some people. OK, it intimidated me also but I didn’t email myself about it. One day I decided to sit down and figure out how to make haunched tenons sans the fear and loathing. Like a bunch of woodworking tasks making the haunched tenon really isn’t as tough we our minds can perceive them to be, especially once you see them made and then do it a couple of times for ourselves.
What a “haunched tenon” is
A haunched tenon really is variant of a common tenon. The only real difference is a step on the outer edge that fills an otherwise empty groove in the mating piece. This empty groove comes when we mill grooves down the full length of the frame pieces that will carry internal panels (raised or flat) for things like doors and dust panels. Being able to fill that unused portion of the groove with an extension of the tenon allows us to use the super-strong mortise and tenon joints for these projects and conceal what would be a short but empty groove on the edge of the piece.
 |
 |
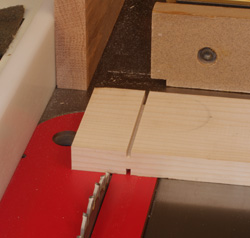
The process of making the tenon does not change, including most of the shoulder cuts (left) that are made to define the tenon and give it a sharp edge. We do not cut this groove on the haunch side of the tenon. We measure the full depth of the mortise to establish the overall length of the tenon just as with any mortise and tenon joint. Click images to enlarge |
|
While I used a tenoning jig on my table saw when doing this story and video you can make haunched tenons using a stacked dado blade. A band saw does make it easier but I know lots of people make the final tenon cuts with a handsaw, including the haunch. Those of you that frequent my site know that there is little to no chance of me using a hand tool so most of the time I figure out how to use a machine. The good news here is that the haunched tenon is not difficult to make so it can be done on several machines or with hand tools.
Common Mortise and Tenons
The mortise in most ways does not change from how we normally make this joint. It can be made to the same sizes that we always make them. I normally hold the mortise in about ½” from the end of the piece that it fits in to just to make sure that there is strength there. And, if I do it the same way all of the time I hardly ever make a mistake cutting this stuff anymore.
The tenons are also largely unchanged from how we make a regular mortise and tenon joint. The only difference is that the outside edge has the step that we call the haunch. The haunch is the same thickness as the rest of the tenon so no strange operations are needed. If we hold the mortise in the ½” from the edges of the stile as I usually do the process is a bit easier because we can use one setting on the band saw if that is the machine that you use to trim the tenon sides.
 |
 |
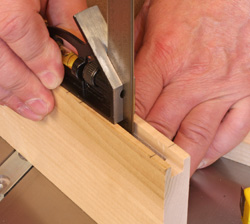
You do have to determine the length of the haunch and lay that out (left) on the tenon. I always go about a line-width long just to be sure that I can trim it back to be perfect. People do use hand tools to cut the haunches but I have a band saw (right) so my secret hand saw stays hidden in the drawer. Click images to enlarge |
|
Another change comes if you make defining shoulder cuts on the table saw to insure crisp corners. While both cheeks (wide portion) of the tenon get a normal cut we have to remember that only the inside edge of the stile gets a shoulder cut. The haunch side does get a shoulder cut but it is moved down to match the depth of the groove in the rail pieces. Theoretically you could measure down for this “shoulder” cut but I find it much easier to make this cut at the band saw because I can more or less sneak up on the correct depth. The sneaking up part can be important because if you cut the haunch short you have a gap and no good way to fix it.
I measure the depth of the groove that the haunch will fill, transfer that to the tenon and mark it. Then I can make that cut at the band saw and start on the bottom of the layout line where I should be a bit long. After trying the tenon and haunch in the mortise I can make a much better estimate of where to trim the haunch. Taking my time and getting the haunch right makes for a nice looking joint. Rushing and cutting the haunch short means a repair and a joint that you have to try and hide someplace.
After fitting the haunch and gluing it up let the glue dry at least over night before you begin sanding. The haunch joint always looks way better after it is glued and sanded even when it may not have come out exactly as you wanted. I’m not sure why that happens but it does. If you don’t have any major gaps all will be fine after sanding and finishing.
Video Tutor |
The haunch joint is largely a cosmetic technique but I am sure that when done right it adds some additional security to the joint though that has to be a small increase. The visual impact is the major reason to use the haunched tenon. This is a good joint to learn because it gives you another option when building things like dust panels, doors and more.
Have a comment on this story? –Email Me!
All written, photographic and drawn materials are property of and copyright by NewWoodworker.com LLC 2000-2019. Materials may not be used in any way without the written permission of the owner.