
This is a Veteran Owned site
![]()
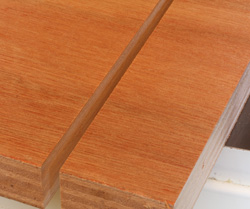 |
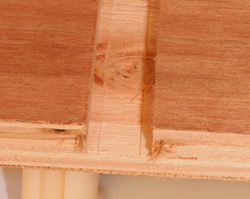
Achieving a clean cut like this in fragile veneer plywoods really is possible if you pay attention to the basics. sharp, clean cutters and proper alignments make clean cuts much easier to attain. Click image to enlarge |
Minimizing Chipping and Tearout
Less frustration leads to improved appearance
Text, photos and video by Tom Hintz
Posted – 8-4-2011
The fragility of wood often manifests itself in the form of chips, splinters and tearout along a cut edge. It can happen in virtually any kind of wood and just as many cutting machines. The culprit can be dull cutters, incorrectly aligned machines, difficult wood or a combination of any of the above. The good news is that there are things that we can do to minimize this frustrating damage.
Cutter Sharpness
All of the cutting edges we use were designed to cut rather than tear the wood fibers. However, as the cutting edge loses sharpness it transitions from slicing the wood fibers to using the impact of the cutting edge to break or tear them. Once that transition begins chipping and tearout increases quickly.
The need for truly sharp cutting edges is universal. Whether we are using a circular blade in a table or hand saw, the cutting edges on router bits or the reciprocating blades of jigsaws they simply cannot cut cleanly when dull. In fact, one of the indicators of dulling cutters is when the amount of chipping and tearout starts to increase.
Cutter Design
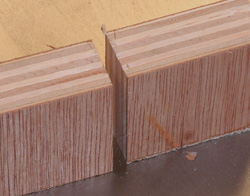
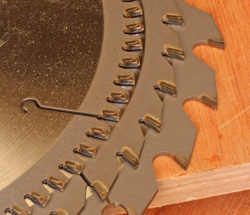 |
Using a cutter that is designed for the type of cut and wood you are working with is important. But so it the cutter being sharp, clean and the machined aligned correctly. Click image to enlarge |
In circular saw blades the number of teeth as well as their shape contributes to how well it can handle fragile woods. Generally speaking higher tooth counts on a table saw blade in the 60 to 80-tooth range handle cutting veneer plywood, laminates and other fragile woods much better than a 40-tooth combination or 20-something-toothed rip blade.
ATB or alternating tooth bevel blades use slicing teeth with steep angle to produce a clean edge. Most of these blades will have one tooth angled to the right and the next angled to the left to slice the wood fibers followed by straight (or sorta straight) teeth sometimes called planers that remove the remaining wood before the next group of angled teeth slice more fibers.
There are many variations of the combination tooth layouts but the alternating pattern remains in some form. The ATB design can also be applied to blades with large numbers of teeth as well as fewer teeth. Here again, the higher tooth counts generally produce smoother cut edges than lower tooth numbers.
All of this applies to dado cutters like the common stacked dado sets but there is a caveat. We can’t increase the number of teeth on the dado set and all of the available sets have roughly the same number of teeth on the outer blades. However we can use a reduced feed rate and a zero clearance insert to help control chipping. Of course a good quality dado set will produce a cleaner cut than the “bargain” sets. We often have to put the presentation side of the wood down anyway so using a zero clearance insert can be a big help with controlling chipping and tearout along the dado.
In router bits many cutters are installed at an angle to promote a slicing action as opposed to trying to shear the fibers as when the cutting edge is parallel to the bit centerline. The angled cutting edges do help and they work best when sharp and clean but they are not magic. You still have to pay attention to your feed rate, grain direction and bit speed.
Clean Cutters
Cutting wood often results in some amount of resin transferring to the cutter. As this layer of resin gradually increases the performance of the cutter decreases while the tendency for chipping and tearout goes up. Even though most blade manufacturers tell the woodworker to keep their blades clean to get the best performance that information is usually in the instructions that hardly ever get read. The result is a large number of woodworkers buying new blades to replace dirty ones. Had they cleaned the old one the original performance would in many cases have returned.
 |
 |
Correctly prepared zero clearance inserts for normal blades (left) as well ad stacked dado sets (right) go a long way toward supporting fragile wood fibers to produce cleaner cuts. Click images to enlarge |
|
This layer of contamination on a cutter not only makes it cut as if it is dull, it can insulate the cutter increasing the heat generated. Between the increased heat and the sticky nature of the contaminates chipping and tearout are all but a certainty. For this reason the first thing that I do when a cutter starts losing performance is to clean it thoroughly.
Zero Support Is Good
Zero clearance inserts are a good safety device but they also help reduce chipping and tearout on machines such as the table saw. If we put the presentation side of the wood down the blade is moving downwards during the initial cut which wants to push the edges of the wood away from the edge. The zero clearance insert supports the wood fibers right at the cut edge and can reduce chipping and tearout dramatically.
I also have found that a zero clearance insert prepared to fit my stacked dado is well worth the expense. Just as with a normal table saw blade, the dado set zero clearance insert supports the wood fibers to reduce chipping and tearout. Of course the edges of the zero clearance insert must be very close to the sides of the outer blades. The majority of my dado usage involves burying part of the blade within a sacrificial fence. That allows me to install a ¾”-width stack almost every time I use this tool. Even when I don’t use the full width dado stack because my saw is a left tilt, the left side outer blade is always directly next to the edge of the zero clearance insert so the support of the insert reduces chipping and tearout. When I have to use a narrower stack slowing the feed rate, keeping the wood moving in a perfectly straight line and hoping real hard seem to contribute to reduced chipping and tearout.
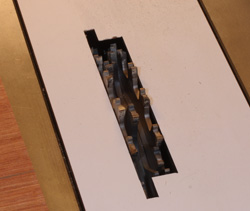
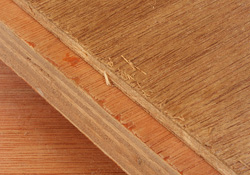
Exit Wounds
 |
 |
Blown out fibers at the end of a dado cut (left) are common and are often covered by face frames and other trim pieces. there can be some fiber damage at the end of a regular blade cut (right) but that is usually very limited and easily "repaired" by normal sanding and preparation for finishing. Click images to enlarge |
|
Whenever a cutter exits the wood it can push chips or splinters away from the edge of the wood. While this is usually far worse with a router bit, it can and does happen with circular saw blades and to a lesser degree with tools such as jigsaws.
The only way to control these exit wounds is to use a sacrificial backer. A backer is just another piece of wood held against the rear edge of the wood being cut. It supports the wood and makes the cutter think that it hasn’t exited the wood yet. As the cutter exits the workpiece up front there is no chipping or tearout. It’s not magic but it can seem like it when you are working with fragile woods.
The backer can be used on the router table or nearly any saw where we are using a miter gauge or other support tool. We need to use these holding type tools to prevent the wood from turning during the cut and causing a kickback or more damage to its edges. The backer need not be very wide but should be stiff enough to provide support of the original piece during the cut.
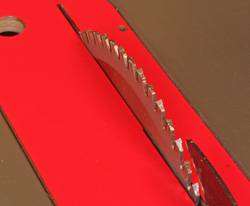
Alignment
A common reason for chipping and tearout along a saw cut is also one of the most overlooked. Because it is nearly impossible to get both the blade and fence perfectly parallel to the miter slot we are all but guaranteed to have some amount of blade rub on the sides of the kerf as it passes the rear edge of the blade. This isn’t such a big deal at the front of the blade where the actual cutting is happening. When the rear of the blade rubs against the wood its upward movement makes it far more likely to produce chips and tear out along the kerf.
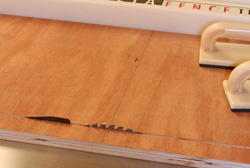 |
 |
Keeping your blade and fence in as close to perfect alignment (left) as you can helps prevent dragging of the back side of the blade against one side of the kerf. When that dragging happens chipped and lifted wood fibers (right) are the result. Click images to enlarge |
|
The obvious solution is to get the alignment of your saw perfect – if it were only that simple. This alignment should be something that we are checking and tweaking regularly. Keeping the machines properly aligned will minimize this problem. Another way to limit the problems here is to maintain control of the wood so that it does not wander during the cut even a little bit. We still may get a little bit of chipping or tearout but with the alignment very close I have not experienced damage that did not go away under normal sanding and preparation for applying finish.
There is a rumor being spouted on some forums that if you crank the blade all the way up this kind of chipping and tearout will go away. If you stop and think about this you will realize that if there is an alignment issue, raising the blade all the way up just makes matters worse – and often more dangerous. Kickbacks usually start at the rear of the blade and raising it all the way just enhances the chances of a small rub turning into a major kickback. Keep your blade set as prescribed by the manufacturer, usually with some or most of the gullet between the teeth above the wood surface. That lets the blade make the best cut that it can and you stay safe in the process.
The Wood
Some types of wood are just more prone to chipping and tearout than others. Most solid woods are relatively easy to cut with minimal damage along the edges. Veneer plywood can be downright frustrating. Lauan plywood is cheap but can actually look pretty nice with finished but is notorious for its long, brittle fibers pointing skyward along the kerf line even when cut with good tools.
Video Tutor |
I’d like to tell you that there is a simple cure for wood that seems to enjoy chipping and tearing out but there just isn’t one. Some say to apply tape along the cut line but if it sticks well enough to stay put during the cut the tape itself usually pulls up more fibers when removed than would have come loose from the cut alone. People say to wet the area being cut but that also seems to instigate as much chipping as the tape does.
Using a zero clearance insert and putting the good side down during the cut can help in some situations but in others, not so much. The best plan is to make sure that you have everything on your cutting tools as good as it can get and then try a test cut or two for a preview of what is to come when you cut the actual work pieces. Sharp tools that are properly aligned and performing well is probably your best bet in reducing this type of damage. Practice and patience are always good ways to limit chipping and tearout. All you have to do is give yourself the time and state of mind to employ that approach to your woodworking.
Have a comment on this story? –Email Me!
All written, photographic and drawn materials are property of and copyright by NewWoodworker.com LLC 2000-2019. Materials may not be used in any way without the written permission of the owner.