
This is a Veteran Owned site
![]()
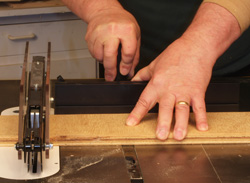 |
Tuning up your miter gauge should not be taken lightly. Its performance has lots to do with how your joinery and projects turn out! Click image to enlarge |
One-Cut Miter Gauge Test
Speedy way to check the squareness of your miter gauge
Text, photos and video by Tom Hintz
Posted - 3-31-2010
As with anything else used to cut wood, the alignment of the table saw miter gauge is crucial to overall accuracy. A tiny error in the alignment of the miter gauge can render many forms of joinery virtually impossible to get right. What is odd is how many people just accept even moderate errors in their miter gauge as the nature of the beast. Well, it's not. While I am a much bigger fan of using an artist's square to adjust the miter gauge (See Related Material below) many of you have been asking about the one-cut method.
Some woodworkers try to use the five cut method for setting a miter gauge but I think that is unsafe. The idea is to make five consecutive cuts on a square piece of wood and measuring the final cut off piece to see if it is consistent in width. The problem is the miter gauge is not capable of accurately making those five cuts safely because the size of the wood is necessarily too big for the gauge to remain on the table when starting the cut.
Prepare the Blank
For the one-cut method we will need a piece of wood roughly 6" to 8"-wide and 20"-long or so. The idea is to have a large enough piece of wood so we can control it during the cut. The width is important only in that the miter gauge is flat on the table saw surface when the cut begins. You might cut a few pieces of wood for this test in case you have to make corrections later.
 |
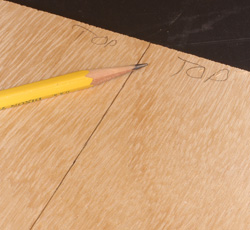 |
First make sure that the blank has parallel edge. A simple rip cut (left) should handle it if one edge is already straight. Then, draw a cut line (right) and label the top on both sides of the line. Click images to enlarge |
|
I like to use plywood or MDF for this cut because the factory edges are usually very straight. Put that factory edge against the rip fence take a light cut the full length cut to make sure that the opposite edge is parallel to the factory edge.
Finally, draw a cut line across the width of the piece 6" or 8" in from the end. Also mark the "top" edge (the one facing away from the operator) on both sides of the layout line.
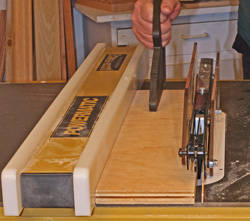
Make the Cut
This is the easy part. Line up your cut line with the blade and make a full width cut. Just be sure to use a moderate feed rate. We want to avoid forcing the piece into the blade as that can cause a distortion that will compromise the accuracy of the cut and this test.
 |
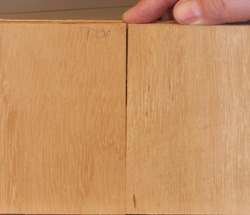 |
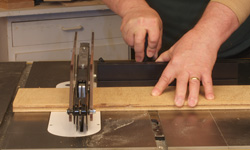
Make a clean cut (left) on your layout line. Then, lay the pieces on the edge and reverse the cutoff (right) flipping it top to bottom. If the miter gauge is off at all, it will show a gap like this. Adjust the miter gauge and make another cut to confirm that the miter gauge is now square to the miter slot. Click images to enlarge |
|
When the cut is complete, shut the saw down, wait for the blade to stop and then bring both pieces back to your side of the saw. I shouldn't have to tell you to wait for the blade to stop but experience suggests that I do. You know who you are!
"Read" the Results
Stand the larger piece that was against the miter gauge fence up on edge so that the "top" mark is at the top. Now, stand the cutoff piece up next to it so that the "top" mark is also at the top. Now, flip the cutoff piece over (top to bottom) so that the "top" marking is at the table surface, the marking facing away from you.
Slide the cut edges together and look for a gap between them. If the miter gauge is set up perfectly square to the miter slot, there will be no gap. If you can see light through any part of the cut edge, you need to adjust your miter gauge.
Corrections
Video Tutor |
If the gap is at the top of the cut, the miter gauge is aimed in towards the blade so must be adjusted away from the blade. If the gap is at the bottom of the cut, the miter gauge is angled away from the blade and the correction is made towards the blade.
In either case, the adjustment needed will be roughly half of the width of the gap you see. Make the adjustment and repeat the mark and cut procedure on a fresh piece of wood or in another spot on the original blank if it is long enough to do safely.
You might have to go through the procedure a couple times to get it perfect but the results are worth the effort. Getting your miter gauge set up perfectly square to the miter slot will make many joinery tasks easier because you have perfectly square edges to work with.
Of course, I still think that it is easier and faster to use the artists square but I present this article because not everyone does things the same way. See the link below for my story on using the artists square if you are interested.
Related Material
Squaring Your Miter Gauge the Right Way
Have a comment on this article? - Email Me!
Back to the Tips & Tricks Directory
All written, photographic and drawn materials are property of and copyright by NewWoodworker.com LLC 2000-2019. Materials may not be used in any way without the written permission of the owner.