
This is a Veteran Owned site
![]()
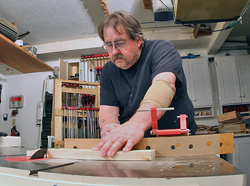 |
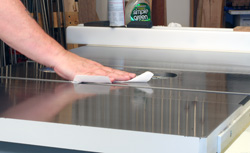
Every thing we use or do on our cast iron tables can cause a stain, spot or scuff. The procedure described here is an easy way to clean the iron up and make it look a bunch better in the process. Click image to enlarge |
Resurfacing Cast Iron Tables
Combating the results of everyday use
Text, photos and video by Tom Hintz
Posted – 9-29-2011
I get a bunch of emails every month asking for “the correct” way to refresh the surfaces of the cast iron tables that attracted so many of us to our saws, jointers, planers, drill presses and more. Everyday use can leave fine scuffs while lots of other common procedures can leave a stain or spot of rust on the surface of the iron. It is important to note that the only way to cure everything woodworkers can do to iron surfaces is to have them surface ground which is hugely expensive and just not practical in most cases.
We also have to make it clear that the red-colored stuff you recognize as rust actually is cast iron that has been converted by the corrosive process to rust. Cleaning away the red-colored rust will improve the appearance to some degree but some metal has already been lost. That means that you will probably still be able to see that spot to some degree. How much you see it later depends on how soon you catch it.
We can’t re-grind our cast iron in our shops but there is a way to restore much of the original finish appearance with simple tools and some effort by the cheap help – us. The procedure described here was given to NewWoodworker.com by Barry Schwaiger, Director of Product Management – Woodworking for the venerable JET and Powermatic power tool lines. In addition to managing two of the most popular woodworking tool lines in the world Barry is also a long-time woodworker who has had to maintain his own cast iron. That need along with his engineering-based understanding of the iron itself helped him develop this cast iron refurbishing procedure.
 |
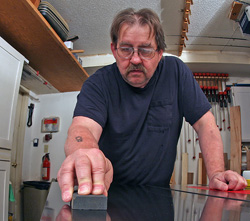 |
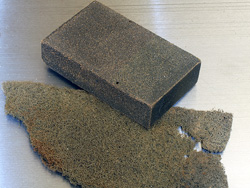
Like many of you I used to use the abrasive pad (left) but am now sold on the Sandflex blocks! when refurbishing cast iron it is important to move the block with the grinding marks (right) usually running front to back on table saws. Click images to enlarge |
|
Sandflex Hand Block
At the heart of this process is the Sandflex Hand Block which is available in coarse, medium and fine grits. The Sandflex blocks are essentially a rubber block with abrasive mixed in throughout the rubber, inside and out. As you use up the abrasive on the outside layer new abrasive is exposed below it. Flip the blocks over frequently while working to help keep the abrasive working at its best. Barry says he uses the fine grit but I have also used the medium grit for “problem” spots. After cleaning up that trouble spot I go over that spot and the rest of the table with the fine grit block.
As always, we want to be very careful about removing iron as that will start a tiny depression that can become more pronounced as refurbish the surface in the future. It is also necessary to be realistic. This kind of refurbishing described here is not meant to repair scratches and gouges. We can get a remarkable finish on old or heavily used cast iron this way and get rid of many spots and stains but if you encounter a scratch or gouge, move on and resist the temptation to keep sanding on that spot!
Wash First
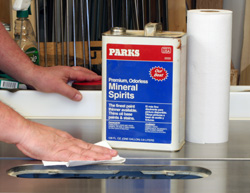
Since most of us have been applying wax or some other material to the cast iron surface to protect it and keep it slick, we need to get all of that off first. Mineral spirits usually does the trick but read the container of the material that you have been using. I have gone over my table saw several times with mineral spirits to be sure I had everything off. Then after wiping the surface clean and letting it dry thoroughly we can go to the Sandflex Hand Blocks.
 |
 |
It just makes sense to remove (left) whatever you have been protecting the iron with. Mineral spirits usually works just fine. When you are done using the Sandflex blocks, clean the surface up to be sure the abrasives are gone (right) and apply your favorite cast iron protectant. for me that is Boeshield's T-9. Click images to enlarge |
|
I have found that working one section of the table surface at a time as defined by a miter slot or the wing to table seams helps prevent missing spots. It also helps keep us oriented if we have to stop for the phone or something.
I mostly use the fine grit block if the surface is just dull. However when I come upon a stain or spot I will get the medium block out, clean up that one area and then go over it with the fine block to even out the finish. If you really have to work to remove a spot or two you may be able to see some shinny and not-so-shinny spots. You can spend more time with the fine block to even out the surrounding surface or just continue and as you maintain the surface in coming months those spots will gradually disappear. It all depends on how much time and energy you have at the moment.
You will find that it is very important to do the whole table surface within one day. Now that you have the cast iron all scrubbed nice and clean the ambient air and humidity can have their way with it overnight. Start this process when you have the time to finish it. The first time I refurbished my table saw it took about 1-1/2-hours.
Video Tutor |
When you are done with the Sandflex Hand Blocks brush and wipe the whole table down with paper towels or clean rags. We want to be sure that all of the grit is off of the surface. Then apply a good coat of whatever material you like to protect your cast iron. Then stand back and admire your shinny work!
Have a comment on this story? –Email Me!
All written, photographic and drawn materials are property of and copyright by NewWoodworker.com LLC 2000-2019. Materials may not be used in any way without the written permission of the owner.