
This is a Veteran Owned site

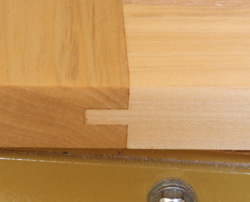 |
The Tongue and Groove Joint is simple to make, versatile and can be used in many lighter-duty applications like flat panel doors or dust frames. Click image to enlarge |
Tongue and Groove Joints
A versatile, easy-to-make old friend
Text, photos and video by Tom Hintz
Posted - 3-5-2009
The Tongue and Groove Joint has been around for decades and refuses to fade away because it remains a useful joint that can be applied to a wide range of woodworking projects. I use the Tongue and Groove Joint for making drawer and dust frames or doors for shop cabinets. Despite the simplicity with which it is made the Tongue and Groove Joint is surprisingly strong.
A good portion of the Tongue and Groove Joint strength comes from making the tongue side of the joint in the rails. That means the top and bottom surfaces of the tongue are long grain, which glue to the long grain sides within the groove. Because there is no reason to not make the groove the full length on all of the parts, making doors or frames with multiple panels is also very easy.
One of the things that makes the Tongue and Groove Joint so popular is that it can be made on a table saw with a normal blade and no additional equipment more complicated than a featherboard. Certainly the Tongue and Groove Joint can be made on a router table given small enough bits to accommodate the groove or panel thickness but the table saw remains the overwhelming favorite.
Prepare the Stock
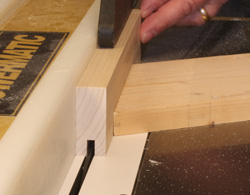 |
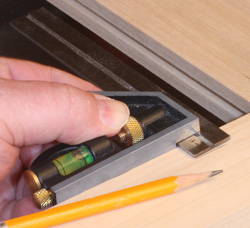
Starting with the blade centered (by eye) on the workpiece, make a pass, turn the board end for end and make another pass to center the groove perfectly. Check against your wanted dimension or the panel stock, make very small adjustment to the fence (towards the blade) and re-do both cuts. Sneaking up on the correct groove width is fast and saves lots of wood and frustration. Click image to enlarge |
While all of the project pieces should be identical in thickness, their width need not be the same. The way the Tongue and Groove Joint is made means that you can use different width stock for the rails than for the stiles, which is customary with doors and in many other projects.
Getting Your Groove
The first step is to make the groove along the inside edge of the required pieces. If you are not installing a panel, just the stiles need the groove. If a panel is to be installed all four pieces get the groove. I usually groove everything more out of habit than need. Grooving all of the pieces also eliminates the chance of my grooving my rails instead of my stiles and the berating of myself that often follows such an oversight.
If a panel is being installed the groove width is sized to accommodate that thickness. The ideal fit allows the panel to slip into the groove easily without rattling around. In most cases the groove will be somewhere around 1/4"-wide. Making the groove 1/2"-deep should be plenty to secure the panel and provide sufficient glue surface for the tongue to develop a strong joint when glued and assembled.
Another thing I like about the 1/2"-length for the tongue is that it makes sizing the rails easier. Knowing that you have an even inch of extra length needed for the stiles to accommodate the joint overlap can eliminate the goofy fractions that induce frustrating errors in parts dimensions.
I use a standard kerf width table saw blade (usually a combination blade) to make all of the cuts when forming Tongue and Groove Joints. For the groove I set the blade height to 1/2". Then hold a piece of the stock against the fence and adjust that position so that the blade makes its cut as close to centered as you can get it by eye. When satisfied with that lock the fence in place and install a featherboard to help stabilize the wood during the cut.
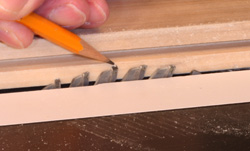 |
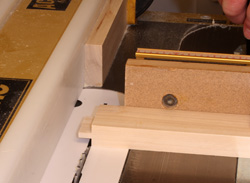 |
Use the groove as a guide (left) for setting the blade height to start cutting the tongues. Use a gauge block to set the length of the tongues (right) and then nibble away the material from both sides. Here again, sneaking up on the right blade setting saves time in the long run. Click images to enlarge |
|
Make one pass across the blade, turn the wood end for end and make a second pass on the same edge. That guarantees that the groove is centered on the thickness of the wood. I know lots of people use their fingers for moving the wood across the blade because the wood is on edge but play it safe and use a push handle! Also, use a sample piece of wood to confirm adjustments before cutting your project wood!
After cutting the initial groove in all of your work pieces hold the panel stock to it to judge how much the groove must be widened. Because we will continue to make two cuts (reversing the piece between them) per groove, we adjust the fence 1/2 of the total error noted to get the right size groove. Make a small fence adjustment and re-cut a sample and check the panel in the groove. You might have to go through this process two or three times to get a clean panel fit but it goes quickly and prevents major errors.
If you are not installing a panel you can follow this same process to sneak up on a groove that is about 1/4"-wide. I have used groove widths up to about 3/8" but on 3/4"-thick stock that results in fairly thin sides so I stay closer to 1/4"-wide for the groove. Using this multi-cut process makes sure that all of the grooves are the same size and that all of them are perfectly centered on the stock.
Cutting Tongues
 |
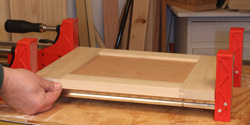 |
During the dry fit I use my combination square to measure the groove depth (left) and draw it out on the outside so I can measure for the proper panel size. After applying glue to all of the mating joint surfaces, clamp the assembly up, (right) make sure the edges are flush and let it dry! Click images to enlarge |
|
To form the tongue we need to use a gauge block to establish its length so we can cut the tongue with a miter gauge. Because of the relatively short length of the tongue nibbling the material away with a standard blade is easy enough. I used to set up my stacked dado set but realized that by the time I made that setup I could have cut all of my tongues with the nibble method. Use whatever tool you feel most comfortable with.
The blade height has to be set to insure a tongue that is too thick initially so I use the wall of the groove on one of the workpieces, laid on its side as a gauge. Set the top of the tooth arc below that thickness and you have a good starting height.
Cut both sides of a tongue on the scrap wood and check it against a groove in a work piece. The tongue should now be too thick so note how much material has to be removed and carefully increase the blade height by a little less than half of that much. Re-cut the tongue to check your progress. Repeat the process until you get a tongue thickness that slips into the groove smoothly without a lot of effort but without slop. When satisfied with the fit you can cut all of the workpiece tongues, nibbling the material away and using the gauge block to insure the correct length.
Video Tutor |
Though I have always used the tongues as they came off of the table saw blade without a strength issue you may want to smooth them somewhat. If you want smoother tongues be sure to cut them a little thicker than needed on the table saw so you can then sand them down to fit correctly.
Because the grooves run the full length of the stiles we do not have to cut shoulders on the ends of the tongues. This simplifies the procedure for both the grooves and tongues. When the assembled joint is sanded and finished the tongue and groove joint can add a little visual appeal to the project by showing that interaction. The end grain of the stile usually darkens considerably more than the long grain rails when finish is applied so the joint is highlighted by that contrast.
With a thin, even coat of glue applied to the mating surfaces the Tongue and Groove Joint is very strong and stable. This simple to make joint lets even beginning woodworkers tackle project components like doors and dust frames with confidence.
Have a comment on this article? - Email Me!
All written, photographic and drawn materials are property of and copyright by NewWoodworker.com LLC 2000-2019. Materials may not be used in any way without the written permission of the owner.