
This is a Veteran Owned site

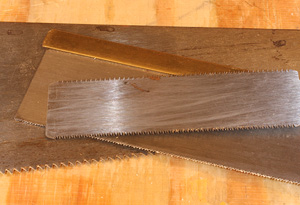 |
Any of these saws will cut dowels but only the top one, the Flush Trim saw will do it right, if you use it right. Click image to enlarge |
Using a Flush Trim Saw
The correct tool & technique + perfect results
Text, photos and video by Tom Hintz
Updated - 2-14-2013
Trimming a dowel close to the surface is a good thing because it eliminates the more labor-intensive operation of sanding it flush. Trying to hold a sander perfectly level while the excess dowel is sanded away can be difficult to do and may result in a wavy surface that looks as bad as saw marks. Even though this is admittedly a hand tool, (I do use a couple of hand tools, just not in public) it is the correct tool for this job.
The Real Deal
Like many of you I have tried to use a dovetail saw (and others) to trim dowels but they just do not work and often do way more damage. A true flush trim saw has a thin, flexible blade with no backbone reinforcement. This allows the cutting portion to lie flat and cut the dowel off very close to the surface. Even more important is that the teeth have only an upwards set, unlike virtually all other saws that alternate the set to both sides of the blade. The flush trim saw is designed for this one task but it does it well and can save a bunch of sanding (or repair) time for the small cost of owning one.
Most flush trim saws have rows of cutting teeth on both sides of the blade, a feature that comes in handy in confined spaces and for left-handed woodworkers that may be comfortable sawing with the other side of the blade. Both rows of teeth have the upward-only set.
 |
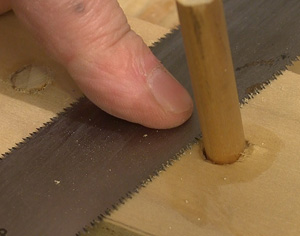 |
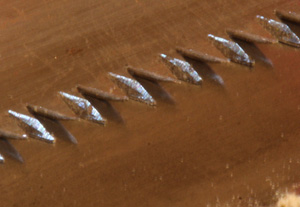
In this close-up (left) you can see that the Flush Trim teeth are flat or set upwards while ZA regular saw has it's teeth set up and down. Adding a finger pushing downward lightly (right) on the blade at the dowel helps the blade stay flat and not marking up the surrounding wood. Click images to enlarge |
|
Use It Right
Despite the typically wide and flexible blade of a flush trim saw it can be difficult to keep the blade parallel to the surface. As your hand goes through the motion of sawing back and forth preventing any rocking from side to side is somewhere between difficult and “ain’t gonna happen.” However, the flush trim blades characteristic flexibility makes helping it remain parallel to the surface rather simple – once you do it a time or two.
Simply adding a little pressure with a finger on your free hand, applied near the center of the blade during sawing keeps the blade flat (parallel) on the surface by eliminating the rocking of your hand. This sounds more difficult than it really is and you will find that out after trying it a few times to get the feel. The key is not pushing down hard on the saw blade but rather just keeping it flat on the surface which takes very little pressure.
The result is slicing the dowel away very close to the surface, leaving just a tiny amount of it to be sanded off. With so little dowel left above the surface you can apply a sander flat on the surface to bring it down flush with the surrounding wood.
I know this may sound overly simple to some but it does work. Very often it is the simple answer that works best. For those who have had to sand away the grooves left by an errant saw, this easy to do technique will be welcome news.
Video Tutor |
Have a comment on this story? - Email Me!
All written, photographic and drawn materials are property of and copyright by NewWoodworker.com LLC 2000-2019. Materials may not be used in any way without the written permission of the owner.