
This is a Veteran Owned site

 |
I built this cart as a down and dirty shop cabinet but you can make it as fancy as you want! CHECK THE PARTS DIMENSONS AS YOU GO! |
Parts Dimensions |
Top – 23/32”-thick plywood by 53”-long and 18-3/4”-wide Top Skirt – 5/16”-thick by 2-1/2-wide poplar cut to fit the edges of the top Sides – 24”-tall by 18”-wide, 23/32”-thick plywood Floor – 23/32”-thick plywood 48”-long by 17-5/8” wide Back – ¼”-thick plywood, 24”-tall by 48”-long Front rail – 23/32”-thick plywood 3”-tall by 47-3/8”-long Drawer Front/Back Rails – ¾”-thick poplar 3-1/2”-tall by 45”-long Drawer Ends – ¾”-thick poplar 3-1/2”-tall by 16”-long Drawer Bottom – ¼”-thick plywood – 14-3/4”-wide by 45-5/8”-long Casters – 3” wheels, full locking 1 on each corner |
Mini Lathe Cart Video Tutor Project
Make it as fancy as you like
Text, photo and video by Tom Hintz
Posted – 8-8-2012
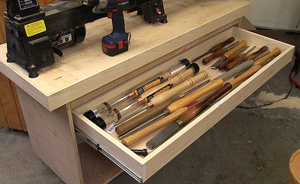
While mini lathes are often considered to be Benchtop machines few of us have that much bench space available even on a part time basis. If you want to add the very popular bed extension existing free space becomes even more rare. For me the Mini Lathe Cart was the no-brainer answer. A dedicated space, on wheels so it can be parked out of the way when not in use with some much-needed storage space beneath the lathe are all important features if your shop is smaller than you need/want.
I used relatively cheap materials to make the Mini Lathe Cart you see here. I know some like to use good materials and there is nothing wrong with that, build to the level you want! My purpose in presenting this Video Tutor is to cover the basics of construction and as usual, to show where I screwed up. I figure that if I can make the mistake, some of you might also, at least thinking that way makes me feel better about myself so bear with me on this.
Video Tutor |
The list below shows the sizes of the parts used. I did correct the dimensions of the back panel and the floor to compensate for my error shown in the Video Tutor. Also, note that the drawer slides I used take up ½” on either end of the drawer so if you use different thickness slides measure for the drawer parts on your cabinet to be sure to measure for the right size drawer parts! Be sure to check ALL DIMENSIONS as you go as small differences in how you cut or build a project can make changing dimensions from what I have here mandatory.
Have a comment on this Video Tutor? – Email Me
All written, photographic and drawn materials are property of and copyright by NewWoodworker.com LLC 2000-2019. Materials may not be used in any way without the written permission of the owner.