
This is a Veteran Owned site

 |
This is an easy skill to learn but one that will handy for the rest of your woodworking life. Click image to enlarge |
Building Tongue and Groove Doors
Simple Tools, Solid Results
Text, photos and video by Tom Hintz
Revised - 1-18-2013
Building tongue and groove doors is easier than you might think, plus you do not need an array of fancy tools to do it. Depending on the wood used, these simple-to-build doors can be used on projects ranging from shop cabinets to upscale interior applications. This building technique is also commonly used to build drawer or dust frames in cabinetry.
Sizing the Rails & Stiles
You get to decide on the dimensions of the rails and stiles but most times the rails are wider than the stiles. A good way to cheat on coming up with these dimensions is to check out ready-made panel doors in a furniture showroom. Find a door that is close to the size you want to build and measure the width of the rails and the stiles. You can alter these dimensions somewhat if you like but more often than not those changes will be small to get a door with pleasing looks.
Measure the opening being covered by the doors and figure out the finished height and width needed. The stiles will be cut to the full finished size but the rails have to account for the width of the stiles on either end. We also have to figure in the length of the tongue at each end of the rails. To make this easier I have always made my grooves ½”-deep. I have made some rather large doors with this ½”-deep groove which means the tongues are also ½”-long. Some of those doors are 20-some years old and no failures. This is a strong joint that we need not complicate with longer tongues.
To determine the cut length of our stiles we subtract twice the width of the stiles and then add 1”. That’s it. I am all about keeping thing simple because that translates into fewer errors and dumb-looking fixes in our projects. Some will build their doors or panels around ¼” oversize in both length and width so that they can take light trim cuts on all four sides to confirm them being square and to get very clean edges.
Groove the Rails and Stiles
 |
 |
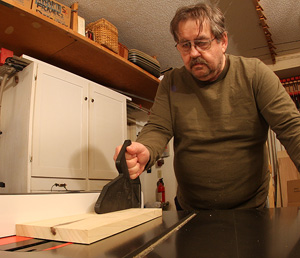
You can use stacked dado set for some of these cuts but I stick with my 1/8"-wide combination blade for both grooving (left and forming the tongue (right). Because I make the tongues 1/2"-long I can have this job essentially done by the time I can install and set up the stacked dado. Click images to enlarge |
|
We could cut the tongues and grooves with a stacked dado set but for something this small I think it is just easier and faster to use a standard (sharp) table saw blade. Also when using the popular lauan plywood the needed groove is a bit less than the ¼” minimum width most stacked dado sets cut.
First, set the table saw blade height to ½". Adjust the fence so that the blade is very close to centered on the thickness of the rail and stile pieces. Run all rail and stiles over the blade, groove edge down and held firmly against the fence. After each cut, turn the piece around and re-cut it to center the groove perfectly.
Check the plywood fit in the groove, if it fits at all after the first cuts. We are looking for the plywood to slip into the groove easily but without a bunch of side-to-side play. Chances are the groove is still too narrow at this point so we need to widen the groove. Carefully bump the fence slightly further from the blade. I do mean SLIGHTLY because we have to cut both sides of the groove to keep it centered so the change in groove width will be twice the amount we moved the fence. Re-cut all of the pieces being sure to make one cut, reverse the piece and make the second cut on each of them. Then test the plywood into the groove again and make adjustments as needed to get the right fit.
When you think that you have the groove correctly sized confirm that by trying the plywood in all of the grooved pieces. I still don’t know how I did it but I have missed one set of cuts on one of the door pieces so had to go back and try to recreate that exact setup to finish that one piece. Not fun.
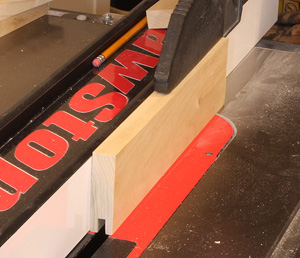
Cut the Tongue
Clamp a gauge block to the fence and set the distance from its face to the far side of the blade to ½". Lay one of the frame parts flat on the table and set the blade height so that it is a little below the groove for the initial cuts. The fit of the tongue in the groove is important so we want to take our time here.
Move the gauge block to the operators’ end of the fence and clamp it in place. Using the miter guide, butt a scrap piece (same thickness as the frame parts) against the gauge block and then slide it over the blade. Remove the wood, bring the miter gauge back to your side of the table. Flip the piece over (last cut now at the table surface) butt it against the gauge block and make the second cut to define the shoulder.
Now I make several passes over the blade on each face of the tongue to remove the remaining wood. I always remove the wood before bringing the miter gauge back to me to avoid even a small chance of a kickback. I’m just not in that much of a hurry to take the risk of just bringing the wood back over the blade. When all of the wood is removed back to the initial shoulder cuts test the tongue in the groove.
 |
 |
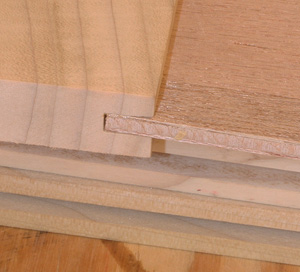
The panel should fit the groove (left) without a bunch of play but still float easily. When applying the glue (right) take care to coat only the areas where the tongue and groove joints meet. The panel is not glued in place. Click images to enlarge |
|
We only have to do this test on one piece because the final blade height will work on all of the pieces. If the tongue is too thick (as it should be if you set the initial blade height below the groove) raise the blade SLIGHTLY because we are cutting both sides of the tongue. Re-cut the tongue just as we did before and try it in the groove. When satisfied with the fit of the tongue into the groove, cut the remaining tongues on both rails.
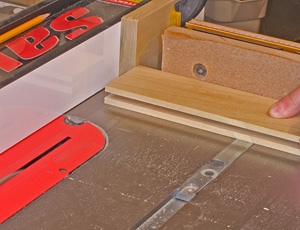
Measure for the Panel
Assemble the rails in the stiles (no glue) and place in clamps with just enough pressure to close the joint. If you haven’t already this is also a good test to make sure that all of the tongues fit in the grooves. Correct any problems before continuing.
Use a combination square to measure the depth of the groove and lock that setting in. Then you can use the combination square to make light marks on the frame on opposite sides of the width and length that represent the bottom of the grooves. Now you can measure between those marks to determine the actual size of the center panel needed. Remember that the mars represent the bottom of the groove so measure between the inside edges of those marks. I also subtract another 1/8” just to give the panel a little room just to be sure it is not tight in the frame all the way around.
Cut the panel to the dimensions needed and lightly sand its edges to remove any ships or small splinters. Dry fit the assembly one more time to confirm that the panel fits and all of the joints close fully.
Assemble the Door
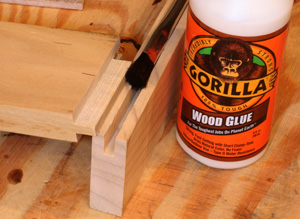
Apply glue to the ends of the rails and to the stiles only in the area that contacts the rails. No glue goes in the groove to retain the panel because we want that to float. Assemble the door and put it in clamps and squeeze the joints closed but don’t get carried away with the pressure. After the joint closes any additional pressure just warps the assembly. Make sure the door is flat in the clamps, is square and the ends of the stiles are flush with the rails. Let it dry completely.
Video Tutor |
After drying, scrape off any excess glue and sand the joints smooth. If you oversized the door to allow for final trimming, do that now. Take very light cuts to just clean the edges up until the door is at the final size.
The outer edge of the doors can be routed with a decorative contour if you like before final sanding and finishing. Poof! You're done!
This procedure takes considerably longer to describe than just doing it yourself. Like anything in woodworking a little practice also makes the process faster. This is a worthy skill to have in woodworking that has lots of uses in your projects.
Have a comment on this story? –Email Me!
All written, photographic and drawn materials are property of and copyright by NewWoodworker.com LLC 2000-2019. Materials may not be used in any way without the written permission of the owner.