
This is a Veteran Owned site

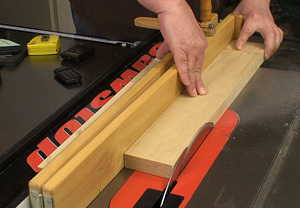 |
Using a Taper Jig is easy and safe if you do it right. With wider pieces I use my fingers to hold the wood down but with anything that gives my fingers less than 3 inches of clearance to the blade I use a push stick or other hunk of wood to hold the piece down. Click image to enlarge |
Using a Taper Jig
The straight scoop on cutting tapers, two at a time even!
Text, photos and video by Tom Hintz
Updated - 12-18-2012
Cutting tapers is a relatively common procedure in woodworking that can be a little intimidating for newbies and veterans a like. The idea of intentionally running a piece of wood through a table saw at an angle seems unnatural. However, the proper use of a Taper Jig makes this task both very accurate and safe if you pay attention to what you are doing. If you are not paying attention at the table saw, cutting tapers should be the least of your worries.
There are many Tapering Jig designs but most function very much alike: they hold the stock at a specific, desired angle to the blade during the cut. Despite how it looks, using a Taper Jig is reasonably safe if the fence and blade are properly aligned, the blade is sharp and the operator is actually paying attention to what they are doing as you should be anyway.
While it is fairly common to gang two or more pieces together to be cut at one time this is not a safe practice when using a Taper Jig. Once the Taper Jig and table saw are set up for a cut you can make several identical pieces very quickly with surprising accuracy.
Lay Out the Cut
 |
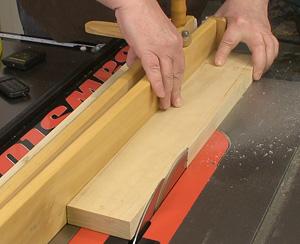 |
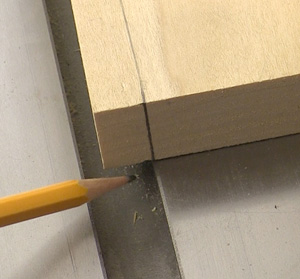
Aligning the layout marks to trhe right side of the miter slot (left) lets you get the jig set up perfectly. Than after setting the fence-to-blade distance you can cut a perfect taper. Click images to enlarge |
|
Laying out the cut line representing the taper to be cut accurately on the face of the wood is important to setting the jig up correctly. When satisfied that the cut line is drawn correctly, use a combination square to extend both ends down the thickness of the material to meet the table surface. These line extensions are the landmarks that allow setting a Taper Jig accurately and quickly.
If several identical parts are to be cut with the same taper, the layout only needs to be done on the first one. Once the jig and fence are set for the first cut the remaining pieces will come out the same also.
Aligning the Jig
For a Taper Jig to work correctly the cut line must be parallel to the fence. That way the fence and jig hold the wood at the correct angle to make the necessary cut.
With the saw OFF, place the Taper Jig against the fence with the piece to be cut against the jig, its bottom edge against the stop. Move the fence so that the cut line marks are over the right edge of the (left) miter slot. Adjust the angle of the jig and the fence position until both ends of the cut line are exactly aligned with the right edge of the miter slot. If your fence is aligned to the miter slot the cut line will now be parallel to both the fence and the cutting path of the blade. When satisfied tighten the fastener that lock the Taper Jig and re-check its alignment.
Move the fence so the mark indicating the beginning of the taper just touches the front edge of the blade. Lock the fence in place and re-check the alignment. Pull the jig and work piece towards you until they are well clear of the blade before starting the saw.
Making the Cut
Note: Left-handed woodworkers may have to alter this procedure to best suit how they use a table saw. Make sure whatever procedure is being used is safe!
 |
|
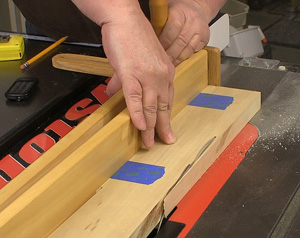
By placing a shim equal to the thickness of the blade between the cutoff and work piece (left) we can then put that edge against the fence (right) and cut an identical taper on the opposing edge. Click images to enlarge |
|
I make all taper and rip-type cuts with the fence on the right side of the blade. To give me the most control and the largest margin of safety I stand to the right of the fence. With my hands over the top of the fence, I can grasp the Taper Jig and stock, holding them firmly against the fence, without having to reach over or exert force towards the blade.
If the work piece is too small to grasp safely, a method of securing the jig and work piece together must be devised so you can keep your fingers a safe distance from the blade. Most often in this case people will use masking tape to secure the wood to the jig. Just be sure to use a piece of tape at two widespread points on the wood to be sure it remains parallel to the jig and fence.
When making the cut, push the jig and work piece through the saw being careful to not force the wood into the blade. Let the blade do its work and then continue to move the jig and work piece until they are well clear of the blade. There is never a good time to pull the jig and work piece back through a running saw!
The cut off piece will fall to the free side of the blade, but it still could be thrown back. Shut the saw down and let the blade stop before trying to retrieve the cut off piece or bringing the jig back to the starting position.
Cutting Opposing Tapers
Cutting identical tapers on two opposing sides of a leg is fairly common but getting the tapers identical on both sides of the leg can be difficult. Traditional thinking has been to tape the initial cutoff piece back onto the leg and then place that edge of the wood against the jig to cut the opposing side. Almost right.
The problem with this is that we lose the thickness of the blade and the second taper cut will be differently than the first. To fix this we need to cut a shim the same thickness as the width of the blade and put that between the cutoff piece and the leg itself. That way when we flip the leg over and put the cutoff piece against the fence, the blade cuts along an identical path on the opposing side of the leg.
Video Tutor |
I use standard 1/8”-wide saw blades so I begin by making a light cleanup pass on a piece of wood just to be sure the blade cuts the entire length. Then I move the fence exactly ¼” closer to the blade and lock it in place. Make another ripping pass and you get a shim that is precisely 1/8”-thick. I then reduce the length of that shim so that it fits in between the cutoff piece of the taper and the main piece without protruding at either end. If necessary I will break the shim into two pieces so I can distribute them evenly to support the cutoff piece solidly before taping them onto the main piece to cut the second taper.
I realize that we are going to be slightly different in size, specifically over by the thickness of the masking tape used. Since this kind of tape is just several thousandths of an inch thick the actual difference in the tapers cut is impossible to see. I have used this technique dozens of times and have yet to find any visual difference in the tapers cut.
Using the Taper Jig often feels a little awkward when you first use one, but with a little practice, you will be making accurate cuts that benefit your projects. This is a very common woodworking technique that when done correctly is both safe and adds another point of interest to the project.
See the NewWoodworker.com Taper Jig Custom Plan Set - Click Here
Do you have a comment about this page? - Email Me!
All written, photographic and drawn materials are property of and copyright by NewWoodworker.com LLC 2000-2019. Materials may not be used in any way without the written permission of the owner.