
This is a Veteran Owned site
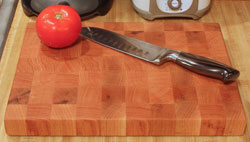 |
This is a fun, simple project that makes good use of some of the scrap you can't get yourself to throw out! Click image to enlarge |
Making an End Grain Cutting Board
A useful project from the scrap bin
Text, photos and video by Tom Hintz
Posted - 10-16-2008
After building our Round Kitchen Table project, I had several heavy oak cutoffs from when I trimmed the boards used to make the top for that project. The pieces were roughly 1-1/2"-thick, 6"-wide and between 12 and 18-inches long. Rather than toss them out, I decided to make a cutting board or two.
Scraps to Strips of Cubes
 |
|
 |
|
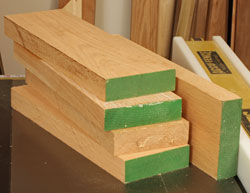
I turned this pile of scraps (top) into a bunch of 1-1/2"-square strips (bottom) that were glued together in groups of seven. Click images to enlarge |
|
The easy way to go would be to simply cut the scraps into strips and glue them together to make a traditional cutting board. I decided to go the extra step and make an end grain cutting board. I did cut the strips, 1-1/2"-square and glued them up in rows of 7 strips. I turned the grain of each piece (end grain) 90-degrees to the one next to it for both strength and to enhance the checkerboard look. I used Gorilla Glue throughout because I like how easily the excess scrapes away without leaving contamination of the wood behind. Other points in Gorilla Glue's favor is its remarkable strength, near total resistance to water (indoors or out) and that it is non toxic when completely cured, usually after 24 hours. I followed the instructions, dampened one side of each joint and spread Gorilla Glue on the other. I carefully assembled the groups of strips to minimize cutting problems later (squaring) and applied clamping pressure.
After allowing the strip assemblies to dry I removed them from the clamps and scraped away the foamed-out excess glue. Then I found the flattest side, put that face down on the table and ran them through my POWERMATIC 15HH (with the Byrd head), taking very light cuts to just flatten the surface. Both pieces only took one pass to flatten before turning them over and flattening the other side. Then I used my Table Saw Sled to cut strips from those blanks, 1-1/2"-wide. Those cuts produced a bunch of strips of 1-1/2"-square.
End Grain Assembly
 |
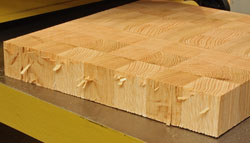 |
I used my planer to both flatten the initial strip groups (top) and the cutting boards themselves. The Byrd cutting head did a great job though it did produce some minor chipping (bottom) that went away with the clean up cuts later. Click images to enlarge |
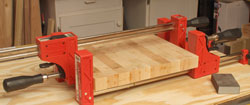
As with making the strips, I dampened one face and applied the Gorilla Glue to the mating joint surface, this time having the end grain up. I also took the time to arrange the strips of end grain blocks so the lighter and darker blocks contrasted each other to produce a more distinct checkerboard pattern.
While assembling the groups of strips I took my time to get the ends aligned as perfectly as possible. I wanted to do everything I could to minimize the later tasks of squaring the edges and flattening of the main surfaces. I snugged the clamps down lightly and then used a dead blow mallet to be sure all of the strips were fully down on the clamp bars to get the assembly as flat as possible. Once satisfied I tightened the clamps a bit and set them aside to allow the Gorilla Glue to dry thoroughly.
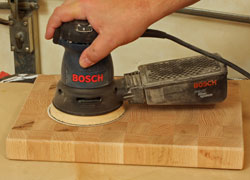
Flattening and Sanding
The toughest chore when making end grain cutting boards is getting the surface flat and smooth. Sanding is the most-used technique but the toughness of end grain means that process will not be short. I decided to give my POWERMATIC 15HH with its Byrd cutterhead a try. I was hoping that the superior cutting capabilities of this machine would let it slice the end grain without tearing the cutting boards apart in the process. I should note that I would not try this wihtout the Byrd head, the anti-kickback features of the POWERMATIC 15HH and my standing to the side while doing it!
I set the planer to the lightest cut I could take and ran the smaller cutting board through. It came out the other end with a little chipping on the trailing edge but was otherwise flat and undamaged. Encouraged, I sent the larger cutting board through at the same setting and found the same results when it emerged. I raised the planer table 1/32", flipped the cutting boards over and sent them through again, making sure that the chipped edge was the last to enter the machine. I wanted to confine the chipping to one end so I could trim it away. The chipping on those trailing edges did get somewhat worse when planing the other face of the cutting boards but the damage seemed to be 1/8"-deep or less.
 |
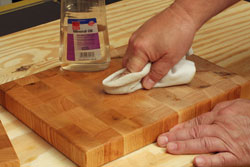 |
All that remained was sanding (left) to smooth the surfaces to 320-grit and the applying the mineral oil (right) to protect and preserve the cutting boards. Click images to enlarge |
|
With both wide surfaces flat I returned to the Table Saw Sled to trim the blanks to be sure they were square with clean edges. The chipping produced in the planer cut away easily with little more than the amount of material I normally would lose to trimming so using the POWERMATIC 15HH saved a bunch of time without sacrificing a lot of material. And, I saved half a days' worth of sanding.
All that remained was sanding the surface smooth. The planer did a good job of flattening the surfaces but the end grain was a bit rough as was expected. The only remedy is sanding, starting with 80-grit and working up to 320-grit. In the end, I sanded both cutting boards to my satisfaction in a couple hours. That's like a light year or so shorter than had I not used the planer.
Finishing
Video Tutor |
There are many food-safe finishes available but on a cutting board, I use pure mineral oil. Mineral oil soaks into the wood to preserve and protect it from moisture. Also, mineral oil does not form a hard film on the surface that would be damaged by normal use of a cutting board. Down the road, when the surface begins to dry, applying another coat of mineral oil freshens it up easily.
I rubbed three coats of mineral oil into all of the surfaces. I let the oil soak for a couple hours between coats then over night after applying the final coat. Then with a clean dry rag, I rubbed all of the surfaces down to remove any excess mineral oil before using the cutting boards.
I should stress that you cannot use most other vegetable-based oils as they will go rancid. Mineral oil does not go bad which is why it has long been a favorite for this kind of project.
That's it! A nice, simple and useful project that you can make out of scraps. The strips/squares can be virtually any size you want to use and the overall size of the cutting boards can be changed as well. Now, whenever your scrap pile starts getting too big, you have something constructive to do with some of it!
Have a comment on this project? - Email Me!
All written, photographic and drawn materials are property of and copyright by NewWoodworker.com LLC 2000-2019. Materials may not be used in any way without the written permission of the owner.