Ryobi BT3100 Table Saw
Assembly and Setup
Simple, logical and common tools
Text & Photos by Tom Hintz
 |
 |
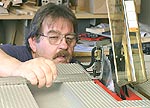
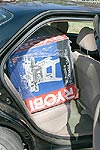
The guys at Home Depot slipped the BT3100 in my car (Top) but left my daughter and I to get it out. (Bottom) Both were accomplished, though not by much!
Click images to enlarge |
Big Box
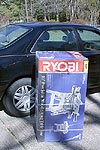
The first thing you notice about the Ryobi BT3100 is the box, specifically the size of it. At 41 1/2"-long, 22 3/4"-wide and 21"-tall the size of your vehicle becomes an important consideration in getting this tool home. If you have a SUV, mini-van or pickup this is an easy task. If you have a sedan, as I did, it gets a little challenging.
The two Home Depot employees who helped me were understandably skeptical when I pulled my Toyota Camry into the loading area. After some careful measuring eliminated the trunk, they decided the back seat was our only possibility, and that wasn't looking very good.
With the Home Depot guys on the outside angling the box through the doorway and me on the inside guiding that end by the front seats we got the BT3100 into the back seat.
Back at the shop, my daughter pushed from inside the car while I guided the other end of the box over the handles and arm rest on the door. With a little tugging and coaxing, the BT3100 slid out with no damage to the box, or the Camry.
Logical Packing
Opening the top of the BT3100 box revealed what appeared to be lots of parts, all neatly arranged in compartments molded into the foam liner. All of the pieces emerged unmarked and with no grease-covered parts, just one advantage of using aluminum instead of cast iron.
 |
All of the fasteners used in assembly, and those factory installed are standard SAE sizes!
Click image to enlarge |
The parts are oriented within the packaging roughly in the order of assembly with the instruction manual being one of the first things you find. It should also be the first thing you read.
The individual parts packages are not marked but easily identified by comparing to the listings in the instructions. All parts and fastener counts were correct.
A notable exception to the norm these days is that if you used the BT3100 as an excuse to buy that fancy metric wrench set you will have some explaining to do. All of the fasteners, Allen drive pieces included, are standard SAE sizes. All of the factory-installed fasteners encountered during the setup and adjustment process were also standard sizes.
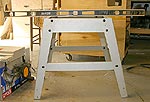
The Stand
 |
Leveling the base before tightening the bolts is a simple but effective addition to the instructions.
Click image to enlarge |
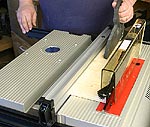
Assembling the stand was first, following the instructions and illustrations to get the right pieces in the right places. This is important as only two of the top rails have mounting holes for the main saw cabinet and must be located opposite from each other.
Though the base includes adjustable leveling feet, I placed a long level across the top of the assembly, tweaked it until level and then tightened that set of fasteners. Turn the level 90-degrees across the base, adjust as needed and tighten the remaining fasteners.
I like leveling the base at this point because it helps establish a level assembly and limits the adjusting needed at the feet. Usually very small adjustments are all that are needed to correct for uneven floors.
Note: Since I had the accessory kit, I installed the wheels and their mounting plates on the completed stand before continuing. Pay attention to the orientation of the stand and the cabinet mounting rails so you get the wheels on the side, not the front or back of the saw. I can tell you from experience this is an easy mistake to make but if you catch it before adding the cabinet, as I did, moving the wheels to the proper legs is easy.
The Cabinet and Accessories
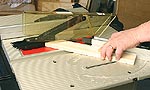
The main saw cabinet is completely assembled as it comes from the box. The motor, belts, blade and electrics are all factory installed. Even the handle for adjusting the height and angle of the blade is factory installed.
Before plugging in any saw for the first time, check the blade to be certain it is tight and rotates freely as the instructions recommend. Remove the throat plate and LOOK! It is very rare that there is a problem, but it only takes a minute to be certain.
For now, leave the throat plate off until after installation of the splitter and blade guard as indicated later in the assembly sequence.
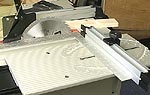
Installing the fence rails requires no tools as they are each retained by a pair of lever-actuated cam clamps. The modular design of the BT3100 makes moving the fence rails to accept the sliding table or to maximize the rip capacity fast and easy.
Even if you routinely use a tape measure for setting the rip fence, follow the instructions for locating the fence rails the first time. Once the fence rails are aligned with the rip fence and blade, I scribed a thin line on the front rail and the saw cabinet to let me return the front rail to this "base" location quickly. The rear rail is easily aligned to the front by moving the accessory table to the end of the front rail and adjusting the rear rail to match. It takes longer to explain that than to do it.
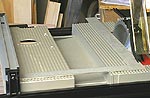
Once the rip fence, sliding table with miter fence and the right side table are installed, the saw is essentially complete. However, it is not ready to use!
The pages immediately following assembly show the various cuts and can give the impression you are ready to make them. Read on a couple more pages until you reach the setup information. Follow the alignment procedures fully before using the saw. My BT3100 needed only minor adjustments but it is well worth the effort to be safe the first time and to be familiar with these procedures later. All table saws need to be checked for alignment occasionally.
Conclusion
The assembly and setup of the Ryobi BT3100 is simple and surprisingly fast. The design of this machine combined with effective instructions should make it easy for first time table saw owners to end up with a correctly assembled, accurate cutting saw with little if any frustration.
As with any woodworking machine, keep the instructions handy and check the alignment occasionally. A properly aligned table saw not only performs at it's best, it is safer to operate.
See the full BT3100 review!
Do you have a comment about this page? - Email Me!
|