
This is a Veteran Owned site
| |
|||||||
Using the Box Joint Jig
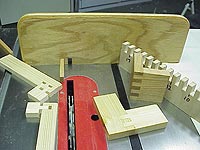
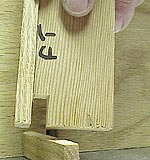
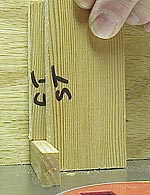
Text and photos by Tom Hintz Using a box joint jig is relatively easy. Once you have made a few joints and become accustomed to the process, you will be making good-looking box joints quickly, and accurately. Many of the projects we build, a wall-hung cabinet, a jewelry box or a blanket chest, are a form of box. The age-old box joint provides a simple, effective and attractive way to join the side panels of nearly any box. For our purposes, we will assume we are working on the carcass of a small wall cabinet, and have it lying on the bench top up. First, label all four sides with their position, and identify the top of each. When placing parts in the jig, always put the top to the (operators) right. Following this procedure each time, you cut box joints will prevent confusion during the jointing process.
There are two basic methods of using the box joint jig. Both parts of a corner can be cut together, or all of the parts can be cut individually. I told you this was easy. I like to cut pieces one at a time as that seems to increase accuracy slightly. It is just easier to hold one part in the jig correctly than two parts. Whether cutting the parts together or individually, one (from each corner joint) must be started with the spacer stick inserted between it and the indexing pin. This forces the initial cut to the outer edge of the material. The mating part is cut without the spacer and the proper offset is achieved, allowing the joints to mesh with the top and bottom edges of the work pieces even. I start with the parts that use the spacer stick for the initial cuts. Because there is no taper to box joints, I can place the top facing to my right, make the cuts in one end of the piece, flip it vertically and cut the other end, the top still to the right. When cutting two parts simultaneously, insert he spacer stick and make the first cut on one piece. Remove the spacer stick, place the second piece in front of the first, butt both against the indexing pin, and then make the second cut. With both pieces held together, move that cut over the indexing pin, cut again and repeat the process over the width of the material. Most projects allow us to alter dimensions so that box joints are cut evenly across the joint. Partial fingers are less attractive and can be a problem if they get too thin and break out in the final stages of construction. I made a gauge with which I can lay out my pieces to get the box joint pattern I want. (See photo) The gauge is a 20-inch-long piece of scrap in which I cut fingers across the entire length, starting with the end butted against the indexing pin. With this sample I can lay out my project parts so that full fingers are cut and I get the pattern I want.
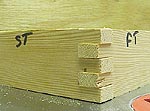
A retired cabinetmaker that serves as my unpaid, but appreciated consultant offered a "cheat" for this process. He suggests cutting the stock slightly wider than needed. Mark the parts with their locations and the top as described above and complete the joint cuts normally. There will be excess material at the bottom of your pieces that can now be trimmed off at the table saw, jointer or sander to leave a full joint finger. Presto, you are a master box joint maker! Though admittedly very basic, I like the versatility of this jig. It creates clean fitting joints in narrow or wide stock without changing the setup. Dovetails will always be my first choice for drawers and many other jobs, but the weave of end grain squares down both sides of a cabinets corner remains an attractive alternative I will keep at hand. With a little creative thinking, you may find other ways of using this ancient form of jointery. I recently made a few test pieces experimenting with box joints in applications such as face frames or perhaps even doors. A large part of woodworking resides in the imagination of the person operating the tools. The box joint is a simple technique that can be applied in imaginative ways when we employ creativity in equal portions to technology. |
|||||||
Do you have a comment about this page? - Email Me!
|
All written, photographic and drawn materials are property of and copyright by NewWoodworker.com LLC 2000-2019. Materials may not be used in any way without the written permission of the owner.