
This is a Veteran Owned site
Mobile Tool Cart/ Work BenchText, photos and design by Tom Hintz An all-too-common condition of the modern woodworking shop, hobby or professional, is not having enough space, particularly workbench area. Witness the grand poo-bah of woodworking spaces, The New Yankee Workshop. Despite comparative canyons of room, master woodworker, Norm Abram, seems to build two or three new forms of workspace--usually mobile--each season. I needed a platform on which to use my jointer, planer and other tools. I also wanted the ability to move it where it best fit the current project. After using one end of my RAS table, the inconvenience of rendering the RAS unavailable was a problem. One day while gazing at my stock of wood remnants, I realized I had enough for such a project. I dug out several 2X4 scraps and measured them up. I had enough footage, but as always, their width and thickness dimensions varied. I used the jointer and planer to "qualify" this lumber. By qualify I mean bringing all of the pieces down to a common dimension. In this case, that meant a cross section of 3 1/8 X 1 3/8-inches.
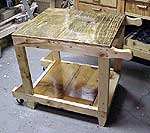
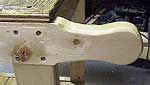
I wanted a 30 by 25 inch-wide work surface to accommodate my jointer and planer. It would also provide a decent sized area for other operations. I wanted the unit to be 31-inches tall for a comfortable working height with most equipment. To make the unit mobile I wanted something other than the traditional combination of two fixed and two swivel locking casters that were always hard to reach under a cabinet. I decided to use a single pair of stationary 3 ½-inch casters mounted to cantilevered arms protruding 6 inches from the front of the cart. At rest, the cart stands on four legs that are part of the corner uprights. I cut four 36-inch lengths for the upper and lower side rails. With identical layouts the lower rails would extend forward of the main frame by 6-inches, the uppers rearward an equal amount. The only difference is cutting the handle shapes at the end of the upper rails. I cut 6-inch lengths of stock to double the forward cantilevers to which casters are attached. In keeping with my tendency to over-build, I also cut 45-degree corner blocks and bolstered the junction between the forward uprights and cantilevers. All of the main frame joints are half-laps, secured with glue and screws. With the lumber "qualified" as described above, cutting accurate, tight-fitting joints was accomplished with one setup at the RAS. The lower horizontal rails were located so that when resting on the four legs, the casters would be ¼-inch off the ground. When I lift the handles, the legs leave the ground and the cart rides on the casters. Rather than having to lock a set of casters, all I do to firmly locate my cart is set it down on the legs. Even I can remember to do that! I made the actual work surface from a scrap of very-weathered ¾-inch plywood, rescued from the bed of an open pickup truck. I cut two pieces to size and screwed them to the framework. I had added a cross brace running side-to-side in the center to support the seam in the top pieces and stiffen the overall work surface.
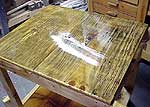
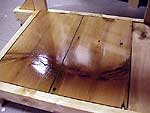
I added a simple lower shelf for additional storage, cut from an old piece of barn board I had sitting around that was not long enough for other projects. One pass through the surface planer to clean it up and it not only fit the job, but surprising things happened when applying finish. More on that later. With the framework assembled, glued and screwed, I permanently attached the work surface and the lower shelf. Since this was to be a simple shop cart, I spent less than my normal inadequate time prepping the wood for the application of the finish. I also ran a ¼-inch round over bit over all exposed edges. The entire cart was given a hopelessly brief sanding, blown off with an air gun and lightly dusted with a piece of dry cloth found laying on the bench. Again, this is shop furniture and I did not want to spend lots of time making it pretty. I knew what I would be doing to it in the near future. In the spirit of using up leftovers, I rummaged through my finishing supplies cabinet and discovered a pint of Minwax Helmsman Spar urethane. I apparently had purchased this can for some long-forgotten project, but never used it. With the cheapest foam brush I own, I began slopping the Spar urethane on the cart. The instructions say to wait at least six hours before applying a second coat and when I came back several hours later, I was shocked to see a deep, clear gloss on much of the cart. I was more than a little intrigued by the potential finish and decided to follow the directions on the Spar urethane can a little. When the first coat had dried completely, I gave it another hopelessly inadequate sanding, blew it off with the air gun again and wiped it down with that same dry rag. I applied two more coats of the Spar urethane with more cheapo foam brushes and was astounded to see the mirror-like finish hours later. The biggest surprise came when the urethane was applied to the barn boards. A single pass through the planer had revealed what appeared to be rather attractive, tight-grained (northern?) pine. With the finish applied, this wood took on a deep reddish color that came to life and shined like fine furniture. When completed, my shinny new mobile cart became a welcomed addition to my shop. I now can use my jointer or planer without taking my RAS out of service. I also can use the sturdy surface for other operations. The ease of moving it about means it is never in the way when I do not need it. My best work is often accidental, and this project failed to vary from that trend. Do you have a comment about this page? - Email Me!
|

All written, photographic and drawn materials are property of and copyright by NewWoodworker.com LLC 2000-2019. Materials may not be used in any way without the written permission of the owner.