
This is a Veteran Owned site
| |
||||||||||
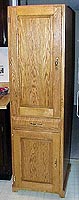
Oak Chimney CupboardText & Photos by Tom Hintz During one of our mandatory weekly New Yankee Workshop viewings, Norm Abram built a chimney cupboard that instantly went to the top of my to-build list. Kitchen storage space is always an issue and this cupboard represented a partial, but attractive cure. Since our plan is to rebuild the kitchen cabinets in oak, the chimney cupboard became the first part of that transition. Norm's chimney cupboard was made of old pine with features true to the original. Our version was modified to fit our situation, but the basic idea of a stand-alone, tall and relatively narrow cabinet remained. The carcass is made from ¾-inch-thick (23/32nds in the real world) two-sided red oak plywood. Two permanent shelves and the top were set into ¼-inch-deep dados. The lower permanent shelf is four inches above the floor and the center shelf 37 ½ inches below the top.
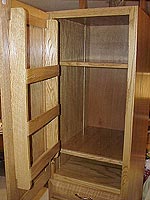
A drawer was added to the design so a frame made from tongue-and-grooved ¾-inch-thick pine was also set in ¼-inch-deep dados. Full extension drawer slides were centered between the middle shelf and the frame below it. The drawer, made from ½-inch-thick pine is 3 ¾-inches-deep, 17 ¼-inches wide and 22 ½-inches deep. All four corners are joined with half-blind dovetails. The ¾-inch-thick oak drawer front is glued and screwed to the case. The drawer front is "raised" with the same bit used to make the door panels. To insure versatility, metal adjustable shelf supports were let into a pair of 5/8-inch-wide vertical dados in each of the sides. The shelves were also made from ¾-inch-thick oak plywood. The front edge of each shelf was covered with a one-inch-wide solid oak nosing, rounded top and bottom with a ½-inch roundover bit. All three shelves are 18 1/8-inch wide. The bottom compartment shelf is 23-inches long but the shelves for the top compartment were cut to 20 ¾-inch lengths to clear a door mounted spice rack. The actual reduction in shelf space is minor compared to the amount of space freed up by the new spice-bottle storage.
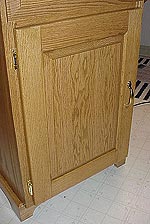
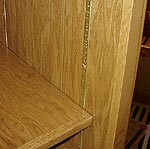
The rear of the cabinet is enclosed by a sheet of 5/32nd lauan plywood, let into a ¼-inch-deep rabbet. The top and permanent shelves were cut to be flush with the rabbet so the back could be glued and nailed to their rear edges for additional strength and stability. The face frame is made from ¾-inch-thick by 1 ½-inch-wide oak with mortise and tenon joints at the intersections. The face frame fits flush with the cabinets outer sides and overhangs the inside by ¾-inch. The raised panel doors are made from solid ¾-inch-thick red oak. Three boards were glued up, reinforced with biscuits, to make the panels. The rails and stiles are 3-inches-wide and machined with my Jesada kitchen cupboard bit set. After assembly, the outer edges of the doors were eased with a ½-inch radius round over bit. The top door is 37 ½-inches tall and the bottom door 24 1/4-inches tall. Both are 17 ¾-inches wide. A solid oak spice rack is hung on the inside face of the top door. The three-shelf rack has 3/8-inch thick side panels but all remaining shelf components are ¼-inch thick. Self-closing polished brass hinges are used. Because the top door is so large, and carries the additional weight of the spice rack and it's contents, three hinges were used to mount it. The bottom door uses the traditional two hinges.
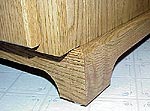
To finish and strengthen the bottom of the cabinet, a 3-inch-tall band of oak was fit to the front and sides. The corners are mitered, reinforced with biscuits and glued before being secured with screws from the inside. A one-inch tall cutout dresses up each of the bottom rail pieces. The cupboard carcass was cut out ½-inch beyond the oak band to hide it from view while retaining its full strength at each corner. The result is four distinct "feet" to minimize rocking should the floor be slightly out of level. To insure lateral stability at the rear edge of the carcass/banding I cut a pair of oak legs that form a 90-degree angle at the rear of the cupboard base. These were glued and screwed into place. After sanding and a final test assembly, the cabinet was taken apart and turned over to my wife Beth who handles the finishing of our projects.
Beth first applied one coat of Olympic Golden Oak (#41554) oil based stain. The stain was left on the wood for approximately 7 minutes, and then rubbed out with a cloth, dampened with the same stain. After the stain had dried thoroughly, Beth applied three coats of Olympic water-based clear semi-gloss (#42785) polyurethane, sanding lightly between coats. The cupboard and parts were set aside for a day to allow the finish to harden. We then added the hardware and our new oak chimney cupboard was set in place. This chimney cupboard, with its oak raised panel doors, is one of the more challenging projects I have attempted. It also is a good example of how one of Norm Abram's New Yankee Workshop projects can be adapted to fit individual needs. The basic construction techniques Norm used apply and having seen it done by His Normness, made it easier to build. Sorry. Plans are not available for this project. Do you have a comment about this page? - Email Me! |
All written, photographic and drawn materials are property of and copyright by NewWoodworker.com LLC 2000-2019. Materials may not be used in any way without the written permission of the owner.