
This is a Veteran Owned site
| |
||||||||||||||||||||
Climb Cutting
Minimizing the dangerText & Photos by Tom Hintz Safety: Climb cutting always has been and always will be one of the more dangerous operations that can be done with a router. While there are procedures that can reduce the danger, climb cuts should never be taken lightly.
|
||||||||||||||||||||
 |
 |
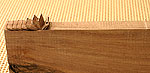
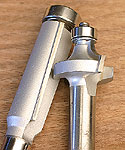
On the left is a classic climb cut situation. The bits rotation forces the cutter to try and lift the grain when the wood is moved in the normal right-to-left direction. Reversing the wood's movement allows the bit to cut more downward, reducing it's tendency to grab or lift the grain. The photo at right is of a normal trim cut, the bit cutting down, or with, the grain. Click images to enlarge |
|
What is a Climb Cut?
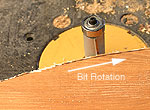
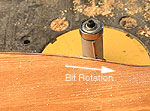
Note: If you are unfamiliar with reading grain direction, a necessary skill for this procedure, see my story, "Reading Grain," in the Tips & Tricks section of this site. Router bits are designed to cut against their rotation. Whether moving a hand-held router along a piece of wood or pushing wood into the bit of a router mounted in a table, working against the rotation of the bit provides resistance that gives you control over the wood.
A climb cut is when we reverse the feed direction, moving the wood in the same direction as the cutting edges are turning. The bit rotation no longer resists the movement of the wood but rather tries to accelerate it in the same direction you are moving it. If done incorrectly, the cutting edges of the bit can grab the material and eject it with tremendous force and speed.
The Consequences
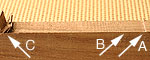 |
Anatomy of a climb cut: "A" is where the bit first began to grab. "B" shows the lengthening marks as the bit accelerated the piece. "C" is where the piece came out from under the last push pad and the bit was in full control. Click image to enlarge |
While damage to the wood is likely, that is the least of your worries. When the wood is ejected, it essentially disappears, leaving your hands dangerously close to a spinning router bit capable of causing devastating damage almost instantly. Compounding this danger is that the force you had been applying to control the wood can cause your hands to lurch towards the bit when the wood is ejected.
If adequate protection in the form of quality push pads or similar devices are not used, your hand can easily contact the cutter. In situations like this, there are few small injuries.
Bits and Climb Cutting
 |
I will only make a climb cut with a straight cutter like the one on the left. Cutters with any kind of shape, like the roundover bit on the right, mean you can't reduce the amount of wood to be trimmed to a safe level. Click image to enlarge |
The shape of the router bit has a lot to do with the decision to make a climb cut or not. I personally will not consider a climb cut using anything but a flush-trim or other straight-sided bit equipped with a bearing that limits the depth of cut to 1/16" or less.
Many straight bits have slanted or spiral blades designed to produce more of a slicing motion, reducing their tendency to chip and tear the wood. While they are effective, they do not eliminate the chances of a kick out during a climb cut and demand the same level of caution.
Bits with any kind of shaped cutter are not candidates for climb cuts in my shop. Very often, cutters with curved or shaped cutting edges can be used against the grain, taking a series of light cuts, without chipping and tearout problems. Those same edges in a climb cut mode will almost certainly bite into the wood and eject it.
Best Technique - Avoidance
Obviously, the best way to eliminate the danger of a climb cut is to avoid it in the first place. In many cases, there are alternatives.
When routing symmetrical patterns, very often the down-grain side can be routed, the piece turned over, the template re-installed and the remaining portion routed, also in the down-grain mode.
In cases when repositioning of the pattern was not possible, I have routed the down-grain side and then moved to my drum sander (a spindle sander also works well) to finish shaping the piece. It takes longer, and requires considerable care to avoid damaging the
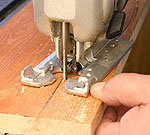 |
Using a band saw or jigsaw, remove material as close to the layout line as you can and still leave just enough for the trim bit to clean up the surface. Click image to enlarge |
template, but the end result can be just as good as with the router, and much safer.
Preparation is the Key
To make a climb cut with any degree of safety, it is crucial to eliminate as much of the waste material as possible before going to the router table. The amount of material being cut has a direct relation to how difficult it is going to be to control the wood during a climb cut.
Those who are practiced with a hand-held jigsaw or a band saw can use those machines to remove waste very close to the layout line. Ideally, there should be a maximum of 1/16" of wood to be removed with the router bit.
If you are not comfortable cutting that close or if your machine is not quite accurate enough to do this reliably, cut as close as you can and then use a drum or spindle sander to reduce the remaining material outside the layout line to 1/16" or less. Because the router will clean up the edge, aggressive-grit paper can be used to help speed this portion of the operation.
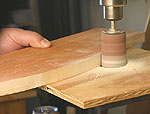 |
A drum sander works very well for bringing an edge close to the template. Click image to enlarge |
The most important part of this procedure is to be sure the edge created during trimming is square. There has to be enough material for the router bit to clean up the whole edge - no more, no less. For this reason, I favor doing the final material removal with my drum sander in the drill press, with the table adjusted to exactly 90-degrees to the drum. Some jigsaws (and jigsaw blades) can cut at an angle when you least expect it. If that angle runs towards the layout line, it can remove material beyond the path of the router bit and ruin the edge.
Safety and Control
I have tried many different devices meant for use on the router table to control wood and keep fingers safe. To me, the best are the rubber-bottomed push pads with elevated handles more commonly used on the jointer. To me, these pads get a better grip on the wood than I can with other devices, including my fingers.
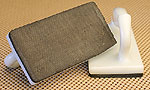 |
Push Pads like these give a better grip on the wood and with the tall, offset handle, keep your hands away from the cutter. They aren't perfect, but far better than using your fingers. Click image to enlarge |
An important feature of these push pads is the distance and material they put between your fingers and the cutter. If things suddenly go wrong, I would much rather tear up my push pads than my fingers.
Smaller pieces are most dangerous to climb cut because they are more difficult to control. Very often, the profile that needs routing can be done on a larger piece of wood, and then the final piece cut from the board. Consider doing this even for normal routing procedures to increase their safety.
Bit Speed
Following the bit manufacturers recommendations on bit speed is always necessary for safety and performance. When it comes to climb cutting, speed can be especially important.
Running a bit too slowly reduces its cutting effectiveness and can make it "grab" more easily. Turning a bit at excessively high speeds can cause the bit to vibrate, increasing the chances of it "grabbing" and starting a loss of control. This vibration may not originate solely from the bit but rather be a combination of the bit, play in the router and in the mounting to the router table itself. Individually the amounts of runout or play may be within specification, but when combined, a serious vibration can result.
I have found that long bits, especially those with cutter lengths in excess of two inches, are more prone to vibrate at higher speed settings. While this is probably due to the same combination of factors described earlier, it can occur at speeds within the manufacturers range of recommended settings.
To identify this vibration, I start the bit at the lower end of the recommended speed range and then slowly increase the speed. Often as the higher speed limits of the bit are approached, I can hear and feel a small vibration begin. Slow the speed setting until the bit "smooths out" and use that speed for routing.
Note: If you have to slow the bit below the manufacturers recommended settings, there could be a problem with the bit itself, the router or how the router is mounted in the table. Investigate those problems and make repairs as needed before trying to make a climb cut!
Making the Climb Cut
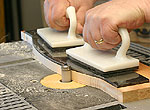 |
A good set of push pads with rubber soles makes handling pieces on the router table far easier, and safer. Click image to enlarge |
Control, Control, Control
Reducing the amount of wood to be cut as described in the earlier steps helps limit the cutting forces generated during a climb cut. However, maintaining a solid grip on the wood remains crucial. Using a good pair of rubber-bottomed push pads not only keeps your hands away from the cutter, they give you a better grip on the wood.
Make sure that no one is standing where the wood may go if you lose control. It is also wise to turn your router table so that there are no windows or other breakable objects in the possible "launch" area. If the wood is ejected, it usually does so with considerable force.
With the router bit properly adjusted so the bearing is squarely on the template, start the router and let it come up to full speed. Place the push pads on the material so the rubber pads have the maximum contact with the wood or template if it is on top. Remember that little pressure is needed to keep the wood in contact with the bit but considerable force will be necessary on the push blocks to maintain control of the wood.
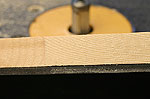 |
As you can see, the finish left by a climb cut is not perfect, but is close to it. The amount of sanding to smooth this surface out is minimal. Click image to enlarge |
Slowly move the wood to the bit, letting the bit cut the wood away rather than forcing the wood into it. Once the bearing is against the template, slowly move the wood left-to-right along the bit, again letting the bit cut its way through the wood. If you try to go any faster, the bit will take a bite and loss of control is almost certain.
Some like to make climb cuts in small sections rather than one long cut. Often short cuts let you keep the push pads in the optimum position. Never try moving the push pads on the material during a cut! If you feel uncertain at any time during a cut, pull the wood away from the bit and reposition your push pads or the wood so you feel more comfortable.
Be careful when nearing the end of the board or the end of the area you are cutting. If there is an edge at the end of the cut or a change in grain direction, it is safest to stop routing just short of that point and finish it with hand tools.
No Guarantees
If you make climb cuts long enough, a failure during that procedure is all but certain. Hidden weaknesses in the wood itself can cause it to split even when the climb cut is done correctly. It is also very easy to have a momentary loss of concentration, allowing the bit to grab and eject the workpiece. Making a climb cut is not an operation to try if you are tired or otherwise distracted.
Climb cuts can be accomplished with relative safety if the piece is prepared correctly, the bit is very sharp and good push pads are used. However, there is always some level of risk. You can minimize this risk by being aware of it and taking necessary precautions before making the cut.
With the array of tools available to us, there may be another way of forming the wood in place of the climb cut. Often those alternatives require more time and effort, but if you feel safer, they should be your first choice.
Resources
Do you have a comment about this page? - Email Me!
All written, photographic and drawn materials are property of and copyright by NewWoodworker.com LLC 2000-2019. Materials may not be used in any way without the written permission of the owner.