
This is a Veteran Owned site
Craftsman Clock PlaqueText, photos & design by Tom Hintz
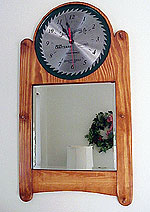
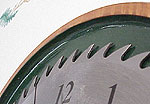
A while ago, my wife gave me one of those Craftsman (Sears) clocks, made from a replica 10-inch circular saw blade. Since then, I have been trying to decide the best way to display it. Just hanging it on the wall, as was the original design intent, was an option. Being a woodworker with a shop full of equipment, I felt obligated to explore more creative ideas. Finally, I realized that there were two things many woodworkers lack. First is a reality-based concept of the passage of time. Once in the shop, many of us lose ourselves in the glee of woodworking, with promises of "just an hour or so" fading quickly from our consciousness. I also realized that most woodworking shops lack a good mirror in which we can take stock in just how cute we woodworkers tend to be, especially with a fine coat of oak dust highlighting our striking facial features. As I entered the design phase I pulled out my very best scraps of southern yellow pine, the clock and a 12 X 12-inch beveled mirror originally cast aside because of a small chip in it's edge. An uncharacteristic burst of creative thinking resulted in a unique, somewhat useful, and cheap addition to my project list. I knew the clock would have to be inset somehow. The edges of the mock-blade face are rather sharp. Since I am able to nick myself with objects commonly thought incapable of inflicting such injury, shrouding the clocks teeth safely within some form of smooth frame would reduce the chances of future blood-letting on my part as well as look cool. Recently we had rescued a circle cutting router attachment from the closeout bin at Lowe's. I realized that this tool, in conjunction with a never-used cove bit, could be the start of an attractive presentation for the clock. After gluing up a blank, I laid out the necessary circles. I attached my circle-cutting band saw attachment (made from the ShopNotes plans) and cut the top half-round section of my panel. Then I routed a half-inch-deep cove in a full circle, one-half-inch inside that. I like common dimensions in projects. Then, switching to my half-inch straight-cutting bit, I plowed out the rest of the material within the circle. The depth? One-half inch of course! A little work with the random orbital sander and my recess was nearly complete. Adding a square cutout in the center of the plowed-out circle to accept the clock mechanism completed the recess portion of the project. Next, I cut stiles, rounded both ends with the above-mentioned circle-cutting fixture, and then attached them to the sides of the primary blank with glue and biscuits. I cut the bottom rail to complete the mirror surround, with an arch on the bottom edge to make someone, somewhere think Gustav Stickley may have had something to do with the project. As an afterthought, I ran the bottom rail through my thickness planer, thinning it sufficiently to produce a nice shadow line where it met the stiles. With all these pieces glued and biscuited, I routed a 3/8 X ¼ inch rabbet in the back of the mirror surround for the Luan plywood mirror backing. With everything assembled, sanded, rounded over and generally massaged, I added the shaker pegs on which I probably won't hang anything and sent the piece on to the finishing department; my wife. The wife applied stain, clear gloss polyurethane and coated the recess area with a deep forest green enamel. When the finish had dried I squeezed liberal amounts of mirror adhesive onto the surfaces beneath the mirror and clock, then pressed both in place, aligning them in their recesses. I then set the completed assembly aside to wait the prescribed 36 hours for the mirror adhesive to cure. Less than 24 hours later (I do not wait well) the clock was hanging on the wall. The result is quite impressive to me, and hopefully some of you. Not bad for a spur-of-the-moment creation out of the scrap bin! Do you have a comment about this page? - Email Me! |
All written, photographic and drawn materials are property of and copyright by NewWoodworker.com LLC 2000-2019. Materials may not be used in any way without the written permission of the owner.