
This is a Veteran Owned site
| | ||||||
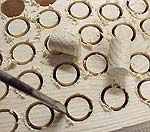
Plugging Countersunk Screw HolesText & photos by Tom Hintz I have always been nervous about drilling countersunk screw holes in a nice piece of wood. At first I used putty to cover them, often having to redo the putty several times before it stopped shrinking, cracking or wrinkling at the surface. Finally, I decided to drag myself into the modern times, get a plug cutter set and give that a whirl. Of course, now I wonder why this bit of brilliance took so long to overcome me. Plug cutters are cheap, last forever (as far as I can tell), and provide you with an essentially free source of plugs that match your project wood exactly, because it IS your project wood. You only need remember to use a piece of scrap from the same project for this to work. If you have more screw holes than plugs, you may want to take a look at your fastening tendencies. A drill press is really needed for making plugs, but virtually any size press will do. One thing I have found is to keep the speed down. I like things happening fast, so my drill press was always set on the fastest speed, which is fine for sanding and some drilling. Cutting plugs is a different story. With the drill press humming away the plug cutter slices through pine like it is butter, but the heat build up from all that speed seizes about every other plug in the cutter and snaps it out of the surrounding wood. You can usually dig them out of the cutter, but the process is time consuming and often produces short plugs. I found that by slowing the drill press down (mine is set at 930 rpm) the plug cutter still plunges in easily, but leaves the plug attached to the wood, where it is supposed to.
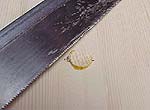
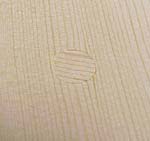
I also discovered that when snapping the plugs free of the donor wood, you have to use a tiny, flat-bladed screwdriver. Stick the screwdriver down in the cut and lever it against the plug along the grain. Snapping the plugs out across the grain tends to break them off higher up, giving you a short plug that may or may not work. I try to make sure my screws are sunk between 1/4 and 3/8-inch below the surface to allow the plug to seat well. I have successfully plugged shallower holes, but it seems 1/4-inch or a bit deeper works best. Apply a little glue around the small end of the plug, twist it into the hole with your fingers to get it started, and then rap it in with a regular hammer. I give them a little extra rap to make sure they are bottomed out, and expanded slightly. The seams between the plug and surrounding wood are always very tight. Let the glue dry completely, then saw off most of the excess plug with a dovetail or similar saw. I used an old razor saw but upgraded to a nice Japanese-style flexible saw that works great for this. You can use a belt sander to flatten the rest of the plug out, especially if they are cut from hardwood. With soft woods such as pine, a random orbital sander with 100-grit works well also. Check for voids around the plugs and fill if needed, then sand and finish as usual. I have been tempted to install the plugs with their grain matching that surrounding the hole but doubt they will be totally invisible. I install the plugs randomly so people will notice what a cool job I did getting them to fit so nice. Do you have a comment about this page? - Email Me! Back to the Tips & Tricks List
|

All written, photographic and drawn materials are property of and copyright by NewWoodworker.com LLC 2000-2019. Materials may not be used in any way without the written permission of the owner.