
This is a Veteran Owned site
Storage Case for the Leigh D4 Dovetail JigProtecting an investmentText and photos by Tom Hintz The Leigh D4 dovetail jig is made up of many pieces that provide its extensive capabilities and dictate a fairly large overall size. Many of those pieces could easily be damaged if the jig was accidentally knocked from its storage place or struck by a falling object. To protect my investment in the D4 I needed a way to store it safely when not in use. Like many hobbyist woodworking shops, mine has no free cabinet or shelf space that would store the D4 safely. The only real option was to custom-build a case for it. DesignThe primary design consideration for this case was to enclose the entire jig in ready-to-use form, including the 36 X 7 ¼ X ¾-inch poplar clamping board to which the jig is bolted. I also wanted to include storage for related bits, collets, tools and other accessories used with the Leigh D4.
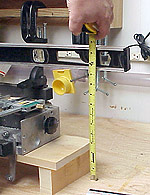
The case was designed to afford approximately ½-inch of free space between the outer edges of the jig and the inside of the case. I began by measuring the distance from the bottom of the clamping board to the bottom of the vertical side stops. I cut blocks 2 ¾-inches tall and 6 ½-inches long that would become the primary mounting points within the case. I placed the blocks on my bench, and then set the D4 on them. Holding a level set across the upper clamp handles, I measured the distance to the bench surface, and then added ½-inch to insure clearance inside the case. The way I have my D4 set up on the clamping board, it is flat on its rear surface. I laid the jig on its back, placed the level across the front clamping handles and again measured to the bench surface, adding ½-inch. The clamping board extends beyond either side of the jig so the overall width was set to allow a small amount of clearance on either end of it. These measurements gave me final inside dimensions for the case of 36 ¼-inches wide, 12-inches high and 12 ¾-inches deep. Keep in mind that how the clamp handles are adjusted and the size of the clamping board (if one is left in place) affects these dimensions. Measure your jig to arrive at the proper dimensions. Building the Case
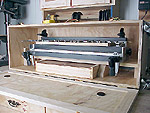
The top and bottom panels of the case were cut to 36 7/8-inches long and 13 ¼-inches wide out of 9/16-inch plywood. The end pieces are 13 ¼-inches square and the back, which is set into dados on all four sides 36 ¾ inches long and 12 ½-inches wide. Again, your dimensions could be different. Be sure to measure your jig and use those dimensions! Dados ¼-inch-deep and 9/16-inch wide were cut in three sides of each end panel. The uncut side of each would face forward. The top and bottom panels had the same size dados cut along the rear edge only to accept the rear panel. The case was assembled using glue and secured with my finish nailer shooting 1 ½-inch-long nails. I checked the case for square and set it aside to let the glue set up. After the glue dried, I drilled and counter-sunk for 1 5/8-inch-long drywall screws along the dado joints for added strength. The glue and nails are probably more than sufficient, I just like the peace of mind adding the screws gives me. A simple tongue and groove door was made to fit the front, using ¾-inch-thick ponderosa pine for the rails and stiles and ¼-inch-thick plain plywood for the flat panel. Fitting Out the InteriorI glued and screwed the mounting blocks cut earlier inside of the case, against the end caps. Another set of blocks, 2 ¾-inches high and 9 ½-inches long were added, spaced 17 1/8-inches apart, equally splitting the center of the case. This second set of blocks provides extra support for the jig itself and frames the area for the accessory box.
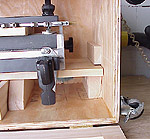
The jig was set into the case for final fitting. I cut two more blocks 2 X 6 ½ X ¾-inches and installed them directly above the edges of the clamping board, spaced up with 1/8-inch-thick shims to be sure the jig would slide in and out easily. Accessory BoxAfter looking at the manual and other pieces I would store in this box, I decided to make it 2 11/16-inches tall, 17-inches wide and 12-inches deep, front-to-back. The Leigh jig was used to cut half-blind dovetails at all four corners. I cut dados sized to accept luaun plywood for the top and bottom. The bottom floats in a closed dado but I wanted the top to slide out for access to the contents. I cut the upper dado identical to the bottom one, and then nibbled the wood away above the lower edge of this groove on the front piece only so the lid could slide in and out. A ¾-inch hole was drilled near the front of the lid to provide a finger-hold for opening.
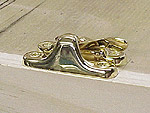
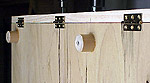
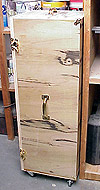
Unconventional HardwareOriginally, I planned to use a pair of wire hoop hasps to hold the door closed. When I went to the Lowe's near my home, I discovered they had no such hardware. Not wanting to wait to order these little pieces, I settled on a pair of brass-plated window locks. I know what you are thinking, but they work, were cheap and they were in my hand. I also picked up four 1 X 2-inch brass hinges, a pair of four inch brass handles and brass corner protectors. One handle was attached at the center of the top when the case is on its wheels and the other on the top when it is lying on its side. To make it easier to open the door with the case lying on the bench I had to elevate it a bit with some kind of feet. Again, the local outlets failed me as I could find nothing that seemed appropriate. Back in the shop, I discovered a length of 1 ¼-inch diameter poplar dowel. I beveled one edge at my sanding center and then moved to the band saw to slice off a one-inch length. I pre-drilled and countersunk one hole at the center of each leg, then repeated this process to produce six legs. Glue was applied to the bottom of each leg and a screw run through to secure it to the bottom of the case. To complete the case I added felt bumpers originally intended to protect the bottom of furniture legs. They are self-adhesive and available locally. These pads are placed so the clamping handles bump them rather than the wood inside of the case should the jig move around during handling. I also stuck a pair of these bumpers to the rear of the case to provide cushioning there.
This case, with the jig and accessories inside, is rather heavy. I wanted it to be easy to move around the shop while standing on end so a set of 2-inch-tall casters I had laying around were installed on the bottom end. The Case in UseSince building this case, I have come to appreciate it more and more. It is easy to roll around the shop and takes up just over one square foot of floor space. Having everything except the router in one case is nice, but the secure feeling of knowing my expensive jig is protected from most kinds of accidental damage is the best feature of all. See my story on the Leigh D4 dovetail jig - GO Also, Tips for using the D4 dovetail jig - GO Do you have a comment about this page? - Email Me!
|

All written, photographic and drawn materials are property of and copyright by NewWoodworker.com LLC 2000-2019. Materials may not be used in any way without the written permission of the owner.