
This is a Veteran Owned site
| |
|||||||||||
Checking Table Saw Alignment
Simple Tests Can Keep You Happy and Safe.Text and photos by Tom Hintz Note: I intentionally do not provide specifications in this story. Woodworkers must use the specifications and techniques recommended by the manufacturer of their particular equipment. If specific alignment tolerances were not provided in the documentation accompanying your machine, contact your manufacturers technical department and get them. Guessing, or using other specifications could lead to a dangerous situation.Checking the alignment of your table saw is an important part of regular maintenance that will help insure good results, and safe operation. Whether you use our shop-made dial indicator jig or some other design, the procedures are generally the same. If there are differences between the procedures described here and the instructions from your dial indicator or saw manufacturer, always follow their advice. They may have specific reasons for doing things in a specific way or order. Checking Blade AlignmentThere are two measurements we are most interested in at the saw blade; run out and parallelism. Run out is how true the blade itself and the arbor to which it mounts tracks as the assembly turns. Parallelism indicates how the blade relates to the miter slot. Run Out
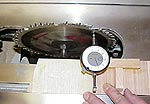
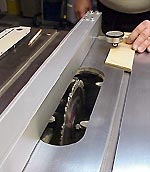
I start by checking blade run out because if the plane on which the blade spins is not consistent we need to know that, and consider it when checking parallelism. This test also indicates something is going wrong with the blade or arbor if the run out changes between checks. Set the dial indicator at one edge of the blade, just inside the gullets and zero the dial. Carefully turn the blade (with a piece of wood) through several revolutions, noting the maximum amount of variance indicated during each revolution. Be very careful when turning the blade as it is easy to accidentally apply side pressure the to the blade and render the dial indicator readings useless. I generally turn the blade through three or four revolutions to make sure I did not accidentally deflect the blade while turning it. My SystiMatic blade and arbor indicated less than 0.002-inch total variance (within tolerance for this Jet saw) over a complete revolution during this test. That is the same as the last time I checked it so I can safely assume the blade and arbor have not been damaged.
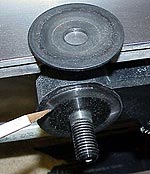
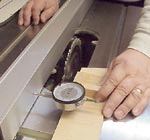
If your test shows run out, remove the blade and clean both washer flanges and the center of the blade. Very small amounts of sawdust or other debris trapped between these parts can cause the out-of-line condition. Reassemble and check it again. If the run out is in excess of that allowed by your saw manufacturer you need to check the arbor itself to see if it is bent. Also, closely inspect the washers to be sure one of them has not been damaged. If there is no evidence of problems with the arbor or washers, try a different blade. If run out returns to acceptable limits with a different blade, you must assume the other blade has been damaged. Contact it's manufacturer to see if there is anything that can be done to repair the blade, or replace it. Do not run a blade known to have excessive run out! Blade ParallelismSince it is very rare to find a blade/arbor combination with zero run out, it is necessary to eliminate run out when measuring parallelism. The easiest way to accurately check parallelism is to use one point on the blade throughout the test.
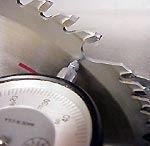
Mark a point at one of the gullets nearest to you, place the dial indicator at that point and zero the dial. Rotate the blade so the mark is on the far side of the table and move the indicator to the same mark in its new position. The reading on the dial indicator shows how far out of parallel your blade is. If the blade parallelism is out of alignment in excess of your manufacturer's specs, follow the instructions for your saw to correct it. On most saws, there are large bolts that secure the arbor assembly to the underside of the table. In most cases these bolts are loosened and the assembly moved to align the blade to the miter slot. When the blade is perfectly parallel, tighten the bolts and re-check to be sure the assembly did not move. It is important that you use the procedure prescribed by your saws manufacturer for checking and adjusting parallelism. While most saws are similar in this regard, there could be small differences that require a specific procedure. Don't guess! Check your manuals or contact the saws technical department. They all have them. Checking Rip Fence ParallelismAlignment of your rip fence is both easy to check, and very important to your safety. Considering what we do with rip fences, we need to check them regularly regardless of what you paid for it, or the name on it. If something happens to throw the fence out of alignment, the next piece of wood you push along it could become a projectile coming your way.
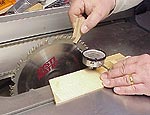
Some manufacturers want the rip fence parallel to the blade/miter slots while others tail the fence out (away from the blade) slightly at the back of the saw. Whatever your manufacturer prescribes, follow those specs, and the procedures to arrive at them. Take the time to read and understand these instructions! One of the things I like about my shop-made dial indicator jig is how easy it is to check the fence alignment. Insert the jig in the (left) miter slot close to the front edge of the table, move the rip fence over until it compresses the indicator's plunger about half way and lock the fence down. Hold the indicator jig firmly in place and zero the dial. Slide the indicator down the length of the rip fence and note the reading at the far end. If the reading at the far end of the fence is outside the manufacturer's specs, make the necessary adjustments before plugging your saw in again. Usually these adjustments are fairly simple. Another thing to check for if your rip fence is out of alignment is sawdust or other contamination in the fences locking system. Even a tiny piece of debris under any of the locking mechanism parts will be compounded over the length of your fence. The result can be a dangerous misalignment. With the clamping mechanism and it's mounting rail clean, reassemble the fence and perform the test again. If the misalignment persists, adjust the fence and re-check until you get it within the manufacturers specifications. Once you become familiar with these tests, they can be accomplished very quickly, with accuracy. Keeping your saw aligned properly is not only a safety issue, it helps keep it performing at it's best. See our story on building the dial indicator jig - Click Here Do you have a comment about this page? - Email Me! Back to the Tips & Tricks list
|
All written, photographic and drawn materials are property of and copyright by NewWoodworker.com LLC 2000-2019. Materials may not be used in any way without the written permission of the owner.