
This is a Veteran Owned site
Installing Adjustable Shelf PinsConsistency Is KeyText & Photos by Tom Hintz Adjustable shelving is a common feature of virtually any type of cabinet and a simple way to increase the versatility of the project. Drilling the cabinet sides to accept the pins that support the shelves is easier than you might think. The most important part of the process is being consistent. Since each shelf is supported by a pair of pins at each end, the holes must be level for the installed shelf to be level. The good news is you can handle this task with basic equipment in a minimal amount of time.
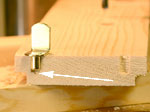
Drilling OptionsThe goal of drilling is to produce holes that are accurately aligned to each other front to back and equally spaced vertically. In addition, the holes must fit the pins closely, be 90-degrees to the side and deep enough for the pin to seat fully. While a hand-held drill can be used, it must be held exactly 90-degrees to the surface and very steady to avoid increasing the diameter of the holes. If the holes are not precise, the pins will hang and the shelf will rock or tilt. Using a drill press is by far the easiest way to eliminate nearly all of these problems. Even the most basic drill press is capable of drilling shelf pin holes quickly and accurately. I have drilled shelf pin holes with a 10", benchtop press for years with no problems.
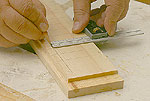
JigsManufactured jigs that vary widely in price and capabilities are available for drilling shelf pin holes. Common pegboard can be used to build a drilling jig but has liabilities as well. If the cabinet has a recessed back panel, two jigs may be necessary. In addition, pegboard is very soft and the holes easily enlarged during drilling, greatly reducing accuracy. LayoutA very accurate layout can be drawn quickly using a simple combination square and a sharp pencil. Creating a simple grid on the cabinet sides makes drilling an accurate set of holes easy, particularly on a drill press. The pins should be set in from the edges of the shelf sufficiently to limit their visibility while maximizing support. Set the blade of the square to locate the forward line of holes and draw that line on both cabinet sides, top to bottom.
Because most cabinets have a rabbet that recesses the back panel, the rear line of holes must be set in from the edge of that rabbet. With the square adjusted as needed, draw the line for the rear line of pins on both cabinet sides. Start laying out the horizontal lines by finding the vertical center of the cabinet sides and drawing a line across the width making sure to cross both vertical layout lines. The vertical spacing between the rows of holes can be whatever you like but I find ¾" works very well. This also is the width of the blade on most 6" combination squares. Using the blade itself to space the lines of holes makes this part of the layout fast, simple and all but goof-proof.
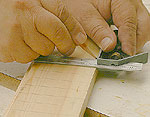
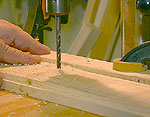
Align the edge of the blade to the centerline and draw a line along the other side of it. Move the square down, register the blade with that line and repeat the process until you get close to the end of the cabinet side. Go back to the center and draw lines on the remaining half of that piece. Do the same on the other cabinet side and the grids will match. The holes can be run as close to the ends of the cabinet sides as you like but be realistic. It is unlikely that a shelf will be placed within 2 or 3-inches of either the top or bottom of the cabinet making pin holes in those areas unnecessary. DrillingNote: When using a manufactured jig, follow the directions that came with it. Install the appropriate-sized brad point bit for the shelf-pins into the drill press. Place one of the cabinet sides on the table and lower the point of the bit, aligning it with the center hole location. It doesn't matter if you start with the front or rear line of holes.
Sink the point of the brad point bit into the wood where the layout lines cross, marking the location of a pin hole. Square the workpiece to the table before clamping a piece of wood to the table against its rear edge to act as a fence. Set the depth stop to produce holes approximately 1/16" deeper than the pins require to insure they will install flush against the sides. Slide the board along the fence, aligning the fine tip on the brad point bit with the layout lines. Carefully drill all of the holes in that line on both cabinet side pieces. Adjust the fence for the remaining line of holes and repeat the procedure to finish both cabinet sides. After all of the holes have been drilled, you can finish sand the inside faces of the cabinet sides, cleaning up the edges of the holes and removing the layout lines in the process. Simple tools and procedures can produce shelf pin layouts equal in accuracy to a jig without sacrificing versatility. All that is required from you is a little time and attention. |
||||||||||||
Do you have a comment about this page? - Email Me! |

All written, photographic and drawn materials are property of and copyright by NewWoodworker.com LLC 2000-2019. Materials may not be used in any way without the written permission of the owner.