
This is a Veteran Owned site
 |
|||||||
| | |||||||
Routing On The Edge
A very simple jig makes a very hard task very easy!Text and photos by Tom Hintz
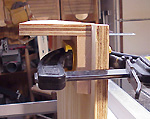
A common way to help this situation is to clamp two or more boards together to increase the available surface to help stabilize the router. This poses its own problems in that if the boards are not perfectly aligned, the mortise can be cut unevenly. Each board added to the stack increases the opportunity for error. As is usually the case, the answer is simple -- build a clamp-on surface that makes the router think we are working on the side of the board rather than the edge. ConstructionMost important in the construction of this jig is using boards with square edges and flat faces. Usually the length needed is relatively short, often in the 24"-long range. With most router bases, a stock width of 3" handles the job easily. The other piece, used as a gauge to align the jig, has to be 5 or 6" wide and 12 to
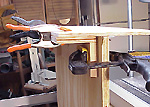
18" long. The relatively small dimensions mean you should look in your scrap bin before running out to buy new wood. Trim the edges of the jig pieces and cut to the length desired. Apply a little glue on one edge and nail the two jig boards together, forming a 90-degree angle. Make sure the edges at the joint are flush. As soon as the glue dries, you are done building. UseClamp the third board to the top surface of the jig so that it extends over the top of the board being routed. Use this board as a gauge to be sure the jig is aligned with the edge of the board being worked on. You could align the edges with a square and lots of patience, but this works better and faster. Make sure the alignment board is flat on the piece being worked on and then clamp the jig securely in place. The jig is now ready for use.
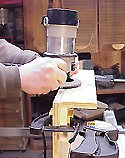
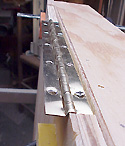
Because this jig mounts to the rear and is aligned evenly with the edge being routed, bit depth and fence adjustments are made normally. As always, make a test piece before cutting your stock. With the router fence and bit depth set, use a pair of hand clamps to attach the larger alignment board to the top jig surface, extending out over the work piece. Set the jig on the piece to be routed with the alignment board resting on the edge to be routed, then clamp the jig securely in place. Remove the alignment board and the jig is perfectly aligned with the edge to be routed. This jig allows routing the edges of boards just as easily as flat sides. The router base is fully supported on the back side making it much easier to make a consistent cut. This jig also saves time and increases accuracy because you can install, route and remove it in far less time than it takes to stack and align two or more pieces of wood. I have found this jig especially useful for making hinge mortises (piano and plate style). Make your version approximately 24"-long and it will handle the vast majority of your future edge-routing needs. |
|||||||
Do you have a comment about this page? - Email Me!
|
All written, photographic and drawn materials are property of and copyright by NewWoodworker.com LLC 2000-2019. Materials may not be used in any way without the written permission of the owner.