
This is a Veteran Owned site
Checking Framing Square Accuracy
Knowing it’s right, fixing it if it’s not
Text & photos by Tom Hintz
Framing squares are popular tools in woodworking for drawing layouts in addition to checking our equipment, tools and projects to be sure they are square. While most good quality framing squares are in fact square, we have to confirm that when new and occasionally thereafter to be sure damage has not compromised its accuracy.
A Simple Test
 |
 |
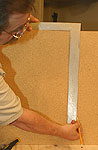
Drawing a square line (Left) and then turning the square to the other side and matching it to that line (Right) will tell you if the square is correct or not. Click images to enlarge |
|
The easiest way to check a framing square is to hang it on an edge of a piece of sheet stock with an edge known to be straight. I frequently use MDF (medium density fiberboard) as the factory edges are usually cut very accurately. The most common framing square used in woodworking has one 16”-long leg and one 24”-long. To maximize the accuracy of this test, place the shorter leg on the edge of the wood with the long leg hanging down.
Using the edge of the square as a guide, draw a line down the full length of the blade. Turn the leg on the edge of the plywood to the other side and carefully align the blade with the line. If the line is parallel to the blade over its full length, the square is accurate. If the line angles towards or away from the blade, the square is deformed.
Note: This test can be used to confirm the accuracy of any square, including combination and speed squares. However, errors in those kinds of tools are built in and there is nothing reliable that can be done to remedy the problem.
Repairing a Framing Square
 |
 |
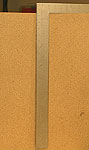
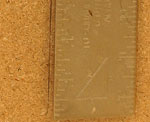
(Left) Unless something awful happened to the square, the amount of error will be small. (Right) Making a few dimples in the appropriate edge can correct small misalignments of a framing square. Click images to enlarge |
|
Note: The repair described here only works with very small errors. If the square is more than 1/16” off at the end of the long blade, I consider it junk and replace it. Thankfully, this level of error in a good framing square is rare.
To remove a small error from a framing square use a centerpunch and hammer to make dimples along an edge (about ¼” in from the edge) to expand the metal slightly. Making the dimples along the edge of the short (narrower) leg just makes sense, as there is less material (width) to resist the expansion.
If the square has to be opened up, moving the long leg further from the short leg, the dimples are made along the inside edge of the short leg, beginning where it meets the long leg. To close the square, make the dimples on the outside edge of the short leg directly across from where the legs meet.
Video Tutor! |
The number of centerpunches needed depends on the amount of error and how well this technique works on that square. Differences in metallurgy can make each dimple more or less effective. Start by making two or three dimples and check the square again, drawing a new line, to gauge progress. If more correction is needed, making additional centerpunch dimples ¼” apart along the same edge works better than deepening the first ones.
When the square has been repaired, it may be necessary to flatten tiny bulges on the edge where the dimples were made. A few strokes with a fine metal file should be all that is needed. All that is necessary is to remove the bulges, not file any length of the edge.
Buying good quality squares is the best way to insure their accuracy now and later. The techniques described here can save a slightly damaged square but when the amount of error exceeds 1/16” or so, its time to buy a new square and perhaps spend a few more dollars to get the good one. With a little care, that accuracy will benefit your projects for many years. Over 20 years ago I opted to buy the best framing square the hardware store had. That square is still used in my shop and is featured in the photos in this story. It remains perfectly square and has needed no corrections along the way. I consider that money well spent.
Have a comment on this story? - Email Me!
Back to the Tips & Tricks List
All written, photographic and drawn materials are property of and copyright by NewWoodworker.com LLC 2000-2019. Materials may not be used in any way without the written permission of the owner.