
This is a Veteran Owned site
| |
||||||||||||||
Reversible Glue Line Router Bits
Setup is the hardest partText & Photos by Tom Hintz Note: Most glue line bits are designed for use in table-mounted routers only. Using these bits in hand-held routers, unless specifically recommended by the bit manufacturer, is dangerous and can easily result in personal injury.
|
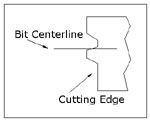 |
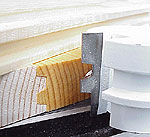
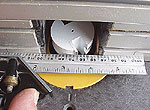
Using the real center of the bit is crucial. Click image to enlarge |
The key to setting up a glue line bit is aligning the vertical center of the bit with the center (thickness) of the wood being joined. The most common mistake is assuming the tooth-shaped portion of the cutting edge is itself centered on the bit vertically. The actual vertical center is usually at the middle of the upper angled edge of that tooth-like projection. See the illustration above.
If you have a good dial or digital caliper you can measure the full height of the cutting edge, divide that in half and set the caliper to that dimension. Hold the caliper with one jaw on the top edge of the cutter and note where the bottom jaw is located. Repeat the process, putting the bottom jaw on the lower edge of the cutter. The top jaw of the caliper should indicate the same spot as the lower jaw did. That spot is the vertical center of the bit and the point that must be aligned with the center of the stocks thickness.
Prepare the Material
As with any joint, the edges of the wood must be square and straight to get a clean joint. The profile cut by glue line bits is not intended to straighten crooked edges.
Joining boards of identical thickness is the only way to avoid extensive sanding regardless of the joinery method used. When possible, use a thickness planer to insure all of the pieces are the same thickness. If a planer is not available, try to cut the needed pieces from one board. Place the boards to be joined on a flat surface with their edges butted against each other. This will make it easier to choose boards that match. Some amount of sanding will always be necessary, but can be drastically reduced with proper stock preparation.
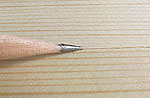
Marking the Stock Center
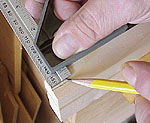 |
Whether using a single or bracket lines, keep them fine, and near the end of the wood. Click image to enlarge |
To align the bit precisely we have to be equally accurate when marking the center of the stocks thickness. Drawing a single mark that is perfectly centered on the thickness of the material is one option, but can be difficult to do accurately.
An alternative is making two marks that bracket the center of the stock. For many, aligning the centerline of the bit between the bracket lines is easier. The bracket lines form a kind of sight picture that seems to help some woodworkers perfect the alignment more quickly.
To make the bracket marks, use a very sharp pencil and a small (6" works great) combination square. Set the blade of the combination square to slightly less than half of the material thickness, hold the square on one face and make a mark. Move the square to the opposite face and make the corresponding mark. The
 |
Take your time aligning the bit to the marks. Accuracy saves time and wood. Click image to enlarge |
bracket lines should be separated by approximately 1/8". Drawing this bracket at the end of one of the pieces being joined (see photo above) makes it much easier to use the wood as a gauge for setting the bit.
Lay this gauge flat on the router table, with the bracket lines at the router bit. Adjust the height of the bit so that the center of the beveled portion of the tooth-shaped portion of the cutter is centered on the bracket lines. Sometimes it is easier to align the beginning and end of the beveled portion of the bit with the bracket lines.
Make sure that your eyes are level with the bit and board when making this setting to maximize the accuracy.
Setting the Fence
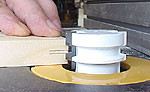
 |
Getting the depth right reduces the chances of ruining a straight edge. Click image to enlarge |
Note: Always follow the directions that came with your glue line router bit. The following procedure works on many brands, but you must be sure it is compatible with your particular bit.
Most glue line bits have a flat section in the cutter profile, usually at the top and bottom of the cutter. I have found the best results are achieved when this flat is even with the fence. I hold a straight edge across the bit and fence and adjust the fence until the straight edge is touching the bit and both sides of the fence with the cutter centered on its arc, closest to the operator.
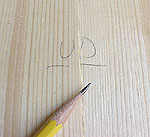
Ups and Downs
 |
This marking is the easiest way to prevent costly errors when cutting the profiles. Click image to enlarge. |
Centering the bit on the thickness of the material is necessary because one side of the joint is machined with the presentation face up and the other half face down. When accurately centered, the resulting joint requires little sanding.
Mark the pieces to be joined- one with a "U" for up and the other a "D" for down. This will help make sure they are machined correctly. These markings are especially important when gluing up several pieces to make a panel. Get in the habit of marking the pieces and you will save yourself wood and frustration in the future.
Adjusting the Setup
Note: When making test cuts, remember that you cannot re-cut an edge. Each test cut requires a fresh edge in order to be useful in checking alignment.
After setting the bit initially, make a test joint using wood with the same thickness to be used in the project. Make sure you have the pieces marked as described above. After cutting the pieces, lay them on a flat surface (both face up) and push the joint together. If there is a ridge at the joint line, the bit must be adjusted.
 |
Get the bit height correct and the finished pieces will be flush to each other. Click image to enlarge |
If the piece marked "down" is lower than the "up" piece, the bit is too low. If the "down" piece is higher than the "up" piece, the bit is too high.
When making bit height adjustments, remember that the amount of change is equal to one half of the ridge height. This means most adjustments are going to be very small.
After making a bit height adjustment, make another test cut until the joint is flat.
Gluing and Clamping
Joints formed with glue line router bits require the same glue and clamping procedures as most other types of joints. A consistent film of glue throughout the glue line profile will produce a very strong joint. The addition of biscuits or other mechanical reinforcement devices is not required.
When clamping, apply just enough pressure to close the joint. Excessive pressure may cause the assembly to cup, distort or squeeze too much glue from the joint line. Alternating clamps over and under the panel being glued or using cauls will help keep it flat.
Glue line joinery, a very old technique bolstered by modern bit technology, remains a very good choice in many woodworking applications. Far too many woodworkers fail to take advantage of this cost-effective technique because of the erroneous notion that they are difficult to set up. The reality is that, armed with a basic understanding of how these bits work, setup is both easy and fast.
The strength of a properly cut glue line joint is substantial while the visual impact on the finished product is virtually nonexistent. For raised panels and many other applications, where biscuits or dowels could be a liability, the glue line joint is an elegant alternative.
See this bit at Infinity Tools - Click Here
Do you have a comment about this page? - Email Me!
Back to the Tips & Tricks List
All written, photographic and drawn materials are property of and copyright by NewWoodworker.com LLC 2000-2019. Materials may not be used in any way without the written permission of the owner.