
This is a Veteran Owned site
The Easy Way To Mortise Hinges
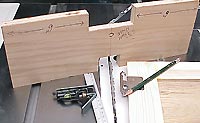
Less layout, more accuracyText and photos by Tom Hintz Mortising flat hinges into cabinet doors not only gives your projects a more finished look, the hinges are stronger. Snug fitting mortises support hinges, helping them resist "racking," or twisting under the weight of the door. Despite the benefits of mortising, too many woodworkers routinely surface mount flat-bladed hinges, often because previous mortising attempts resulted in ill-fitting or misaligned recesses. I was a charter member of the "surface mount brigade" until I came up with an easy way to make a template that ensures routing perfect mortises every time. Since hitting on this technique, I have made templates for every hinge I could find in my shop, and each produced mortises that appear to have been made by someone who actually knows what they were doing. This is new ground for me, and can be for you just as easily. The heart of this process is eliminating the need to measure and draw layout lines. Every line we draw increases the opportunity for error, and each additional line can compound the error from the previous one. Using a single trace line, then letting the kerf of the table saw blade add the router offset protects us from ourselves. If you have a table saw, a sharp pencil and a combination square, hinge mortising problems can be a thing of the past. Equipping the RouterTo use this procedure you need a router equipped with a ¾" OD guide bushing and ½" diameter flat-bottomed bit. This is a very common bit and bushing combination that many of you already have. This combination produces a 1/8" offset, the distance from the outer edge of the collar to the cutting edge of the bit. This process is based on that offset and will not work as described with a different offset. Making the TemplateI use ¾"-thick plywood for nearly all of my routing templates because of its rigidity, and to insure adequate clearance between the collar and workpiece. The template should extend a minimum of 6" to either side of the hinge cutout so it can be clamped in place and not interfere with movement of the router during mortising. A little extra width offers more options when clamping the template near the end of a cabinet door, where most hinges are. Another reason to use a larger-than-necessary blank is incorporating more than one cutout in the same template. If the template material is several inches wide, you can make cutouts on both edges that fit totally different hinges. For many of us, two hinge styles often cover the majority of your needs. Having both on the same template makes storing, and actually finding it when you need it easier. I run the template blank through the table saw, taking light cuts on both long sides to make sure they are parallel, and straight. Squaring the template makes it easier to accurately locate hinge mortises, particularly aligning the template with the edge of the workpiece. The first real job for my new template was to mortise hinges I had surface mounted on shop cabinet doors earlier. After cutting the mortises, I was able to use the same screw holes; accuracy I had been unable to attain previously. Tracing Hinges
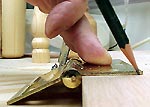
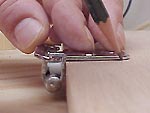
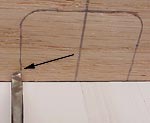
Tracing the hinge outline onto the template accurately is crucial. Hold the hinge on the template, it's center aligned with the template centerline. If the hinge has a step, or pin boss, that should butt against the edge of the template. Make sure the hinge is square to the template, and then with a sharp pencil, trace it's outline, keeping the lines tight against the edges of the hinge. Setting Blade HeightIn most cases, the only measurement necessary is for determining the correct table saw blade height. There are two basic options in arriving at this blade height: adding the router offset, and not adding it.
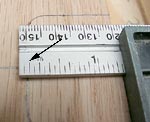
Some hinges, like the butt hinges on the full-sized doors in your house, are intended to have the pin spaced away from the door slightly. In this case, we do not add the offset to the trace line. When the mortise is cut, the router offset automatically spaces the pin out from the door. As long as the template is positioned the same way for each mortise, all of the pins on a door will be aligned. When the offset is not added, simply hold a combination square against the template edge and locate the rule so it's end touches, but does not cover, the trace line. Lock the rule and use the square to set the blade height on the table saw. When the pin or a step in the hinge is to be positioned against the edge of the door when installed, we have to add the router offset to the blade height. This is common on cabinet hinges, including some pin-type designs. Again, the combination square makes this easy. To add the offset, place the 1/8" mark on the rule so it meets the inside edge of the trace line. Lock the rule and set the table saw blade height with the square. Making the CutoutI found that making the cutout at the table saw, using a standard 1/8" kerf blade set at 90-degrees, produced straighter lines than I could get with any other tool in my shop. Also, by carefully placing the initial cuts, the 1/8" router offset, which is always included on the sides of a hinge, is automatically, and accurately, added to the cutout. I use an Osborne EB-3 miter guide when making the cutout because its fence can be moved close to the blade to increase support of the template blank during cutting. You can add an auxiliary fence to most other miter gauges to make this operation easier and safer. Just be sure the fence is straight and mounted securely to the miter gauge. As always, be very sure of where your hands are at all times!
To set up the cutout, (the saw unplugged) place the template against the miter gauge, standing on the long edge, the trace line on the bottom, facing the blade. Carefully align the blade with the edge of the trace line. The kerf (1/8") should take the line and the material immediately outside the trace line. This automatically adds the 1/8" offset to that side of the cutout. Repeat this process on the other side of the cutout, the kerf again just taking the line and material outside the trace line. Depending on the size of your template, and if it can be gripped safely, clamping it to the fence when making these cuts might be safer. Before plugging the saw in, check the setup to be sure the template remains aligned with the blade, and that your hands will be a safe distance from the blade when making the cut. After the side cuts are made, carefully nibble the remaining material from the cutout area. Taking the time to nibble the material away results in a very straight edge. The alternating tooth bevel of many table saw blades leaves a rippled surface on the top of the cutout. File that surface smooth with a rasp, being careful not to remove any more material than necessary to remove the ripples. The correct dimension is attained when the surface goes smooth. If the side cuts were positioned correctly there should be no reason to alter the sides of the cutout.
With the cutout cleaned up, use the combination square to extend the template centerline down the upper face of the cutout to make aligning it with hinge locator marks on the workpiece more accurate. Setting Router DepthThe actual bit depth when mortising hinges is rather small, making it very difficult to accurately measure and set. I have found it easiest to lay the template on the router, the hinge on top of that, and then adjust bit depth to match. I like to be able to feel a tiny bit of the cutting edge when sliding my finger across the hinge to the bit. That insures the hinge fitting slightly below the surface. Routing the MortiseUsing this template could not be easier. Mark the center of the hinge where you want the mortise, align the template centerline with that mark and clamp it in place. The edge of the template should be flush with the edge of the workpiece.
Run the router around the cutout, and then clear the remaining material. If the hinge has rounded corners, you are probably done. Many rounded hinge corners have a radius that is identical to those left by the ½" bit. Bingo, a perfect fit. If you followed these directions correctly, you now have a hinge template that will cut perfect mortises every time. Mark your new template with the type and size hinge it is made for, the size of the collar and bit, and then put it with the rest of your timesaving jigs. You will be missed in the surface-mount brigade. |
||||||||||||||||||
Do you have a comment about this page? - Email Me!
|
||||||||||||||||||


All written, photographic and drawn materials are property of and copyright by NewWoodworker.com LLC 2000-2019. Materials may not be used in any way without the written permission of the owner.