
This is a Veteran Owned site
| |
||||||
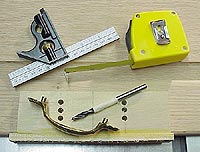
Handle JigText and photos by Tom Hintz Whenever I have to install more than one of the same style handle on a project I make a drilling jig. This is a fast, easy way to make sure the holes I drill in the project are in the right place. The time and money invested in my projects is important to me and the last thing I want to do is kill my work while installing a handle. Start by measuring the handle to be installed. We need to know the distance between the centers of it's screw holes and the size of the drill that will be needed. Also, determine the measurement from the edge of the surface to which the handle will be mounted to the center of the handles mounting holes. Some handles have a screw boss that is recessed into the wood. In this case, I drill the jig to fit the boss, and then drill the through hole for the screw with the proper sized bit freehand. Locate a piece of scrap several inches longer than the handle and wide enough to reach well beyond the hole locations on your panel. Make sure the scrap has at least one straight side and mark it. This side will be used to locate the jig on the panel later. We also need another piece of scrap that can be used as a fence to locate our jig against the side of the panel. Do not install this fence just yet.
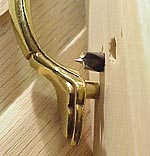
Find the center of the jigs long axis and extend that line across the face and down the side of the jig that will face in on the panel. We will use this line to locate the jig on the panel later. Clamp the fence to the jig and set it on your panel. I make a small mark on the panel showing how far from the edge I want the handle, and then transfer this mark to the jig. With the combination square, extend this line up the edge of the jig and all the way down its face. With these lines established you can now divide the distance between your handles screw holes or bosses and mark them on that line on the face of the jig. Using the proper sized bit (preferably in a drill press) for the screws or screw bosses, drill the holes in the jig at these locations. I use brad point bits for all the obvious reasons and because that little point makes it easy to precisely hit the marks for screw locations. If you are like me, anything that improves accuracy is more than welcome, and used frequently. If your handles have screw bosses, there is one additional preparation. We need to mark the depth on the drill bit to prevent drilling too much material out of the panel. Insert the drill through the jig and hold the handle boss against the bottom of the jig. Extend the bit a little beyond the boss depth, and then wrap masking tape on the bit where it enters the jig. I try to drill boss holes about 1/32-inch deeper than the boss to be sure the handle seats flush on the panels surface when tightened. Take the time now to test-fit your handle to the jig. If it does not fit properly here, it is not going to get any better when you start drilling holes in your project. When satisfied with how the handle fits the jig, attach the fence to the marked side of the jig.
Place the jig on your panel and align the jig center mark with a mark on the panel indicating the center of the handle. Clamp the jig securely in place and recheck the alignment of the marks. Carefully drill the mounting holes. Raised panel doors and other panels can be very difficult to hold in the drill press so I use a hand drill. Take your time and keep the drill as straight as possible. Between your caution and the jig, the holes should be fine. I keep all my jigs, as they are often useful later. The jig in the accompanying photos can be used for three different hole arrangements with handles with 3-inch boss centers. Mark the jig with it's application and put it in a safe place. It could make another day in the shop a little easier. Do you have a comment about this page? - Email Me! |
All written, photographic and drawn materials are property of and copyright by NewWoodworker.com LLC 2000-2019. Materials may not be used in any way without the written permission of the owner.