 |
A scale tape is a useful feature, if installed properly.
Click image to enlarge |
Installing the Eb-3 Scale Tape
Step-By-Step Instructions
Text and photos by Tom Hintz
Having a scale by which to set the flip-stop is a handy feature on a miter guide. However, the ability to adjust the fence-to-blade distance, new on the EB-3, complicates its use and installation. As long as the fence-to-blade distance remains the same as when the scale tape was installed, it will repeat forever. If you change the fence setting, the scale reading will no longer be accurate until the fence is returned to its previous alignment.
Most woodworkers will find a fence-to-blade setting they will use nearly all of the time. The trick is installing the scale tape relative to this position, and then being able to return to that exact setting when the fence has been moved for some reason. The installation process described here does just that.
My best advice to new EB-3 owners is to use it for a while before installing the scale tape, setting the flip-stop with a tape measure, until you feel comfortable with a particular fence position.
I set my fence-to-blade (standard 1/8-inch-wide blade) clearance at 1-inch so there will be no interference when I install my stacked dado at its full width. In my shop, this setting works fine for everything I normally do.
It is important to remember that the scale tape graduations do not indicate their true distance from the blade. When installed as this article explains, the scale tape graduations accurately indicate the distance from the flip-stop face to the blade.
 |
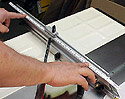
Accuracy when setting the initial flip-stop distance from the blade is very important!
Click image to enlarge |
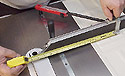
Step One
When satisfied with the fence-to-blade distance, snug the fence locking knobs down so it cannot move accidentally.
Clean the rail to which the scale tape will be applied with alcohol and a clean paper towel, making sure it is completely dry before proceeding.
Using a tape measure or metal scale, adjust the flip-stop so the right-side face (the side the wood rests against for cutting) is 15 inches from the left side of the blades teeth, and then tighten the flip-stop locking knobs. Be as precise as possible as the rest of this procedure is based on this dimension.
For those of you wondering, 15-inches is an arbitrary number, chosen only because it locates the flip-stop in a convenient place on the fence.
 |
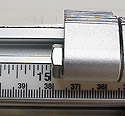 |
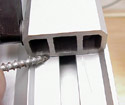
(Top) Carefully align the scale tape to the flip-stop bolt.
(Bottom) I set my scale tape so the graduation aligns with the side of the bolt head.
Click image to enlarge |
Step Two
Lay the scale tape into its rail (don't remove the protective strip from the adhesive yet!) and adjust its position until the 15-inch graduation aligns perfectly with the left side of the bolt on which the flip-stop rotates. This procedure will work with the graduation aligned at either end of the flip-stop bolt but for most people the scale is easiest to read at the left edge.
We want the 15-inch graduation to align perfectly with the edge of the bolt when you are looking straight down onto it. You should view all measurements from directly above to be the most accurate. I set mine so the 15-inch line on the scale tape appears to rest against the edge of the bolt head.
Once satisfied with this alignment, secure the scale tape to the fence at the right end. I used duct tape, but anything will work as long as the scale tape is fastened securely and will not move during the next step. Re-check the alignments once more to be sure nothing has moved.
If everything aligns properly, loosen and slide the flip-stop onto the extension and extend that out of your way.
Step Three
Carefully begin peeling the protective covering from the back of the unsecured end of the scale tape, pulling the covering back under and towards you at a 30 to 45-degree angle. Pull four or five inches
 |
 |
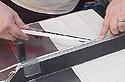
(Top) Carefully pull the protective covering from the adhesive, then stick the scale tape to the rail.
(Bottom) Trim the excess tape at the ends of the fence.
Click image to enlarge |
of the adhesive covering away, holding the tape above the rail. With the scale tape held taught (don't over do it!) carefully begin pressing it into position on the rail, beginning at the left end. Work your way towards the other end, pulling the adhesive covering away and pressing the scale tape firmly into position as you go.
When you reach where the scale tape is secured to the fence, remove the tape holding it in place and complete adhering the scale tape to the rail.
With a soft cloth, rub the tape down to be sure the adhesive is in full contact over the entire length of the rail.
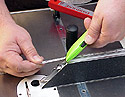
Trim the ends of the scale tape that extend beyond the edges of the fence with a sharp utility knife.
Step Four
Relocate the flip-stop so the bolt head aligns with the 15-inch graduation. Using a tape measure, check the distance from the blade to the flip-stop fence. If the distance is not exactly 15-inches, you can make small corrections by loosening the fence locking knobs and altering the fence-to-blade distance slightly until the reading is exact.
Once satisfied the indication is exact, tighten the fence locking knobs down and measure once again to be sure it has not moved.
Before going any farther be sure to check for adequate clearance between the fence and blade before turning the saw on!
It is a good idea to cut a test piece to confirm the accuracy.
 |
When satisfied with all your settings, scribe a mark so you can return to this precise position later.
Click image to enlarge |
Step Five
When satisfied everything is properly aligned, remove the Osborne miter guide from the table saw and set it on a bench or other safe workplace, in a position providing access to the left edge of the sub-fence. Using a sharp scratch awl, (a new drywall screw works also) scratch a fine line on the rear face of the main fence right where it meets the left end of the sub fence. Make the line just deep enough so it can be seen easily. There is no need to carve a deep gouge or slot in the aluminum.
This line will be your alignment guide should you change the fence-to-blade distance for some reason. To reposition the fence so the flip-stop is once again properly aligned with the scale tape, align this mark with the edge of the sub fence and you should be right back where you started.
Do you have a comment about this page? - Email Me!
Back to the Tips & Tricks List
|
