
This is a Veteran Owned site
| |
||||||||||
Contractors Table Saw Dust Collection
Text and photos by Tom Hintz Note: Dust collectors work by moving large quantities of air in which the sawdust is suspended. If too much area is closed off on the saw box the amount of air can be reduced to the point the dust collector can no longer move the dust out. If you hear your dust collector change pitch (like when putting your hand over the hose) more air holes are probably needed to restore effective air flow.
|

 |
 |
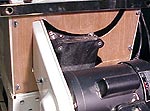
(Top) The dust cover/air restrictor in place. (Bottom) Withe the blade over to 45-degrees, the hole grows in size, but still works well. Notice there is no dust on the motor. Before the cover was attached I had to vacuum the whole motor area after each use. Click images to enlarge |
I started by obtaining a 90-degree elbow and a length of galvanized 4-inch stovepipe, which incidentally, is cheap, and fits nicely. I used the stovepipe because I could not find purpose-made rigid tubing meant for dust collection. A length of stove pipe several inches long was cut and attached between the saws port and one end of the elbow. Another section was attached to the other end of the elbow to extend the hose connection outside the saw base for easier hook-up. The pieces of stovepipe were sized to locate the lower pipe near a leg brace so it could be securely attached to stabilize this assembly.
There are a series of gaps around the underside of the cast iron table where it meets the housing. I considered cutting wooden blocks to fill these holes, secured with silicone, but that was too permanent. If future service was required, these could pose a problem. Then I remembered the Styrofoam packing material left over from a recent tool purchase. I ripped this material into lengths approximately 1 inch square at the band saw, and then cut these "sticks" into appropriate sizes for stuffing into the gaps.
A zero clearance insert also helps make dust collection more efficient.
With these initial modifications completed, I attached the dust collector and ripped a few pine boards. There was a definite improvement, but sawdust was still coming out through the open rear of the saws housing.
I thought about making a solid plate to seal the rear of the housing almost completely but did not think that was the best plan. It stands to reason that some quantity of air must enter the saws housing for the dust collector to operate efficiently. If the housing is sealed sufficiently to draw even a small vacuum, the dust collector could starve for air and it has ability to collect saw dust and chips would be compromised. Another consideration was that I wanted to be able to tilt the blade without having to remove or change the rear housing cover.
 |
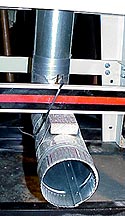 |
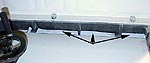
(Top) Foam packing material was packed into openings below the edge of the cast iron table. (Bottom) A length of stovepipe helped bring the dust collection port out where it is easily accessible. Click images to enlarge |
After studying the rear of my saw, I decided I could enclose most of that opening while preserving enough open area for sufficient amounts of air to get in.
I moved the blade through its 45-degree path and made a loose sketch of how the opening would have to be shaped. I also measured the overall dimensions of the rear opening and cut a similarly sized piece of cardboard. I used a combination square to locate and plot the saw components that projected through the plane where the cover would go.
Next, I began moving the blade through its arc, 20-degrees at a time. At each stop, I measured and plotted the new locations of the components. When the saw reached 45-degrees, I added the end positions, then connected the plots with an approximate arc to create a rough layout.
I cut the opening in the cardboard and then cut it into two pieces with joints placed so I would be able to slip the wood versions into place. After taping the cardboard templates to the rear of the saw, I again cranked the blade through its full range of movement, marking the template where parts either rubbed against the cardboard or missed it substantially. From these "corrections" I made up a second template. After cutting and fitting the new template and making a few additional modifications, I was ready to make the actual rear cover.
The pattern was traced onto a piece of luaun plywood and the open areas cut out on the band saw. The cover was also cut into two pieces at the locations determined earlier. After a little touch-up with a drum sander I taped the pieces in position on the saw and ran the blade through its range of motion once more to be sure the fit was right.
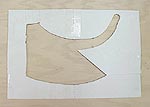 |
I have had lots of requests for this photo. It is the cardboard template I developed and used to trace and cut the initial cover. The outer dimensions are the same as the back of the Jet housing. Click image to enlarge. |
Holes for thumbscrews that would secure the cover were drilled and tapped with ¼-20 threads to complete the job.
Now when I use my contractor table saw, the only sawdust that comes out is off the top of the blade, and that amount appears to be considerably less than before the modifications. So far, I have found no sawdust behind or below the saw, even when ripping pine boards, something that produced an extraordinary amount of dust in the past.
All together, these modifications cost approximately $20 and took a couple of hours to accomplish. It was time and money well spent. My shop stays cleaner, I seem to have a little less dust in the air and I do not have as large of clean up at the end of each days work. More importantly, my wife no longer follows me around the house with a vacuum cleaner and a bad attitude.
Do you have a comment about this page? - Email Me!
All written, photographic and drawn materials are property of and copyright by NewWoodworker.com LLC 2000-2019. Materials may not be used in any way without the written permission of the owner.