
This is a Veteran Owned site

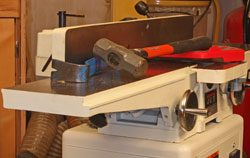 |
No matter how tempting, fixing a jointer with a big hammer is not the answer. Take a breath and all will be fine in jointerland. Click image to enlarge |
Jointer Problems, Causes & Fixes
Straightening the frustrations of a "simple" machine
Text and photos by Tom Hintz
Posted - 2-13-2008
While many jointer problems are related to technique, there are real mechanical/alignment issues that while less common can be equally frustrating. Keep in mind that bad technique often imitates a mechanical problem so you have to consider both causes. It is crucial to be certain that technique is not the problem BEFORE you start adjusting a jointer. Over the years I have heard from many woodworkers who adjusted perfectly aligned jointers out of whack while trying to cure a cut problem that turned out to be a technique issue.
The problems and fixes below are arranged in the order of their frequency in my email. Roughly 20-percent of my overall email regards problems with jointers and the cuts they make. Though many of the "fixes" below are hardware related, always start by checking your technique. It is far easier to confirm technique than to restore what used to be the perfect alignment of your jointer.
Ripples
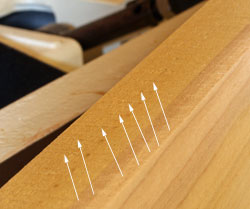 |
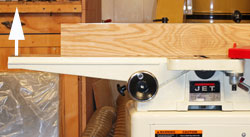
Though hard to see in a photo, the ripples (arrows) will show up in a finished joint. In most cases one high knife or an overly fast feed rate is the culprit. Start with the feed rate! Click image to enlarge |
Ripples, or waves in the jointed surface can be caused by one knife being slightly higher (roughly by the depth of the ripple) than the rest. The other cause is using too fast of a feed rate. Rarely a combination of both of these can arise but that is very infrequent.
Checking for the knife height is pretty straightforward. We want all of the knives flush with the outfeed table surface at the top of their arc. The knives also must be parallel to the table surface across their full width. The amount that a knife must be above the others to produce ripples is tiny, in the thousandths of an inch range. Consequently, taking your time to set the knives right the first time can save a bunch of time and frustration, not to mention avoiding resetting of the knives later.
Jointers work on "cuts-per-inch" or how many times a single knife makes a cut as the board moves one inch across the center of the cutterhead. This is a major reason three knife heads are favored over two knife versions. Without changing anything else, the three-knife head increases the cuts per inch by a third. The more cuts per inch, the smoother the jointed surface. If you move the wood across the cutterhead too quickly, you can dramatically reduce the cuts per inch and induce the rippled or wavy-looking surface. If the knives are all equal in height, simply slowing the feed rate a bit will cure the ripple problem.
 |
Paying attention to the grain direction will stop chipping. Note that the cutter turns left to right in this photo and the grain pints in that same direction so the cutter is working "down" the grain. Click image to enlarge |
Exactly how fast of a feed rate is right is hard to describe. The easiest thing to remember is that you have to let the jointer do its work. Taking your time will always produce better results. It is much harder to go too slow than too fast on a jointer. When in doubt slow the feed rate!
Chipping
A joiner that is otherwise properly aligned and equipped with sharp knives will create a smooth, chip-free surface - as long as you are working with the grain and not against it. It surprises me sometimes how many of us forget grain direction at the jointer. But, lots of us do.
The jointer knives are turning towards the operator so the grain must be running towards the operator also. That way the knives are cutting down the grain, not into it. On some boards it can be downright difficult to read the grain precisely. The way boards are cut these days, you can actually get grain running in both directions. In these situations taking very light cuts in both directions and picking the direction of feed that produces the best looking surface can be the only workable solution.
Some of the solutions in this story call for reversing the board after each of the initial cuts. When you do that be sure to take very light cuts (as you always should anyway) and switch to working with the grain exclusively as soon as possible. Some chipping is likely to occur during the early reverse cuts but that will be removed in the final cuts with the grain.
If you are unsure about reading grain, see my story "Reading Grain Orientation" at the link in the Resources section at the end of this story.
 |
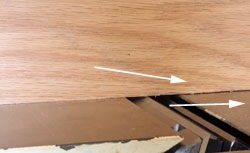
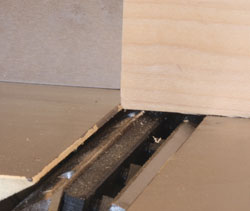
Snipe is almost always confined to the trailing edge of the board as it fall off of a too high infeed table. Click image to enlarge |
Snipe
Snipe nearly always occurs on the jointer at the trailing end of the board. Also, the snipe is confined to an inch or two at the end of the board. Most often this is caused by the outfeed table being lower than the knives when they are at the top of their arc. As the end of the board leaves the infeed table it drops onto the outfeed table, making a deeper cut in that last portion of the board. You will notice that the length of the snipe approximates the distance from the edge of the infeed table to the center of the knives.
The cure is simple - adjust the outfeed table so that its surface is flush with the knives at the top of their arc. Also, make sure that all of the knives are at the same height. Knife height alone is not likely to cause snipe but it is not uncommon to find miss-adjusted knives when the outfeed table was set wrong. Take the time to check!
Tapering (Long Axis of board)
 |
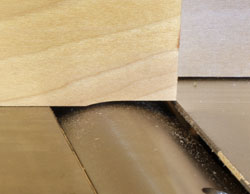
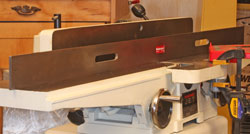
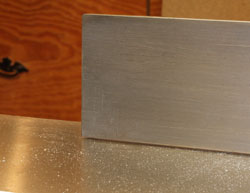
This outfeed table is much too high for the photo but yours might not be so obvious. The outfeed table surface should be flush with the tip of the knives at the top of their arc. Click image to enlarge |
First, we have to be aware that the joiner does not have any way to tell if it is tapering a board. See my related story "My Jointer Cuts Tapers!" for more on this all-too-common phenomenon. If you take enough cuts, a jointer will taper a board to some extent. That alone does not mean anything is wrong with it!
The outfeed table being higher than the knives can cause tapering. Often by the second or third cut the end of the board will begin catching on the edge of the outfeed table which is a good indication that this is the case. Also, the taper will cover more and more of the board as additional cuts are taken. Initially the taper will be confined to the first portion of the board but because the jointer dutifully does its job, the taper will continue to be cut further down the board until the entire surface being jointed is involved if you take sufficient number of cuts.
The jointers natural tendency to taper also increases with the number of cuts. Usually the tapering process is very slow when the jointer is properly aligned. However, the shape of some boards just lend themselves to tapering. If you have a board with a bow over its length, tapering can result if you start with the high point of the bow facing down. With the ends of the bow down you may have to reverse the board after each initial cut to get more of its length on the jointer table. Then you can make cuts with the grain until the board is flattened. Shortening longer boards closer to the length actually needed for the project will minimize this tapering also. The trick here to minimize tapering is to take as few cuts as is really needed to flatten the board and then take it to the planer to cut the opposing side parallel to it.
When the jointer itself is suspected, the most common cure is to make sure that the outfeed table is set flush with the edge of the knives at the highest point in their arc. Make sure that all of the knives are flush with the outfeed table surface or the tapering will continue.
Tapering (Across Width)
 |
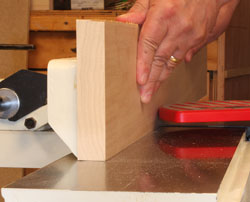 |
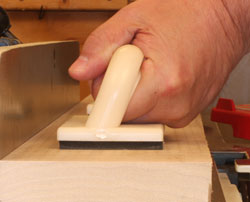
Keeping the pressure even and centered on the wood (left) will help minimize tapering across the width of the tables. Moving the fence to new positions frequently (right) will prevent wearing out once section of the knives which can help induce a taper across the table width. Click images to enlarge |
|
Here again, the jointer has no way to tell if it is tapering the board. Taking a lot of passes will almost certainly induce some amount of tapering so keeping the passes (and depth of cut) to a minimum is always best.
Tapering across the width of a board is frequently caused by uneven pressure applied by the operator. A defect such as uneven cupping across the board can also encourage this kind of tapering. In rare cases one or both tables can be out of alignment with the cutterhead. If the jointer has not been taken apart, finding this condition is exceptionally rare but check it anyway just to eliminate that possibility. See my Jointer Basics story at the link in the Resource section at the end of this story for more on checking for this condition.
The fix for tapering across the width is to be sure that you are applying even pressure across the board. Using the push pads that come with most jointers helps that (and is smart anyway) as does applying pressure along the centerline of the board. As always, keeping the pressure to the minimum needed to maintain control of the board is important.
For boards with a serious cup across their width reversing the board (end for end) between the initial cuts will help minimize tapering. As soon as both sides of the board develop a flat area an inch or so wide, make all subsequent passes with the grain until the surface is flat, then go to the planer to treat the opposing face.
Woodworkers tend to set their fence over one portion of the jointer knives and leave it there. That focuses wear on the knives in one spot or to one side of their length. Having one side sharp and the other side dull can induce tapering across the width of a board. The sharp side removes more wood while the dull side can actually be a few thousandths shorter because of the focused wear. The only cure for this is to sharpen the knives or replace them. Then, remember to move your fence to different spots along the knives frequently to distribute the wear more evenly.
Concave Surface (center up)
 |
 |
Using a good straight edge (left) is the best way to check that the tables are coplanar. In this case, suspect the outboard end of the outfeed table to be low as in the photo at right, but check both tables! Click images to enlarge |
|
When a jointer produces a concave shape in the surface being jointed make sure that you are not pushing down too hard and flattening the wood out during the cut. When the pressure is released the wood comes back up. Repeat this error and the concave shape can get worse.
If you are sure technique is not an issue look for the outboard end outfeed table to be tilted down slightly. This is a relatively rare occurrence but we do see this problem more often AFTER someone has tried to adjust out a problem that was more likely caused by an error in technique. With an outfeed table that really is tilted away from the infeed table, the wood wants to arc downward during the cut, dragging the trailing portion of the board across the cutters as it tips forward. The result will be a concave shape.
Though less likely, the same thing can occur with a long board that already has a concave shape in the surface being jointed. If the board is too long, the ends are never on the tables at the same time and the concave shape can remain or even be made worse. If possible, cut the board to a length closer to what is actually needed for the project. You can also reverse shorter boards to help take equal amounts from both ends until it is flatter on the jointer beds. Then take all remaining cuts with the grain.
Putting shims under the low spot at the sliding rails is the only way to fix most jointers. Using trimmed leaves from a simple feeler gauge for shim stock can save the day, and a few bucks. Click image to enlarge |
Most better quality jointers have the surface of the tables ground true AFTER they are assembled at the factory. Unless something bad happened to the jointer, it is rare to find the tables out of alignment. When the tables are level to each other, they are said to be coplanar. Lay a long (quality) straight edge across the tables and its bottom edge should be flat on both tables over its full length.
Fixing a non coplanar condition usually means adding shims below the low end of the offending table. Do not confuse the gib screws on most jointers that control the fit of the table to the sliding ways on the center housing. I continually see people recommending adjusting the gib screws to fix an out of line table. In nearly all cases, shims must be placed between the table and the center housing at the correct spot along the rails to fix the condition. On most parallelogram jointers there are adjustments at all four corners that can be used to correct a coplanar error. Check your instruction manual or contact the manufacturer for details on making this adjustment on your specific jointer.
Convex Surface (center down)
Creating a convex shape, the center of the curve down on the edge being jointed can be caused by technique or one of the tables tilting up at the outboard end. While this seems to occur more on the outfeed table, don't overlook the infeed table.
 |
Actually finding a table with the end too high is fairly rare but check for it if you cannot cure a convex shape with improved technique. Click image to enlarge |
If the board already has a bow shape and you put the top of that arc down on the jointer tables, it is easy to simply follow that curve, especially if you focus pressure too long on the infeed table. The other end of the board is already up a little and the jointer will remove wood from the portion coming off of the infeed table and it could actually make the convex shape worse or create a taper. Putting the board with the arc up will help, as will reversing the board after each of the initial cuts to help even out the ends. Then you can make the remaining cuts with the grain. Also, cutting the board shorter if the project allows will reduce the amount of the bow and make it easier to correct the original defect.
If either of the tables is angled upwards (running away from center) the only solution is to adjust the table so that they are coplanar or level with each other over their full length. As described in the Concave section above, most jointers require shimming of the offending table to make the correction. With the outboard end of the table being up, the shims will most likely have to go under the inboard end of the table between it and the slides. Use a long straightedge to be sure that your correction actually made the tables coplanar. Then remember to reset the outfeed table so that it is flush with the top of the knives at the top of their arc.
Think Before Adjusting!
I have to stress the importance of thinking before you start adjusting your jointer. It is very common for problems to be associated with technique rather than mechanical issues with the jointer. People seem to like pronouncing virtually any jointer difficulty the fault of the jointer with an adjustment required. Remember that it is far easier to alter your technique and do the necessary tests to confirm that the problem lies with the jointer itself. I have spoken with very frustrated tech line personnel who have had to try and walk people through restoring what was a perfect alignment that had been adjusted away unnecessarily. Remember that you are the one who can actually see and touch your jointer. Take the time to check its alignment before accepting the advice to adjust anything on it. Just because it happened to someone else doesn't automatically mean your jointer is in error the same way.
Resources
Setting Straight Jointer Knives
Hands Off Jointer Outfeed Tables!
Preparing Wood for the Jointer
Have a comment on this story? - Email Me!
Back to the Tips & Tricks List
All written, photographic and drawn materials are property of and copyright by NewWoodworker.com LLC 2000-2019. Materials may not be used in any way without the written permission of the owner.