
This is a Veteran Owned site

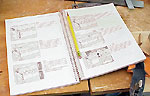
Leigh D4 Dovetail JigThe best there isText and photos by Tom Hintz Note: This version of the Leigh Jig is no longer available as far as I know. The newer one, the D4R is very similar but has upgrades. Click Here to see my review of the D4R. See my Rolling Jig Work Station Plan! - Click Here! I had lusted after the Leigh jig for some time after seeing his Normness use it on The New Yankee Workshop. The price was one consideration, but I was hesitant in part, because the Leigh D4 looked like it could be complicated. Now I wonder why I waited so long, as I suspect many other new Leigh owners do as well. Documentation When unpacking the Leigh jig, one of the first things I noticed was the thick instruction manual and 50-minute-long video.
The manual is quality of the first order. The spiral binding, (lays flat while open) paper and first-rate illustrations show Leigh was interested in producing the best instruction manual possible first and the cost second. The writing is easy to understand and the format guides the reader through all jig functions in a logical order. Assembly
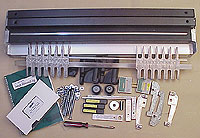
The capabilities of this jig lead one to expect a lengthy and involved assembly process. The reality is this is an easy tool to assemble and set up. Everything is very well made and fits properly. The instruction sequence yielded no surprises and within 20 minutes, my jig was assembled and ready for the short alignment process. Mounting
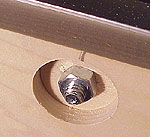
The D4 has a slot along the underside near the front for t-bolts (5/16-inch bolts fit as well) meant to secure the jig to a bench top or clamping board. I bolted my D4 to a piece of ¾-inch-thick 8X36 inch poplar. Holes for two 5/16 by 1 ¼-inch-long bolts were drilled so that the clamp board is held back from the front edge of the jig by about 1/8-inch. I drilled a countersink with a forstner bit to recess the nut and washer, but left the remaining bolt protrude. These act as stop-pins when I clamp the jig to the bench, making sure work pieces clamped in the jig are well clear of any obstructions below. Testing (Play time)
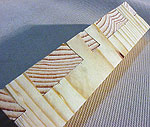
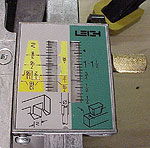
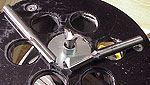
I purchased the Leigh jig kit that included two dovetail bits (#120-8, 14-degree - ½-inch,#80-8, 8-degree - ½-inch) and one straight bit, (140-8, 5/16-inch cutter) all with 8mm shanks, and the 7/16-inch collar which fits my Porter Cable 690 router. Also included is a collet reducer to fit the 8mm shanks to the ½-inch router collet. Again, everything is well made and fit perfectly. When ordering a Leigh D4 dovetail jig, you will be asked what router will be used with it and the kit tailored accordingly. Through Dovetails If you follow the instructions, the chances of making bad through dovetails with this jig diminishes greatly. The one critical step is setting bit depth, but that is relatively easy. Having the bit a little too deep only means slightly more sanding time to bring the pins flush with the surface. My first set extended beyond the surface approximately 1/32-inch. Half-Blind Dovetails
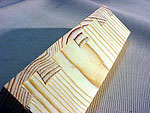
Using the same finger configuration, I tried a set of half-blind dovetails. In the past I could make good half-blinds, but it often took several setup attempts to get the fit right. The Leigh also requires setup, but the simplicity of this jig shortens that time considerably. I have re-installed the dovetail bit for half blinds four times now, none of which required a third test cut to get the fit I want.
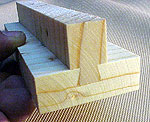
production run. Nothing did and the joints were interchangeable among all the pieces made. End-To-End Dovetails I have tried end-to-end dovetails in the past with little success, and that after considerable searching for the setup. With the Leigh D4, end-to-end dovetails are made with the same setup used for half-blinds, except that both pieces are routed in the vertical position with the finger assembly aligned to a special mark on the indicator. Sliding Dovetails
Whether you want to make full-length (up to 24-inches long) sliding dovetails, or stop dovetails, they are easy to do on the Leigh. There is slightly more setup required, but the instructions get you very close. When making my first sliding dovetail, I had to make two adjustments to get the dovetail right. Tips for Using the Leigh JigThere are a few things to keep in mind when using the Leigh. See my companion story - Click Here See also my article on the Leigh Dovetail Jig Manual - Click Here Click Here to see my review of the updated Leigh D4R.
|
||||||||||||||||||
Do you have a comment about this page? - Email Me! |
||||||||||||||||||
All written, photographic and drawn materials are property of and copyright by NewWoodworker.com LLC 2000-2019. Materials may not be used in any way without the written permission of the owner.