
This is a Veteran Owned site
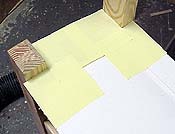
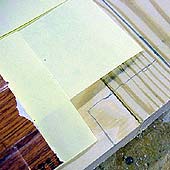
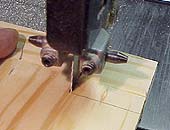
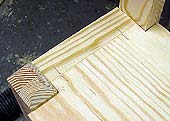
Fitting the Ill-FittingSticky note papers to the rescue!Text &Photos by Tom Hintz One of my biggest problems in woodworking is fitting irregular shapes into equally irregular places. Even regularly shaped pieces fit inside another piece has been a problem. I have tried many different methods of making this task easier, or more accurate. Until now, I only found ways of making more scrap wood. Then I remembered a technique I saw applied to fitting vinyl floor covering that employed those handy little note pads with an adhesive strip on the back of each one. I dare not use their trade name or I might have to pay a royalty or something, but you know what I mean. I start by cutting a piece of cardboard that fits the major area I need to fill/fit. Find the center and mark that on the space and the cardboard. Tape the cardboard in, matching the center marks. Then take individual notes from the pad and use them to "build" the cardboard out. Lay their edges along the ones you want your piece to fit against, using a different piece of note paper for each angle. In this project, I did not try to align the notes along the outer edge. I placed a note, with its outer end at the required length, on each end of the pattern, then connected the edges on the final piece with a straightedge to establish the outer cut line. With all your notes in place, carefully lift the pattern and lay it upside down on the back of the piece you have to fit into the space. Make sure you mark the front edge of the piece, and the center. Align the cardboard template with the center of the work piece and secure with tape. Carefully trace around the edges of the notes to transfer the pattern to the work piece. With all edges traced, remove the pattern and you are ready to begin cutting. I used a band saw but you may be more confident in a jigsaw or hand saw. Any of them, with some care, will work just fine. I cut along the side of the pattern lines facing into the work piece, not the side facing the outer edges. Since you traced around the outside of the pattern, you need to cut inside of the lines, buy just along the edges of your lines! You can always go back and fine-tune a cut if it is a bit oversize. In this case, a job that might take a few hours and much frustration took less than 20 minutes and came out very well. A little final sanding and the pieces are ready to be installed, with nice even seams. Do you have a comment about this page? - Email Me! |
|||||
|
All written, photographic and drawn materials are property of and copyright by NewWoodworker.com LLC 2000-2019. Materials may not be used in any way without the written permission of the owner.