
This is a Veteran Owned site
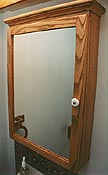
Oak Medicine Cabinet with MirrorText and photos by Tom Hintz The box jig in the Tips & Tricks section was inspired by one Norm Abram made on The New Yankee Workshop. In the same episode, Norm built a medicine cabinet with a mirror set into the door. That piece also inspired this project. The dimensions of this cabinet were designed around the off-the-shelf 16 by 23-inch mirror we bought at the local home center. The reasoning behind this tact was that the ready-made mirror would be much cheaper than a custom cut one and it looked like the right size for the half-bath for which the cabinet was intended. MaterialsI used ¾-inch-thick red oak for everything but the back panels of the cabinet and door. Oak plywood ¼-inch-thick was used for those pieces. Building the DoorThe size of the mirror dictated the rest of the cabinet dimensions so I started by building the door. I wanted 1 ½-inch-wide rails and stiles so allowing for a 3/8-inch-deep groove for the mirror I came up with overall dimensions for the door of 25 ½-inches-tall by 18 5/8-inches wide. Using half-laps would be the safer jointery method, but since getting my Delta mortising machine, everything I make has mortise and tenons. The mirror is just under 1/8-inch-thick so I had to use a 1/8-inch veining bit to cut the grooves. I would have cut them on the table saw but I wanted to stop the grooves so they would not show on the outer edges of the door. The groove was cut slightly off center towards the front of the door so that the ¼-inch-thick plywood backer panel could be glued to the rear of the mirror and remain inset slightly within the door frame. Gluing this panel directly to the mirror (with compatible mirror adhesive) also gave the fragile glass substantial support and helps it resist breaking. Mortises slightly over ¾-inch deep and 1-inch-wide were cut with a ¼-inch chisel in the mortising machine. I cut the tenon shoulders at the table saw, and then made the cheek cuts with my tenoning jig. The shoulders were trimmed at the band saw. After checking the fit of my joints, I glued and assembled one stile and the top and bottom rails before carefully slipping the mirror into its groove. I applied glue and started the tenons on the other stile before setting the assembly in a pair of pipe clamps and carefully squeezing the tenons into place. My fears of a shattered mirror were unfounded and it went together without a crack. Later, when the glue had dried, I treated the front, outside edges of the door with a ½-inch roundover bit. I also used the router with a ½-inch flat bottom bit to cut the mortise for the piano hinge in the back of the door and later, the cabinet face frame.
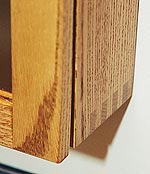
Cabinet ConstructionThe cabinet matches the door width, but is 27-inches tall to accommodate the shop-made cove molding that will be installed below the top. I figured the depth of the cabinet case based on the box joint fingers. Using my box joint gauge stick (see the story on the Box Joint Jig) I determined that by cutting the cabinet pieces 3 1/4-inches wide, I could produce full box joint fingers at both outer edges of the side piece with a little trim room on the back side to be sure all four sides were even. With the ¾-inch-thick face frame, the overall exterior depth came out to 3 7/8-inches. Before assembling the carcass, I laid out lines across the side pieces at one-inch intervals for the shelf support pins. Because placing a shelf close to the top or bottom is impractical, these holes begin 4 inches above the bottom and stop 4 inches below the top. I clamped a fence on the drill press that spaced the drill in ¾-inch from the edges of the sides, then drilled the holes on the layout lines with a ¼-inch brad point bit. The sides and bottom face frame pieces are 1 3/8-nches wide, but the top is 1 ¾-inches-wide to accommodate the cove molding. I first installed the top piece letting the end grain remain exposed to compliment the end grain of the box joints. The sides and bottom were mitered. The face frame was also built about 1/8-inch oversize, installed, and then cut with a flush-trim bit to bring it in line with the cabinet sides. I like this technique much better than trying to bulls eye this alignment and trying to sand it even. Some sanding is still required but doing it this way insures a clean, gap-free fit. After the carcass dried, I routed a 3/8-inch-wide by ¼-inch-deep rabbet in the back for the ¼-inch-thick oak plywood back. I squared the corners with my corner chisel before gluing and brad nailing the back in place. This cabinet will be mounted with screws through the back so I wanted to be sure there was sufficient strength there. After cutting the piano hinge to length, I routed a shallow mortise in the cabinet and door edges using a ½-inch mortising bit and fence. The depth was set to bring the surface of the hinge in line with the surrounding wood.
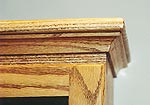
Top and Cove MoldingThe top shelf, made from solid ¾-inch-thick oak, was sized to provide sufficient overhang for the cove molding. It turned out to be 20 ½-inches-wide and 5 1/8-inches-deep. I rounded the top edges with a ½-inch roundover bit but used a ¼-inch roundover bit on the bottom edges. This produces a kind of elliptical edge that has a very nice look to it. The top was attached to the carcass with glue and three one inch drywall screws recessed into the inside surface of the cabinets top. I made the cove molding at the table saw, using my Craftsman molding head cutter, fitted with one inch flute (1/2-inch radius) bits. The cove was cut in the edge of a 5 ½-inch-wide oak board, and then sliced off at its finished size. I started with the bit raised just enough to make contact with the oak, then made several passes, raising the bit about 1/16th-inch for each pass until I reached the profile I wanted. I also made one additional pass without raising the bit to make sure there were no high spots along the molding and to clean the surface up, reducing the amount of sanding necessary later. The molding was given a light sanding, and the back corner rounded off to make sure the rear faces would fit tightly to the cabinet and shelf. The front corners of the molding are mitered and it was attached to the carcass with glue and brads.
ShelvesThe solid wood shelves were made from solid oak, planed to a thickness of ½-inch. They are 2 7/8-inches-wide and 16 7/8-inches long. The length was reached through a trial and error process to make sure they fit into, but cleared the 1/4-inch pin hangars. The front, upper edge of both shelves was treated with a ¼-inch round over router bit. After finish sanding, the cabinet was turned over to my wife, Beth, for finishing. FinishingBeth applied one coat of Olympic Golden Oak oil based stain (#41554), let is stand several minutes, then wiped the excess off, evening the tone in the process. After the stain dried thoroughly, she applied three coats of Petri wipe-on clear (satin) polyurethane. With finishing complete, the medicine cabinet was assembled and the door handle and magnetic latch installed. I hung the cabinet with two plastic drywall anchors and a single 2-inch-long drywall screw, driven into the only stud available behind the cabinet. InstallationTo make hanging the cabinet easier, I cut a strip of 1/4-inch-thick plywood the same width as the cabinet. Using a level and tape measure I taped this strip to the wall where the cabinet was to be hung. I used an electronic stud finder to locate the stud accurately and marked that position on the strip. I then marked the location for the two drywall anchors, evenly spaced in from the cabinet sides. After drilling pilot holes in the strip, I again taped it to the wall to drill the holes in the wall. The strip was then taped to the rear of the cabinet and the holes drilled in the rear panel. When I hung the cabinet on the wall, all the holes aligned perfectly the first time; a first for me. This medicine cabinet turned out great and the exposed end grain produced by the box joints really stands out. Though I am prone to dovetail jointery, the old box joint system definitely has its place in woodworking. |
||||||||
Do you have a comment about this page? - Email Me!
|

All written, photographic and drawn materials are property of and copyright by NewWoodworker.com LLC 2000-2019. Materials may not be used in any way without the written permission of the owner.