
This is a Veteran Owned site
Yard ShedText & Photos by Tom Hintz (5-24-01)
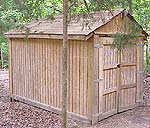
With an ever-growing inventory of lawn and garden equipment, (I NEEDED a 19 horsepower mower! Honest!) we needed somewhere to store all of it. The 10X12-foot steel shed was not big enough, but there was another option. Near the back of our property, the original owner, apparently a woodworker also, had built a large post & platform wood rack, with a tarp as a roof. The tarp had died of old age and high winds and the loosely framed deck was near collapse, but the posts seemed to be in good shape. I figured with a good chop saw I could tie this together and make a cool garage for my lawn tractor and create sufficient room for the attachments I certainly would need along the way. I stripped the old deck and tarp from the posts and began framing it out. This is when I discovered that the posts, three on each side, were not in line. This being my first attempt at building a structure, I decided to forgo ripping the posts out and resetting them. I found that I could run 2X4s along each side with a little work from a hand-held (electric) planner and a spacer here and there. From there, I should be able to get this framed out. I managed to get each side squared up fairly close. The problem was the sides were not in line with each other either. There was nearly a ten-inch difference from one end to the other. The chop saw was looking increasingly like a great investment as none of the rafters were going to be the same as any others. However, that was OK. I had never made rafters before, so they probably would not be the same anyway. The project was quickly descending to my skill level. After I tied the sides together, I split the distance between posts with studs. They would not be 16-inches on center, but they looked good in relation to each other. That was fine until I started putting the cedar sheathing on and found out why studs are normally spaced the way they are. Regardless of which end I started on, there was nothing but air where the edges of the sheathing were to be secured. I fixed that with patches on the inside that are not pretty, but functional. I actually thought to put the ridge beam down the center of the shed, held in place by a couple of 2X4's at what appeared to be the right height. Then I started measuring and cutting rafters, individually. That process actually went rather smoothly. I happily nailed the rafters in place, lining them up with the studs. Of course, this meant the roof sheathing would require the same internal patching when the ends of the sheets hung in open air between the rafters. I anticipated nothing heavier than a squirrel on the roof, no snow load, so it will work. With the sheathing in place it was time to cover the roof, something else I had never done. I watched This Old House a lot and knew which side of the shingles went where, and that good felt must be applied first, but that was about it. The side of the roof facing you in the accompanying photo was where I started. You can see I was making up the reveal as I went along, and it was getting better as I worked my way towards the peak. The other side is much better. I even remembered how to cap the peak! The doors are made from 2X6's and cedar sheathing. I wanted good, solid doors, but wound up with something that could be used as blast shields at NORAD. Over-built as they are, I added an extra hinge and installed them. I also made a mental note to follow more conventional building practices in the future when building non-military doors. After two or three years, there are still no leaks, all of the shingles remain, and the shed has not fallen down. I consider this a success. The moral of this project is that anything I build from this point on will have studs every 16 or 24 inches. I will also begin with a square foundation. Do you have a comment about this page? - Email Me!
|
All written, photographic and drawn materials are property of and copyright by NewWoodworker.com LLC 2000-2019. Materials may not be used in any way without the written permission of the owner.