
This is a Veteran Owned site
 |
|||||||||
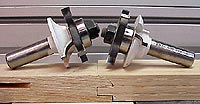
Setting Up Rail and Stile Router Bits
Text & photos by Tom Hintz The quality rail and stile router bit sets available today make the process of machining these parts far less labor intensive than in the days of hand planes and elbow grease. The biggest obstacle is setting them up correctly to produce clean-fitting, flush joints. Note: The rails are the horizontal pieces of the frame and the stiles the vertical parts.When I first started using my rail and stile bit set, the joints were functional, but often required considerable sanding to get the adjoining surfaces flush to each other. The router bits were doing exactly what they were designed to do; I had not mastered the art of setting them up properly.
After struggling through several ineffective setup procedures, I discovered a method that works very well for me. Now my rail and stile joints fit properly and more importantly, are nearly dead flush when assembled. My sanders appreciate it greatly. The first step is making sure all of the parts to be machined are the same thickness. Cutting all of the rail and stile pieces from one board helps. Having a thickness planer helps more. Even small variances in thickness among the pieces is trouble. Planing all of the pieces to the same thickness makes this task much easier. However, be careful not reduce the stock too much. Bits are usually designed to work with a specific range of wood thicknesses. If the wood is undersized, the bits may not be able to cut their full profiles. So far, I have not had to plane more than 1/32nd of an inch to equalize my pieces. One additional step I recommend is making a set of test pieces from the stock being used for the project. It takes a little longer but can save considerable time and expense in the end. Once the correct setup is accomplished, a good "test set" can be saved and used as gauges to speed the setup process on future projects. Making setup blocks also lets you make sure the tongue is being cut to the proper thickness. Most better bits can be adjusted by adding or moving shims within the cutter to alter the tongue thickness as needed. The instructions that come with the bits should explain how to make this adjustment.
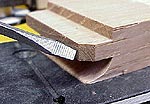
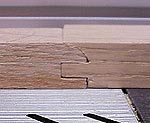
I begin by cutting the rail ends first, which helps in the setup later. Crucial to the setup is getting the bit height right for the wood thickness. Remember, this setup determines where the panel groove will be located in the next step. It is important to be sure the bit height used allows sufficient material at the back of the groove to support the panel. The tongue should be roughly centered on the wood, though many bits cheat it towards the rear of the door somewhat. With this setting determined, cut all rail ends. Next, switch to the stile bit which cuts the panel groove. Most stile bits also cut a cove, bevel or ogee above the groove that matches up to a reversed version of that shape in the rail ends. All four pieces will have their inside edges cut, but don't start yet. This is where things can go very wrong. If the stile bit height is not adjusted properly, the groove will be located at a different height than the tenon on the rails. This misalignment will force the joints out of line. I learned to set the stile bit height by first matching the groove cutter to the tenon on the rail of my test piece. Adjust the height by eye to get this as close as possible. Caution: This step involves touching your test piece to the stile bit while it is in motion. It is very important that you control the work piece, preferably with a clamping fixture such as used for routing end grain. You only need to touch the piece to the bit, not run it through.
To make absolutely sure the setup is perfect I use the rail test piece. Start the router and carefully touch the rail tenon to the stile bit. The corner of the tenon should be cleanly removed, indicating the setup is right. If material remains on the top or bottom of the tenon, adjust the bit height so it will be removed and test it again. If the full thickness of the tenon is cut away in this test, the stile bit is set properly. When satisfied with this setting, you can finish machining your pieces and the rails and stiles will fit correctly. I imagine this setup technique is nothing new to many experienced woodworkers, but it was to me and may be to you. Since learning this procedure, my rail and stile doors and panels have come out perfect every time. Visit the Infinity Tools web site - Click Here Do you have a comment about this page? - Email Me! |


All written, photographic and drawn materials are property of and copyright by NewWoodworker.com LLC 2000-2019. Materials may not be used in any way without the written permission of the owner.