
This is a Veteran Owned site

 |
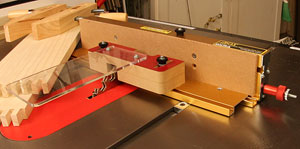 |
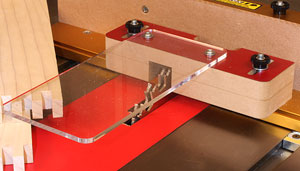
Finally, there is a truly simple box joint jig that also makes it easy to adjust the fit of a box joint! NO, this isn't a dream! Click image to enlarge |
|
INCRA IBOX
Perfect box joints for mortal woodworkers
Text, photos and video by Tom Hintz
Posted – 5-25-2012
One of the truly twisted things in woodworking is the box (finger) joint being touted as a “simple” or “basic” joint. I regularly see self-appointed forum experts advising new woodworkers to “just build a box joint jig” and get used to this joint before moving on to more complicated forms of joinery. The reality is that the box joint is one of the most size-sensitive joints in existence with that sensitivity rising exponentially as the number of fingers grows. Because everything about a box joint jig has to be dead on perfect or it doesn’t work, the build-it-yourself idea often results in building several junk jigs before the perfect-enough one is achieved. That is often followed by much sanding or rasping to loosen a super tight joint.
Enter the INCRA IBOX and your problems are solved. And yes they are equally solved for both new and the veteran woodworkers who will man up and admit their homemade jig is more work than it is worth. To make the INCRA IBOX even more attractive, it is Made In America!
The Basics
 |
 |
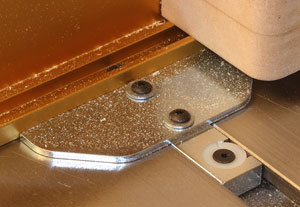
The IBOX is built around a fully adjustable INCRA miter bar (left) that lets you dial out all of the side-to-side play. Aluminum extrusions (right) make up the fence and the material platforms that keep everything stable. Click images to enlarge |
|
The INCRA IBOX can be used on standard table saws (left or right tilt) or router tables. For this review I will focus on the table saw because more people have them but using the INCRA IBOX on the router table is essentially the same. Both platforms are covered completely in the very nicely done instructional manual and DVD that comes with the INCRA IBOX. This DVD walks you through setting the jig up the first time, making simple box joints, center keyed and splined versions. About the only thing that the INCRA IBOX won’t do is work with a wobble dado blade. It works just fine with stacked dado sets and dedicated box joint blade sets or router bits. The INCRA IBOX is very mainstream in its tool requirements.
The INCRA IBOX is built around one of INCRA’s exclusive dual-pitch lead screw mechanisms that allows for quick micro adjusting as well as dialing in a huge range of pin widths from 1/8" to 3/4"! The INCRA IBOX registers to your table saw or router table with their exclusive INCRA GlideLOCK miter bar that fits standard 3/4" x 3/8" miter slots but has an adjustment range of 0.740" to 0.762" to fit the ever-frustrating slots of equipment made by people like Sears.
The INCRA IBOX is built from aluminum extrusions that serve as a base for front and rear blade guards as well as material supports to the left and right of the cutter. The front also supports the work piece and can be adjusted to accommodate wood thickness from 1/8" to 1-1/4".
The fence is 18”-wide and 2-3/4”-tall to provide plenty of support for large work pieces. INCRA recommends using a wooden hand screw clamp (not supplied) to secure the wood to the fence during the cuts and that does work very well. The INCRA IBOX also comes with a pre-drilled backer board to help control tearout. This ¼”-thick board has two sets of mounting holes so it can be flipped upside down to be used a second time. The wise user will trace this supplied backer and use that template for making their own supply.
 |
 |
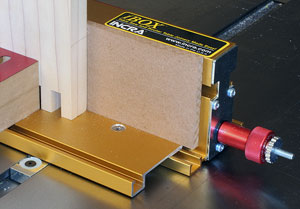
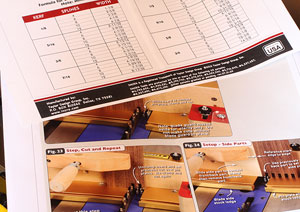
The included instructions and material sizing charts (left) combined with a very well done DVD make it easy to get started with the IBOX and to be dead accurate when using it. The blade guard assembly (right) really is effective and easy to work around. I remove it for a few cuts to more clearly show them in the video but the rest of the time I kept the guards in place. Click images to enlarge |
|
In the Shop
Before assembling and setting up the INCRA IBOX I sat down and watched the included DVD. I strongly suggest that you also view this DVD before doing anything as it really does show the entire setup and why you are doing things. They even have separate setup instructions for using the INCRA IBOX on a table saw and a router table just to be sure they are clear. They also look at preventing tearout on both machine types with suggestions to help you create cleaner joints.
After watching the DVD I began setting up the INCRA IBOX which took just a few minutes. While watching the DVD I realized that I needed to prepare several project pieces for the test before I changed my table saw over to the dado stack. I also cut an extra piece of wood that would be dedicated to making a story stick that will help decide on future stock widths using the 3/8”-wide fingers.
You really have several options when sizing the stock and the DVD and manual cover those clearly. A chart card is included that breaks down the various pin widths, number of fingers and the width of the wood needed for center keyed and splined box joints. The DVD and manual cover a center-keyed form of box joints that lets you work with board widths other than the ones in the charts. This procedure essentially adds the odd width finger to the middle of the joint giving it a unique look. This can really be an attractive point of interest in the joint and a procedure that lets you get even more creative with box joints without sacrificing the ability to tweak the fit.
I cut my first set of box joints following the procedures on the DVD and while the alignment was very nice, the fit was tighter than I wanted. I could tap the joint together with a dead blow mallet but since the INCRA IBOX is “adjustable” I thought we needed to try that also.
 |
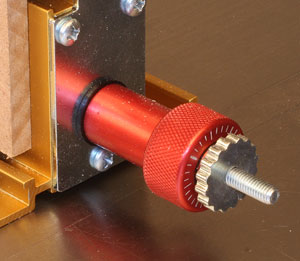 |
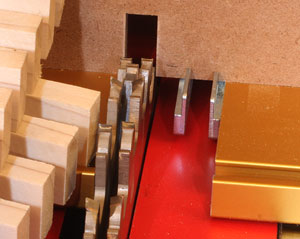
The system of movable fingers (left) that take the place of the pin on other jigs is a big secret behind the ease of use. This adjustment dial (right) is the rest of that secret and allows you to accurately dial in changes to pin width as small as 0.001"! And you will find out that often times, that 0.001" is just about enough of a tweak to perfect the fit of a box joint. Click images to enlarge |
|
After loosening the top-mounted locking knob I went to the dial and turned the silver dial counterclockwise about three of the graduations. Turn the silver dial right to tighten, left to loosen the joint fit. Each graduation represents 0.001” of change so turned the silver dial about three graduations, reducing each finger by about 0.003” which should be too much. However, I wanted to show how sensitive box joints are to sizing to drive home the point about what a present from the woodworking spirits this INCRA IBOX really is.
I cut another joint using the same procedures at the new setting and sure enough, the joint is a bit loose now. I think most people will have to go through this adjusting procedure a few times to get it in their head that you really can dial in a 0.001” change and can actually see a difference in the joint that setup cuts. People that have used INCRA stuff in the past already know this. However, being able to tweak the fit of box joints so easily still takes some getting used to. After this evaluation I found myself tweaking box joint fit just because I could.
While reading up on the center-keyed procedure I saw an opportunity to get a little more creative with the INCRA IBOX so I found more pieces of wood to try this idea. I found some pieces that are 4-1/16”-wide and while that matches up pretty well with my 3/8” story stick I thought I could use part of the center-keying technique to make a box joint with a single wide finger at the middle.
After setting the blade height I made two cuts from either side of the first piece. Then I set the first cut on that piece over the cutter from the left to set the first cut on both edges of the other half of the joint. After that I made two more cuts on each side of the second piece in the normal progression. I found that left me with roughly an extra finger at the center where I wanted the one wide finger on the mating side to go.
I used the adjusting handle that slips over the silver dial because each full turn produces 1/32” of change. I dialed in just under ¼” of offset that would put that extra finger at the blade. I had to make finish cuts from both sides to get rid of the extra finger along with a tiny bit of paring away a sliver of leftover wood but the joint fit perfectly and looks very different for a box joint.
Video Tour |
Conclusions
I should have known that it would be someone like INCRA that came up with an easy to use, fully adjustable box joint jig that virtually anyone can use. Their INCRA IBOX is a perfect example of how high-end engineering and machining can produce a jig that makes a previously very difficult form of joinery very easy. I like that the same jig can be used on a table saw or router table without buying additional pieces. This way you have options years down the road if your shop changes.
INCRA’s attention to detail, their penchant for using high-end materials and dead on CNC (computer numerically controlled) machining means that you are getting a quality American Made tool that will last forever if you can avoid doing something very strange to it.
With a street price of $169.95 (5-24-2012) there just isn’t a good reason to fight with shop made or commercially available jigs that can still need a math major to operate. Add in the super easy adjustability of the INCRA IBOX and the decision on which jig to get is simple for all but the most masochistic among us. Do I still have to tell you to take a look at the INCRA IBOX?
Visit the INCRA web site – Click Here
Have a comment on this review? –Jig
All written, photographic and drawn materials are property of and copyright by NewWoodworker.com LLC 2000-2019. Materials may not be used in any way without the written permission of the owner.