
This is a Veteran Owned site
![]()
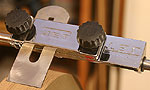 |
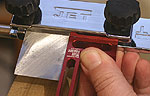
JET's SEJ-1, Straight Edge Jig makes it easy to put a super-sharp edge on plane irons, chisels and other tools with a straight edge. Click image to enlarge |
JET Straight Edge Jig – SEJ-1
Setting it up right
Text & photos by Tom Hintz
Posted – 10-17-2006
The JET SEJ-1 Straight Edge Jig is included (at this writing 10-16-2006) in the basic JET Wet Sharpener package because it handles very common cutting tools such as plane irons and bench chisels. The JET SEJ-1 (also compatible with the TORMEK machine) has a width capacity of 3”, exceeding the similar TORMEK SVH-60 jig by ½”.
The JET SEJ-1 is 6”-long and 1 3/8”-wide and made from a pair of beefy castings that insure the stability necessary to create flat, ultra sharp cutting edges. Fully chrome plated, the JET SEJ-1 is easy to keep clean and corrosion-free in the wet grinding environment.
Setup
 |
 |
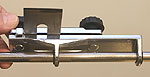
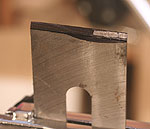
(top) The offset legs allow the SEJ-1 to move even wide tools fully across the grinding stone. (bottom) Before starting, check the cutting edge to see if it is square to the body of the tool. If not, mark the edge that protrudes farthest to help adjusting later. Click images to enlarge |
Note: Before mounting the tool to be sharpened in the JET SEJ-1, use an accurate square to determine if the cutting edge is square to the tool body. If not, note which part of the edge protrudes farthest. Sharpening on the JET Wet Sharpener will correct this but we have to know which part of the edge is longest when adjusting the JET SEJ-1. Also, color the bevel with a black marker to make detecting where grinding is beginning easier.
Notice that the twin mounting legs of the JET SEJ-1 are offset to one side. That “cheats” the tool being sharpened to the suspended side of the JET SEJ-1 to insure the full width of large tools can be ground without interference with the support arm mounts.
There is a pair of locating blocks cast into the JET SEJ-1 base that make squaring the tool being sharpened to the jig very fast. That automatically squares the tool with the support arm and the surface of the grinding wheel. Insert the tool, hold it against those locating blocks and snug the locking knobs down lightly.
The amount of tool protruding from the jig must be sufficient to insure clearance between the JET SEJ-1 mounting legs and the grinding stone when the assembly is adjusted to produce the desired bevel angle. I have found that in most cases, 2 to 2 ½” of the tool projecting from the JET SEJ-1 is sufficient but check this clearance before starting the JET Wet Sharpener.
 |
 |
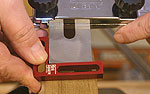
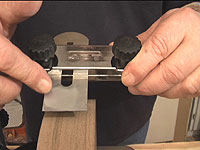
(top) When the tool is long enough, placing the side against both stops (arrows) aligns it square to the SEJ-1 base. |
Some bench chisels are too short to contact both squaring bosses and have this minimum length protruding. In this case, extend the chisel to produce the necessary protrusion, hold it against the forward squaring boss and lightly tighten the locking knobs. Hold a small, high-precision square along the forward edge of the JET SEJ-1 base (not the clamping plate) and adjust the tool so it is square to the JET SEJ-1 base and then tighten the locking knobs to secure it.
Set the Support Arm
When the cutting edge angle is to be retained, adjust the support arm height so that the current the bevel is flat on the grinding stone. Lock the support arm, lightly press the tool against the stone and give it a little turn by hand and look at the coloring on the bevel. Keep in mind that at this point we are interested in the front-to-back placement of the scratching, not side-to-side. That comes later. If the scratching is not over the full bevel, adjust the support arm as needed to make corrections.
If a new angle is being ground, use the Angle Measuring Device (AMD-1) to set the support arm height. When changing angles, the location of the scratch pattern on the bevel (again, front to back) is irrelevant.
Camber Correction
 |
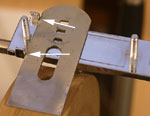
If the test scratch pattern is to one side, the clamping plate of the SEJ-1 has to be adjusted. See the Video Tutor below for a demonstration. Click image to enlarge |
An idiosyncrasy of jigs like the JET SEJ-1 is that the locking knobs can be tightened unevenly and rock the tool being sharpened slightly. If ground in this position, the cutting edge will be angled rather than square to the body of the tool. Checking for this alignment issue and correcting it is simple.
If the cutting edge is already square to the body of the tool and the scratch pattern is in the middle or across the width of the bevel, all is right with the world and you can begin sharpening. If the edge is square to the body but the scratch pattern is to one side or the other, loosen the locking knob slightly on the same side as the scratch pattern and tighten the opposite one. Re-color the bevel, press it against the stone and give it a turn and see if the scratch pattern has moved to the middle. Repeat this process until the scratch pattern is centered on the cutting edge.
Note: Because worn cutting edges may be deformed to some degree, the scratch pattern may not be consistent. What we are looking for is the majority of the pattern to be centered on the cutting edge. Repeating this check as sharpening progresses will help prevent accidentally grinding a slight angle on the cutting edge.
If the cutting edge was not square to the body, the scratch pattern should be on the long point. Adjust the clamping knobs as described above to move it there if it is not.
Video Tutor |
 |
Once grinding begins, you will have to continue checking the cutting edge with a square. As material is removed, the edge will become square to the body. At that point, stop grinding, color the bevel and repeat the scratch pattern test to be sure it is centered on the cutting edge. After adjusting the clamping knobs to center the scratch pattern, double check the support arm height to be sure the angle has not changed. Once that angle is confirmed, you can complete grinding the edge.
If the edge is to be honed at the leather wheel, the setup used for grinding will work there as well. Move the support arm to the horizontal mounts, adjust it so the bevel is flat on the leather wheel and finish the edge.
Pricing Link |
This set up process takes far longer to explain than to do. With a little experience, you will be setting the JET SEJ-1 up and be happily putting super sharp, square edges on your straight edge tools. Soon after that you will notice how efficient and predictable these tools are when the cutting edges are actually sharp and square all at the same time!
Have a comment on this story? –Email Me!
Back to the JET Wet Sharpener Jig Reviews List
All written, photographic and drawn materials are property of and copyright by NewWoodworker.com LLC 2000-2019. Materials may not be used in any way without the written permission of the owner.