
This is a Veteran Owned site

 |
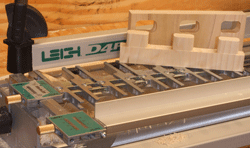 |
The Leigh M2 Multiple Mortise and Tenon Attachment makes this type of joint easy. That means you will use this template often! This tool finished 4th in our annual Top Ten Tools of 2010! Click image to enlarge |
|
Leigh M2 Multiple Mortise and Tenon Attachment
The very difficult just got very simple
Text, photos and video by Tom Hintz
Posted – 9-3-2012
Making regular mortise and tenon joints is challenging but that complexity pales when compared to creating multiple tenon through joints. Once again, the folks at Leigh Jigs came to the rescue, particularly for those of us who own their legendary dovetail jigs. The Leigh M2 Multiple Mortise and Tenon Attachment is a direct replacement for the dovetail finger assembly and it comes complete with all of the components you need plus the accuracy and ease of use we expect from Leigh products.
The Basics
The Leigh M2 Multiple Mortise and Tenon Attachment literally replaces the entire dovetail finger assembly so nothing has to be transferred from one assembly to the other each time you want to use it. Slip the dovetail finger assembly off and slip the Leigh M2 Multiple Mortise and Tenon Attachment on. There is some initial setup but that
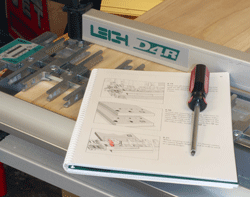 |
The User Guide is very well done and lays flat on its own! You will come to appreciate that binding once you use it. Click image to enlarge |
procedure is both easy and fast. The Leigh M2 Multiple Mortise and Tenon Attachment even comes with its own scale assemblies for the finger assembly and the included fence. The kit also includes one of Leigh’s quality 1/2" HSS spiral upcut bits. (Leigh No.180) This jig is capable of producing three corner radii: 5/32", 1/4", or square (you have to chisel the corners naturally).
If you are at all familiar with Leigh products the Leigh M2 Multiple Mortise and Tenon Attachment User Guide will not be a surprise. As is their habit the 74-page User Guide is clearly written and augmented with large, high-quality illustrations. If you follow the instructions from setup to cutting the joints, success is in your not-so-distant future. Leigh also uses the spiral binding that lets the User Guide lay flat on the bench without having to weight it down.
The Leigh M2 Multiple Mortise and Tenon Attachment adjustable guide fingers allow you to design and cut multiple mortise and tenon joints in nearly any layout you can come up with as long as it fits on stock up to 24" wide and in thicknesses up to 1-1/8”! Mortises and tenons can be cut in sizes from 5/16" x 5/8" to 1-1/2" x 2-1/2"!
The User guide also shows how to use the Leigh M2 Multiple Mortise and Tenon Attachment to cut a wide range of finger (box) joints as well as huge variably spaced half-blind dovetails up to 1-1/4”-deep with some requiring the use of accessory bits.
Installation & Setup
The Leigh M2 Multiple Mortise and Tenon Attachment is a direct replacement for the D4 series guide finger assembly. On some Leigh D4R/D4R Pro dovetail jig models you also have to replace the support arms with the longer ones included in the Leigh M2 Multiple Mortise and Tenon Attachment kit. The longer arms accommodate the fence.
 |
 |
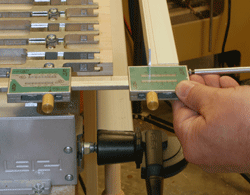
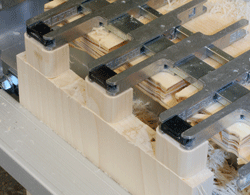
Setup of this template is quick and easy. (left) It is also very much like setting up the D4R in the first place. The guide fingers (right) are truly adjustable, letting you design whatever joint pattern you want. Click images to enlarge |
|
The actual assembly and setup of the Leigh M2 Multiple Mortise and Tenon Attachment is simple. The main task is installing the scale blocks on the ends of the guide finger and fence assemblies. Once the guide finger and fence assembly steps are completed the Leigh M2 Multiple Mortise and Tenon Attachment can be installed on the support arms in seconds with no further setup needed. Another nice touch is that the guide fingers are adjusted using the same screwdriver that came with your Leigh dovetail jig. You also use the same bridging material supplied with the Leigh jigs when your layout produces substantial gaps in the fingers.
In the Shop
I found that setting the Leigh M2 Multiple Mortise and Tenon Attachment up on my Leigh D4R was as simple as they say. I had to replace my support arms with the longer ones that came with this kit but that process adds no more than 2 minutes to the process. Following the User Guide closely I had the guide finger and fence assemblies installed and adjusted in just a few more minutes.
The Leigh M2 Multiple Mortise and Tenon Attachment is not sensitive to the width of the board being cut which simplifies designing the joint. This jig really is fully variable which means that you can let the design portion of your mind go wild if desired. For my initial joints I decided to stick with a simple three tenon layout. I should add that this design is simple with the Leigh M2 Multiple Mortise and Tenon Attachment but would be VERY difficult to produce any other way.
 |
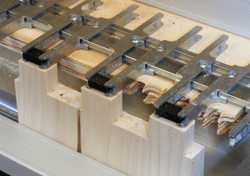 |
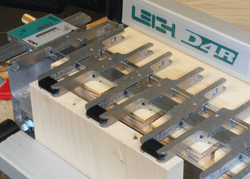
To help cancel out alignment issues between the guide bush and bit you make the first tenon cut (left) on the left side of the jig. then for the second cut (right) you flip the board and guide finger assembly over to finish cutting the tenons on the right side of the jig. Very easy but very effective. Click images to enlarge |
|
The User Guide walks you through the process of setting the Leigh M2 Multiple Mortise and Tenon Attachment up to cut the joint you designed. Because the mortise and tenons are cut with the same guide finger layout the process is just that much faster.
I installed the included bit and Guide Bush in my plunge router and set the depth to be sure that at full plunge it went all the way through the ¾”-thick material I was using. The instructions tell you to route the mortises in steps to reduce the strain on the bit. That is a good idea but it is also a good plan to stop after each pass to clear the debris from the guide finger assembly. Because of the fence the Leigh M2 Multiple Mortise and Tenon Attachment cannot use the Leigh VRS dust attachment and until you go through the wood entirely, the dust is captured and can build up against the sides of the guide fingers. I found that even with stopping to clear the debris, the process of cutting nice, rounded-corner mortises was surprisingly fast.
To cut the tenon you simply flip the guide finger assembly over front to back. The router depth is set to produce the type of joint you want. You can set the depth to produce tenons that are just slightly longer than needed so you can sand them back flush or you can cut them as long as you want to round their outer edges to accent the through mortise. In either case, once the bit depth is set, the process is the same.
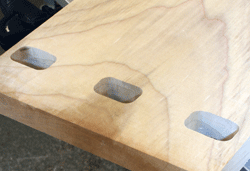 |
My first set of mortises came out very clean on both sides of the board! Click image to enlarge |
First, you route around the guide fingers to clear most of the material. That leaves the backside of the tenons untouched. Now you flip the guide finger assembly over left to right and reinstall it to the same cut depth. Then you move the board to the other end of the jig, turning it to put the square side of the tenons facing out and finish routing them.
This might sound more complicated than necessary but flipping the guide fingers and stock this way helps cancel out any alignment issues between the bit and Guide Bush. Once you do this a couple times it goes very quickly and produces a very clean joint. The User Guide explains how to correct joint fit problems so if your stock is all the same size, the setup can be perfected quickly and virtually any number of joints can be cut. In my testing I was able to cut clean, good fitting joints after one or two trial runs on that setup.
One additional step I would recommend is to wax (non silicone wax) the baseplate on your router and the upper and lower surface of the Guide Fingers. That allows the router to glide freely and lets you concentrate on following the guide fingers without applying unnecessary pressure that could compromise the joint.
Conclusions
Video Tour |
 |
The Leigh M2 Multiple Mortise and Tenon Attachment is a great addition to your D4R series dovetail jig. The multiple mortise and tenon is very difficult to make accurately but with this template system, you can be a master in no time! The other joints the Leigh M2 Multiple Mortise and Tenon Attachment is capable of making extends the usefulness of your base jig even more.
The typical Leigh attention to quality, usability and high-end instructions mean you will be able to make this beautiful joint very quickly. With very little practice your projects can take an impressive step up thanks to the Leigh M2 Multiple Mortise and Tenon Attachment.
The street price for the Leigh M2 Multiple Mortise and Tenon Attachment hovers around $259.00 (9-2-2010) which is not bad considering the amount of work, learning and scrap wood it eliminates! Figure in the “Wow!” factor your projects will enjoy and the price gets better and better.
Visit the Leigh Jigs website – Click Here
Have a comment on this review? –Email Me!
All written, photographic and drawn materials are property of and copyright by NewWoodworker.com LLC 2000-2019. Materials may not be used in any way without the written permission of the owner.