
This is a Veteran Owned site

 |
| If you like quality tools that do the job right the first time and are easy to use, you need to check out these offerings from MiterSet. Click image to enlarge |
MiterSet Setup Tools for Your Miter Gauge
Remarkably fast, super accurate and foolproof
Text, photos and video by Tom Hintz
Posted – 1-7-2016
Woodworkers have been fighting inferior miter gauges ever since there were miter gauges. It should not surprise us that in this day of CNC (computer numerically controlled) machines and ultra-precise laser capabilities that someone would come up with a simple answer for a world filled with inaccurate miter gauges. That “someone” turns out to be the folks at MiterSet. In fact, they came up with idea for individual tools for setting miter gauges for normal miter work and another for cutting segments with a whole new level of accuracy. Both MiterSet products reviewed here are available in versions for use on the Shopsmith Mark V machines, and MiterSet makes both products for common 3/4" miter slots for US standard table saws, too.
MiterSet makes these tools in the USA which is increasingly rare. Equally uncommon is the 25-year product lifetime warranty along with a guarantee to be accurate for the full life of the product. Manufacturers don’t make claims like that if they don’t think that they can back them up.
MiterSet Standard - U.S. Table Saws
Setting up even higher-end miter gauges to cut spot-on miters has never been easy. The design of the MiterSet Standard eliminates the guess work. The design engineers at MiterSet realized that your stock miter gauge would hold the perfect setting if you could get it to that point easily. Now you can.
The MiterSet Standard is based on a 5-7/8” square chunk of aluminum with a .753” wide miter groove. The Shopsmith Mark V version of this plate has a slot .723” wide to accommodate the miter bar that comes with that machine. The bottom of the plate has a nice rubber pad that helps keep it in place when sitting on your cast iron table.
 |
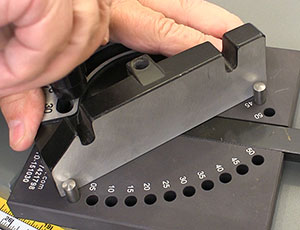 |
| The detent bar (left) lets you alter angles by up to 2-1/2-degrees in 1/2-degree steps. If you don't need to alter the angle use the bare pins (right) and setup is faster yet! Click images to enlarge |
|
To each side of the miter slot are curved lines of eleven holes representing degrees of angle in 5 degree increments. These holes are drilled on high end machines that allow an accuracy of 1/1000th of an inch in the placement of each hole. You also get a pair of precision-ground, slightly tapered pins that fit in the array of holes and are used for setting your miter gauge. Though each of those lines of degree settings go to 50 degrees, you can actually make perfect adjustments up to 52-1/2 degrees using the included detent bar. Put the included pins into both 00 holes and the MiterSet Standard will set your miter gauge to 90-degrees to the miter slot with a speed and accuracy people in woodworking simply are not used to.
The detent bar has a series of stepped cuts on each end that each represent ½-degree of change. This bar allows you to fine-tune the setting whether you need up to 2 ½-degree above or up to that same amount under the angle specified by the pin location. Adding to or subtracting from the base angle set by the pin is determined by which way you use the detent bar.
For our example here the right pin is inserted into the 00 hole on the right side of the MiterSet Standard and the other pin is put in the 20-degree hole on the left side of the MiterSet Standard. By putting the blank edge of the detent bar against the pin at 00 we can increase the angle by up to 2-1/2-degrees using the stepped notches at the 20-degree pin. Turn the detent bar around and put the blank edge against the 20-degree pin and we can reduce the angle by using the notches at the 00 pin.
Things like this are difficult to explain clearly but much easier if we show you. The video accompanying this review has a section that shows this process and how easy it really is. The toughest part of using the MiterSet Standard just might be remembering to put the components back into the included carry case.
Conclusions
The MiterSet Standard is an exceptionally well-made setup tool that saves time because of its simplicity. It is obviously over-built for the intended use but that durability means that this tool will be around longer than we will.
The MiterSet Standard has a street price of $69.95 (1-6-2016) and though not free gives you a very cheap cost per use. That doesn’t include the wood saved by making correctly angled cuts the first time around.
See the MiterSet web page – Click Here
 |
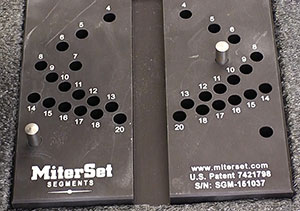 |
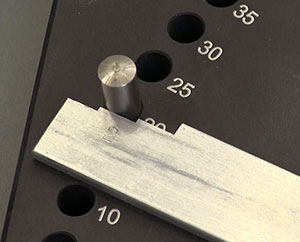
| The detent bar allows changes down to 1/2-degree (left) to the pin position. The MiterSet Segments Jig (right) labels the holes by the number of segments the setting cuts. Click images to enlarge |
|
MiterSet Segments Jig
I am reasonably sure that cutting segments is a woodworking task devised by Mother Nature as a punishment for ruining one of her trees. Take for instance trying to figure out how to set up for cutting seven identical segments. That requires adjusting our miter gauge to 25.714-degrees. The scales on many factory-supplied miter gauges are more advisory than accurate and all are far from detailed enough to attempt this kind of setup.
The MiterSet Segments Jig is fashioned from a hefty chunk of ¾”-thick aluminum cut to 5-7/8”-square. A .753” miter slot runs down the center. A version of the MiterSet Segments Jig is available for the Shopsmith Mark V. The back side is covered with a nice rubber mat that keeps this jig in place during use. Like the MiterSet Standard above the array of holes are produced using CNC equipment that insures accuracy to 0.001”.
There are 17 holes on each side of the miter slot making it easy to set up cuts to the left or right of your miter gauge. The holes are numbered representing the number of segments that setup will cut to form a circle. There are no adjustments, shimming or anything else. Put one of the included pins in the base hole below the numbered ones and then insert the other pin in the hole labeled with the number of segments you want to cut.
That really is all there is to it. Set your miter gauge in the slot, press the fence against the pins and lock it down. That’s all there is to making some of scariest miter gauge setups in woodworking. The toughest part of all this is letting your mind accept that the accuracy is built in and you do not have to be a math wizard.
Conclusions
 |
|
| I made all of the cuts in the video using this contractor saw with a different manufacturers miter gauge. Click image to enlarge |
|
The MiterSet Segments Jig just might be so easy to use that it belies the amount of work, guessing, trial and error and bad language usually associated with getting close to the angles this tool sets perfectly. I know somebody is going to say the MiterSet Segments Jig does not have a setting for 19 segments. While that is true I am comfortable saying “Get over it!” If you can’t survive with one of the settings on the MiterSet Segments Jig you should go wait in the bus for the folks living in the real world.
The speed with which you can make these formerly near-impossible setups is remarkable. Insert two pins, slide your miter gauge against them and lock it down. You can do it faster than I can say it. This is how a well-thought out, well-made tool works.
The MiterSet Segments Jig has a 25-year product lifetime warranty and is guaranteed to be accurate for the full life of the product. Despite all of the above and the MiterSet Segments Jig being made in the USA it sells for $69.99 (1-6-2016) which is not bad at all for a tool this accurate that will remain this accurate well after we are all gone.
Click Here to see the MiterSet Segments Jig web page.
Have a comment on this Review? –Email Me!
All written, photographic and drawn materials are property of and copyright by NewWoodworker.com LLC 2000-2019. Materials may not be used in any way without the written permission of the owner.