
This is a Veteran Owned site

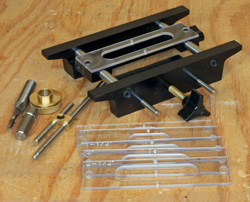 |
The Mortise Pal™ shown here needs only a bit and your plunge router to make loose tenon joinery a simple process in your shop! Click image to enlarge |
Mortise Pal™
An easy, precise way to make loose tenon joinery
Text, photos and video by Tom Hintz
Posted – 1-17-2011
Mortise and tenon joints have been a staple of woodworking just about as long as there have been woodworkers. However, for many creating a good fitting mortise and tenon joint can be daunting. Depending on the tools you use, learning to create mortise and tenon joints that actually fit properly can be somewhere between hard and downright frustrating. Now, the Mortise Pal™ Jig gives you an easy way to create the loose tenon version of mortise and tenon joints with remarkable speed and accuracy.
The Basics
The Mortise Pal™ Jig kit shown here comes with the Mortise Pal Mortising Jig itself, 6 Templates for mortise lengths up to 3-1/2" long in 1/2" increments (1/2", 1", 1-1/2", 2", 2-1/2", 3”), a quality brass Template Guide Bushing w/ Nut (fits the common Porter Cable style baseplate with a 1-3/8” stepped hole) and a Centering Pin. The kit also includes a Removable Stop that makes creating multiple joints of the same dimension/location quick and very accurate. You can cut mortises up to ½”-wide and up to3-1/2”-long. The Mortise Pal™ can handle stock from ¾” to 3”-thick which more than covers the material in which 99% of woodworkers would be using this type of joint.
The Mortise Pal™ itself is precisely machined from high-quality materials (US-Made by the way) and given a very attractive but tough finish. The large outer rails function as a support system for the router base. A thumbscrew-operated clamp works between these rails secures the Mortise Pal™ Jig to the stock being cut.
The template holding fixture slides on ground bars between the support rails allowing you to position the mortise where you want it. This template support is locked in position with another simple thumbscrew. The plastic templates that define the size of the mortise are screwed to this support block using the included hex wrench.
 |
 |
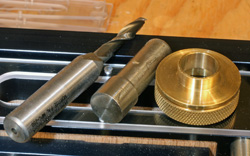
The Mortise Pal™ kit includes the alignment pin and guide bushing (left) but you have to supply the bit. Along with a big selection of compatible bits the Mortise Pal™ website also has pre-machined loose tenon stock (right) that makes this process even faster and easier! Click images to enlarge |
|
The template block has an engraved centering guideline on each end and a machined-in raised pointer centered within the template block opening. These alignment features make positioning the Mortise Pal™ on the wood virtually goof-proof if you are paying attention.
Accessories
The Mortise Pal™ web site (link at the end of this review) also offers high-end long reach carbide and HSS spiral router bits as well as template assortments. Between what comes in the Mortise Pal™ kit and the extras they offer you should be able to apply mortise and tenon joints to a huge range of project types and sizes.
The Mortise Pal™ web site also offers template sets that give you an even larger range of mortise sizes than does the selection supplied in the kit shown here. I expect that the vast majority of woodworkers can do just fine with the mortise sizes that come with the kit.
You can also buy bits, templates and tenon stock individually, all on the Mortise Pal™ site. To further extend the Mortise Pal™ they have 4 and 5 hole doweling templates as well as double 1” mortise templates. Their site also provides ideas on usage, application and tips to make using the Mortise Pal™ easier.
In the Shop
 |
 |
The alignment mark on the end of the template boss (left) makes getting the mortise where you want it simple. The adjustable stop also in this photo is included and makes repeat mortises dead-on accurate. The alignment "pointer" (right) machined into the template opening also makes placing the mortise perfectly an easy task. Click images to enlarge |
|
Using the Mortise Pal™ really is very simple. If you can draw layout lines where you want the mortise, cutting it there with the Mortise Pal™ is all but automatic. A plunge router is required for use with the Mortise Pal™ and it must have a minimum base diameter of 5-3/4” which is not a problem with most of today's’ routers. The only setup issue is getting the bit and guide collar in the plunge router correctly to insure all of the accuracy possible. Even that is made easy because of the precision-machined setup pin that is included in the Mortise Pal™ kit. Install that pin in your router (machined step up), install the guide bushing loosely and then bring the base down so that the alignment pin fits into the guide bushing. The fit between the alignment pin and the inside diameter of the included guide bushing is virtually perfect so you might have to loosen the baseplate a bit. Once the alignment pin slips into the guide bushing lock down the baseplate and guide bushing. If you can’t get enough movement with your factory baseplate take this as a warning and get an aftermarket baseplate with alignment capabilities. Eliminating that little bit of miss alignment will make your routing life more fun. When you get the alignment right, remove the setup pin and install the bit.
The depth of cut is really up to you and is limited by the length of your bit. I used a standard ¼”-diameter spiral bit and was able to get 1-3/4” of cutter length measured from the baseplate of the router. Subtract the 5/8” total thickness of the Mortise Pal™ including the template and 1-1/8”-deep mortises are easy. If you want to cut deeper mortises get a longer bit but for most applications the 1-1/8” per side depth to create a very strong joint.
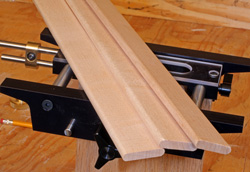
My first mortise and loose tenon joint came out with about 1/64” of offset between the faces of the pieces being joined. That comes from it being very difficult to mark the exact center of the thickness of a piece of wood. But, here is a simple cheat. Mark the front of each of the two pieces being joined as they will be in the finished joint and make sure that the mark is facing you when cutting the mortises. If your centerline is a bit off, it will be the same on both pieces and the finished joint comes out perfect. The joint in the accompanying video is the second one I cut where I made sure both were cut with the same face towards me during the cuts. The result is a perfectly aligned joint.
Conclusions
Video Tour |
The Mortise Pal™ is very well thought out and made with the ultra-precision of modern CNC (computer numerically controlled) machining. All of the parts are made from high-end material and everything works exactly as claimed. I was not a fan of loose tenon joinery before using the Mortise Pal™ but it has swayed me. This jig is dead easy to use and with a bit of care, perfect fitting loose tenon joints are easy and surprisingly fast to make. The depth stop rod assembly makes it even easier when there are more than a couple identical joints to be made.
The Mortise Pal™ kit shown here sells for $199.00 directly from the manufacturer. The ¼”-diameter spiral bit cost another $20.00. If you like well-made, well-designed tools with the added bonus of it being Made in America then Mortise Pal™ deserves your full attention. If you consider the newfound speed with which you can create dead-on accurate loose tenon joints and the stack of wood you won’t destroy learning to use it, the Mortise Pal™ gets to be a better and better value.
Visit the Mortise Pal™ web site – Click Here
Have a comment on this review? –Email Me!
All written, photographic and drawn materials are property of and copyright by NewWoodworker.com LLC 2000-2019. Materials may not be used in any way without the written permission of the owner.