 |
If you do not have the Osborne EB-2, you are not working as accurately as you could be. Period.
Click image to enlarge |
The Osborne EB-2 Miter Gauge
The way it is supposed to be
Text & photos by Tom Hintz
OK. I'll admit I first became interested in the Osborne miter gauge because His Normness used one on his show. However, that was just part of the attraction. The triangulated adjuster is what pushed me over the edge.
I spent nearly 40 years building race cars and know there is nothing more rigid than a triangle. The way Osborne designed the EB-2 miter gauge made perfect sense to me. If you want a miter gauge to be solid, it has to be supported at a point some distance from the pivot.
Construction
When Osborne designed materials for the EB-2 they obviously were intent on producing a long-lasting and accurate piece of equipment. Everywhere you look the materials, machining and fit are extraordinary.
The main body is crafted from a heavy aluminum extrusion. Overall length of the body itself is 25.5-inches, with a height of 2.5-inches. The body is about 0.700-inches thick, not counting approximately 0.014-inches of abrasive coating on one face. The wall thickness of the extrusion is a hefty, flex-eliminating 0.125-inches. The body also features interior webbing that along with the thick walls means you are going to have to do something drastic to warp or bend this tool.
 |
 |
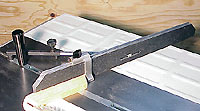
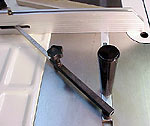
(Top) Triangulation is the key to the EB-2's rock-solid stability.
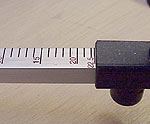
(Bottom) The graduations are dead on, with detents at 0-22.5-30 and 45 degrees. You can go 45-degrees to either side of zero.
Click image to enlarge |
The guide bar is made from plated steel and is 21-inches long, 0.742-inches wide (between adjusting sections) and 0.375-inches thick. The tip of the guide bar is fitted with a steel roller 0.897-inches in diameter to follow the t-slot. A large handle, located on the operator end of the guide bar, provides safe, positive control during cuts.
A heavy-duty flip-stop slides along a channel in the top of the main body and locks firmly up to 25-inches from the blade. The flip-stop is made from heavy aluminum with a heavy-duty, play-free hinge and locking mechanism.
Angle-Adjuster Mechanism
The key part of this miter gauge is the triangulated angle adjuster. It is hinged at the operator end of the guide bar and at the center point of the main body. Both pivots are secure and slop free.
The inner adjuster bar, which carries the CNC-produced graduations, is made from solid 0.350-inch-square bar stock. The rear housing, into which the graduated bar fits is steel and features a comfortably sized knob for locking in the adjustment.
There are ball-dent presets built into the graduated bar at zero (90 degrees to the blade), 45, 30 and 22.5 degrees. All of these presets are available on either side of zero, and all of them dead on.
Assembly
The EB-2 was very easy to assemble, in part because there is no need, or provision, for adjusting it's alignment to the miter slot. Attach the handle, slip the adjustable flip-stop into it's channel, insert the outboard pivot screw as directed and it is ready for final fitting of the guide bar to your miter slot width. That's it.
Set Up
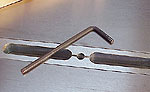 |
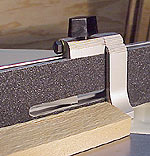
Width adjusters on either end of the guide bar allow a perfect fit to the miter slot.
Click image to enlarge |
The only procedure necessary to ready the EB-2 for use is to fit it to your miter slot. The EB-2 has two easy-to-use adjuster mechanisms machined into the main guide bar. Place the EB-2 into your miter slot and (from the top) tweak the Allen screws located near either end of the guide bar until side-to-side play is at a minimum. This takes a little trial and error to reach a balance of snug fit and free movement, but it is easy.
Accuracy
I have always doubted manufacturer's statements regarding accuracy and the EB-2 would not escape that scrutiny. With the EB-2 assembled and fit to my miter slot, I dug out some scraps to see just how close this tool really was. I should not have wasted my time. Regardless of the angle I set, the cut came out perfect. If you set the EB-2 at the right angle, it cuts the right angle, every time.
I tried cuts using the pre-set angles of 45, 30, 22.5 and zero-degrees. All were exact. Then, I tried setting between the pre-sets at various angles and again, the cuts came out exactly as the sliding indicator said.
Using the EB-2
 |
 |
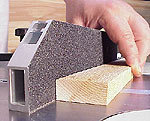
(Top) The no-skid coating is great for accuracy and safety.
(Bottom) The flip-stop is fast, secure and totally repeatable.
Click image to enlarge |
Once I got the EB-2 on the table saw and began cutting wood, it became obvious that I had made the right choice. This is a fine tool that is exceptionally easy to use. Whether cutting square, 90-degree ends or whatever angle is needed, the EB-2 does it perfectly, then repeats that perfection as often as you want.
The length of the main body makes cutting even very long pieces of wood easy. Because the EB-2 cannot flex, the cuts come out flat every time. The only way to get blade marks in a cut is to physically move the wood away from the body yourself.
The no-slip coating on the front body face is remarkable in how secure the wood feels at even the steepest of angles. Only moderate pressure is needed to make 45-degree cuts with absolutely no creep. Besides a substantial increase in accuracy, this one feature brings a new level of safety to miter cutting operations.
The EB-2 actually has two faces, one smooth and the other with the abrasive coating. An adhesive-backed tape measure is supplied that can be applied to the smooth side if you choose to have that face forward.
Also, the EB-2 can be used on either side of the blade. A single screw is removed, the arm swung around and replaced in another hole to reverse sides.
The flip-stop is not only easy to adjust, it makes repeat cuts, angled or straight, a snap to do over and over again. Setting the flip-stop is also much easier than placing a stop block. I found that by lifting the flip-stop slightly and running the tape measure between it and the body, I could set the exact stop-to-blade length the first time with a precision I had not experienced before.
One of the first tests I threw at the EB-2 was cutting an octagon. I grabbed a length of one-by-two, set the flip-stop to the length I wanted, dialed in 22.5-degrees and began cutting. Keep in mind I had not jointed the edges or performed any other operation to insure the wood was straight. The octagon came out perfect with tight, even joints. Just think what you can do with a prepared piece of wood.
Conclusions
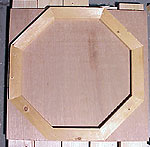 |
I cranked out an octagon, with no preparation to the wood. It came out perfect.
Click image to enlarge |
The Osborne EB-2 is a must-have piece of equipment for virtually any woodworker that seeks accuracy and takes pride in fit. The price tag is not small (I paid $169.99) but worth every penny once it goes to work in your shop. I suspect there will be a savings in wood from this point forward that will more than offset the initial cost.
The Osborne EB-2 certainly makes many table saw operations faster and easier, but that is not the point. The most important factor is the extreme level of accuracy this tool brings. Getting the job done more quickly is a bonus.
Visit - http://www.Osbornemfg.com/
Do you have a comment about this page? - Email Me!
Back to the Tool Reviews List
|
