
This is a Veteran Owned site

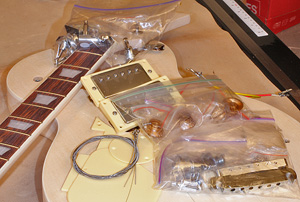 |
This kit comes with very nice wood and everything you need short of an amp to start making sounds! Click image to enlarge |
Rockler Custom -1 Unfinished Electric Guitar Kit
Building your own legend without the legend-level price
Text, photos and video by Tom Hintz
Posted – 9-21-2012
Also: See our new Geezerguitar.com site!
Want to see how to Hot-Rod a guitar kit like this? Click Here!
Thirty-some years ago I played guitar in a working band for several years but have not touched a guitar since. Recently I started playing again so when the opportunity to build a Custom -1 Unfinished Electric Guitar Kit from Rockler came along saying yes was a no-brainer.
I know that right now someone is thinking, “Cool, a $3000.00 guitar for under $300!” Well, what you really get is a solid guitar kit that you can be proud of and actually play if you take your time. The neck is rock maple and virtually complete in terms of the fret board, frets and nut being installed. The tuner holes are also pre-drilled. This kit has a fitted neck but the neck and its socket in the body are CNC cut and matched at the factory and this is a crucial point. Rockler has other kits with bolt-on necks as well.
The instructions that you download may not be the best but I have seen way worse. If you pay attention and apply common woodworking skills you can come away with a nifty, personalized guitar. I am going to present a separated “guitar build” in the near future that will focus on the basics of putting these kits together.
The Basics
The Custom -1 Unfinished Electric Guitar Kit includes a fully shaped basswood body with a nice flamed maple top that is also contoured and sanded from the factory. The body has all of the necessary openings already routed including the electronics passages for wires.
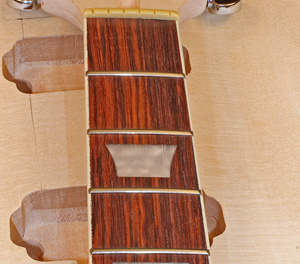
The hard maple neck is also fully shaped and requires only finish sanding before finish is applied. The tuner end of the neck nice as it comes but there is room for you to cut a special shape to personalize the guitar a bit.
 |
 |
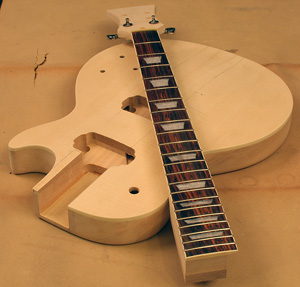
The body and neck (left) come fully shaped and routed which makes your job a ton easier. The neck has the fretboard (right) finished and in place, something we would be hard pressed to do in the average woodworking shop! Click images to enlarge |
|
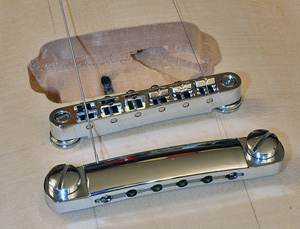
You also get a full set of electronics with all soldering already done. There is some plugging in of the wires that pass through the pre-carved channels in the body but they do include a diagram that makes that an easy task. You even get a pair of Hummbucker style pickups, a popular Nashville Tune-O-Matic style bridge and tailpiece, chrome tuning machines and strap buttons. You literally just need a guitar strap and amp to start making sounds.
Layout and Drilling
If you suspected that this build would get a little intense at some point, this is it. Laying out and then drilling the holes for the bosses that support that bridge and tailpiece are the most critical of the entire build. The good news is that no special skills are needed that we don’t already use in general woodworking. Accuracy is important but that should be our goal regardless of the project.
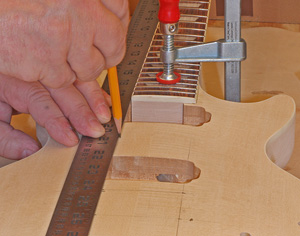
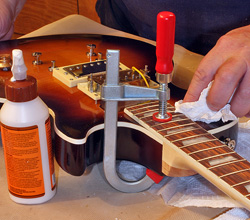
We start by slipping the neck into its cavity and clamping it in place temporarily. I used a simple U-clamp with protective plastic covers on the contact points to protect the frets and because we want this entire guitar to look pretty when we are done. Just make sure that the neck is all the way into its socket and apply just enough clamp pressure to keep it there.
I used a good straight edge to draw light lines extending the edges of the fret board down across the body. One line extending both sides of the fret board. These lines give us a good “sight picture” to make sure we get everything aligned with the neck.
Next we have to mark out the location of the bridge and this is a VERY important dimension. The instructions go through the measuring from the nut to the center of the 12th fret which is half of what we need. Read this to understand it but the dimension we want is 24-11/16” from the nut. Measure down each side of the neck and make a mark at 24-11/16” on each of our lines on the body. Carefully make a second mark next to the top one but 1/8” farther from the neck. Connect this mark with the original one on the lower line to mark the position of the bridge. Angling the bridge back towards the butt of the guitar on the top (bass) side makes it easier to set the intonation later when the guitar is completed.
Now make a second set of marks 1-1/2” closer to the butt end of the body from the ones we made at 24-11/16” on both of the line that come from the sides of the fret board and then connect those two marks to make a second line across the body. This second set is for the tailpiece which we will drill and install first. We use the original marks because unlike the bridge, the tailpiece is not angled.
 |
 |
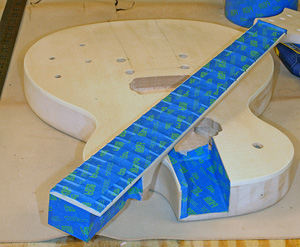
Laying out for the bridge and tailpiece bosses (left) is crucial but I am confident that if you pay attention to what you are doing the toughest part of this whole build will go by easily! Drilling holes in the beautiful body (right) is a little intimidating but take your time and USE A DRILL PRESS! Click images to enlarge |
|
Set the tailpiece on the body, the last cross line running through the openings and center it on the two long lines extended from the neck. We need to mark the center of each the tailpieces hook-shaped openings for drilling holes for the bosses that secure it to the guitar. Take your time and get these marks right!
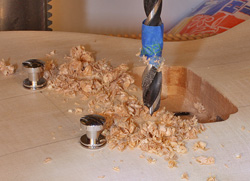
Then using a 7/16” bit, preferably a new Forstner bit but a good, sharp brad point bit works. Use a drill press drill the holes for those bosses just a tick over 1”-deep. The back of the body is flat so laying it on the drill press will insure getting holes that are square to the body. Supposedly this can be done with a hand drill and a bunch of skill but we both know that the drill press, even a borrowed one is the way to go. These holes are critical.
Before installing the bridge bosses make sure you read the section about the bridge ground wire! You need to drill a small hole from the rear pickup rout to the bridge boss hole. String the wire for this ground with a bunch of bare wire in the hole. Then, using a scrap of wood to protect the boss’s drive them into the holes until their flanges are flat on the body surface. Thread the mounts in place and slip the tailpiece into the bolts. If all went well it actually fits.
Temporarily install two tuning machines in the first hole on either side of the headpiece. Unwind the set of strings supplied with the kit and put the thickest one on top and the thinnest on the bottom of the tail piece and start them both in tuners but leave them a bit loose.
Now slip the bridge under the strings (the adjusting screws facing the neck) and set it on the slightly angled line we made for it earlier, set the strings in the first grooves of the bridge and be sure that they also go through the outside grooves in the nut. Snug both strings down letting them move the bridge as they tighten. If you look down the strings from the tailpiece to the neck the strings should be perfectly straight from the tailpiece to the nut.
Align the bridge on the angled line drawn earlier so that it runs across the center of both mounting holes. I used a drill bit that just fit through the hole in the bridge, pressed it lightly into the wood and spun it with my fingers to mark where the holes go for the bosses. If you have a more accurate way of marking these holes, now is the time to use it! There is no slop to speak of between the studs and the holes in the bridge so take your time and get this right! When you are certain about the placement of these holes, drill them 1”-deep with the 7/16” bit and drive the bosses in place. Screw the adjuster studs in all the way and set the bridge onto the studs. We will use these adjusters later to set the action of the strings.
I relaxed the strings enough to slip the pickups into their routs. We need to align them with the strings and then drill and screw them in place. There is a front and a rear pickup and both only face one way so be sure that they are level with the strings and neck before screwing them down! For this fit up you can just wad the pickup wire in the rout.
 |
 |
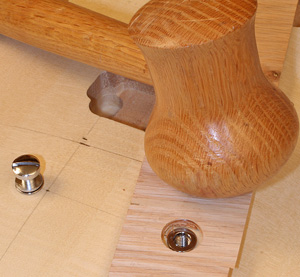
We have to drive the bushings into place (left) so take the time to drill a hole in some scrap to protect the good wood on the body! Using two strings to help locate the bridge (right) is one of the suggestions from the manufacturer and it works great so use it! Click images to enlarge |
|
After setting the pickups we have to see if the chip guard needs to be trimmed to fit around the pickups. The kit includes and metal standoff plate to hold the chip guard at an angle to then body which I decided not to use. I like the chip guard flat on the body but you may want the standoff in place. Do that now.
We also pre drill and install the strap buttons. There are not set locations for these though most put the rear one on the centerline of the guitar and the front one is more or less centered on the top front edge of the body shape. Since this is a second guitar for me I tried to mimic the locations on my Fender Telecaster so my one strap fits the same on both guitars. (My music budget isn’t any bigger than my woodworking one.) I also installed the cover for the truss rod, pre-drilling and installing those screws.
That was as far as I went with installations. I tried the volume/tone pots in their holes as well as the selector switch. I don’t feel the need to install all of that stuff and just take it back out again but I did make sure everything fit and let it go at that.
Now you can take all of that stuff off again to get ready for sanding and finishing. Leave the neck clamped in place for the time being but take everything else off. Trace a light pencil line around the neck where it fits into the body. Also trace a line on the neck itself where it meets the body. We need to identify all of the contact area where glue will be applied.
After taking the neck off of the body mask all of the glue surfaces. I stay just inside of the lines by about 1/32” or so. I want the finish to just enter the glue area slightly so that when assembled I don’t have a bare wood line around the neck/body junction.
The fret board itself will not be finished in most cases so we have to mask that making sure that we get the tape tight against all of the fret wires. If you are going to apply a color to the neck, even an amber shaded clear, run another strip of masking tape along the edges of the neck covering the white banding with the dots in it. After the colored coats are applied you can remove this edge tape before adding the clear.
 |
 |
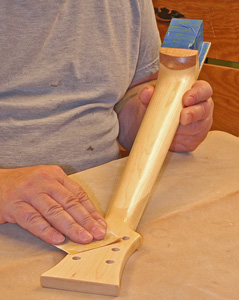
This neck is glued in place but is CNC machined and fit (left) at the factory to make our job way easier! After test fitting we have to mask all of the glue areas on the neck and body as well as the fretboard on the neck (right) before finishing. Click images to enlarge |
|
The instructions call for removing the bosses for the bridge and tailpiece before finishing. I know, but it does work. I used a scrap of thin plywood to protect the body as I pried the bushings out. Just take your time!
Finish Choices
Traditionally nitrocellulose lacquer has been used on guitars and I chose that finish here. Be forewarned though that this is not an easy finish to use and I came away with less than stellar results because of my inexperience. The guitar looks fine from a distance but I know where the errors are.
Being woodworkers you should have a full range of finishing options from which to choose. Any type of stain or top coats that you are familiar with should work on a wooden guitar so indulge yourself. Be sure to apply a few coats of clear over whatever finish you use to protect the surface from handling and normal wear.
Assembly
With finishing complete it is time to glue the neck into place. I used my normal wood glue but was sure to apply a generous coat to all of the mating surfaces. The instructions call for getting a bit of squeeze out all around the joint between the neck and body and that is not a bad idea. With the neck in place apply a clamp to hold it there. Make sure that you protect the finish and the frets! And, don’t get carried away with clamping pressure. Make sure that the neck is straight and in the right position and then leave it alone! I did come back after 15 minutes just to be sure enough glue had not squeezed out to loosen the clamp but then left it overnight to dry thoroughly.
Next, install the switch and fish its wires through the passages in the body. You may have to pull the wires down a bit temporarily to get the output plug connected before screwing it into its place on the edge of the guitar. Install the volume and tone pots into their holes paying attention to the diagram to get the neck pickup volume and tone controls on top and the bridge pickup controls on the bottom.
There is one (black) wire with nothing on its end and that is the bridge ground wire. That is fished into the rear pickup rout and then into the bridge boss hole. Get the ground wire in place before re installing the bosses.
 |
 |
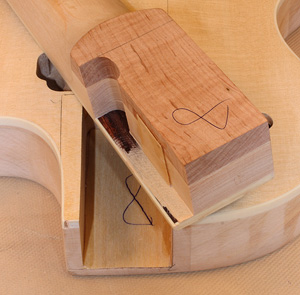
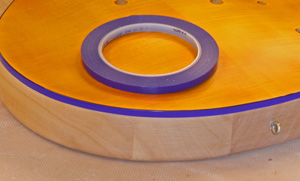
The body of this kit has an edge banding already installed so I used some automotive striping tape (left) to mask it during the color coats. The tape came off for the clear coats. I chose to just clear the neck and sanded lightly between coats to get a nice smooth finish. Click images to enlarge |
|
With the other wiring in place install the neck pickup fishing its wires down to the controls rout and plugging them in. Be sure that its mount is in the right position to hold the surface of the pickup parallel to the strings. Adjust the pickup position so that it matches the strings as closely as possible before installing the four screws. Repeat the process with the bridge pickup.
Isolate all of the connector plugs with the included shrink-wrap or electrical tape. Install the covers on the rear of the body and the Rockler Custom -1 Unfinished Electric Guitar Kit is essentially done. But there is some setup to do before you can play it!
Setup
Note: I am in the process of doing another guitar build story that will focus on building and setting an electric guitar up. A link to that resource will be added when that story is complete. The instructions below will get you started!
Install and snug down all 6 strings. For the uninitiated the strings are thickest on top, thinnest on the bottom. Their names are E (top), A, D, G, B, and E (thinnest on the bottom). The Rockler Custom -1 Unfinished Electric Guitar Kit comes with a set of strings which are fine to get started. I used a set of D’Addario nickel wound regular light gauge strings because I heard that Richie Sambora (Bon Jovi) uses them so they had to make me a star.. maybe. Actually I just like these strings.
You can tune the guitar to any piano, organ but be sure to use the base octave! Electronic tuners are available that take the guesswork out of this task but they can cost $20 to a bunch of money.
After tuning the guitar the first time we need to set the bridge height to get the strings a decent distance above the fret board. Note that the 12th fret has a narrow inlay and a pair of dots on the top edge of the neck. This is midway through the scale length and a good point to check the strings. Adjust the bridge so that the top and bottom strings are about 0.078” above the fret board. You can increase this slightly to help eliminate buzzing but this is close to what works best overall.
When the string height is set, go back and re-tune all of the strings and you are ready to play!
Plugged In
 |
 |
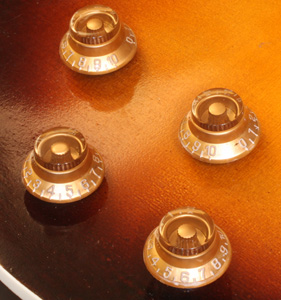
I decided to to do the lacquer sunburst finish (left) which turned out to be much harder than I anticipated. Any good woodworking type finish will work just fine plus stays more in your comfort zone! I know it sounds wrong but after finishing we glue the neck (right) in place. This is where careful masking earlier produces clean looking mating areas. Click images to enlarge |
|
The Rockler Custom -1 Unfinished Electric Guitar Kit is a nice guitar to play. The 14” radius fingerboard is flatter than I am used to but getting my fingers to go to the right places came fairly easy. The frets themselves appear to be in the jumbo medium range which is pretty forgiving for amateur players like me.
The Rockler Custom -1 Unfinished Electric Guitar Kit has very good sustain and tone. The twin Hummbucker style pickups mean that you can produce soft sounds, sharp country-picking tones yet go nuts with overdrive if heavy metal is more your taste.
To me, the Rockler Custom -1 Unfinished Electric Guitar Kit is a very good guitar for the price. The quality of the wood means that it not only sounds good but also you can make it look VERY good using common woodworking finish techniques.
Conclusions
The Rockler Custom -1 Unfinished Electric Guitar Kit has very nice wood and very precise shaping that makes it possible for you to come away with a playable, good sounding guitar. The quality of the wood means that with your wood finishing skills it will also look great!
I should note that I had a problem with the original wiring harness discovered during the initial fitting. A quick email exchange with the manufacturer got a new harness to me well before I actually needed it for assembly. The plug-in style of this harness saves you lots of grief trying to figure out what goes where. You can learn all that later on when you hot-rod this guitar!
And that is another point in the Rockler Custom -1 Unfinished Electric Guitar Kit’s favor. The wood and neck are good enough to make it worthwhile to hop this guitar up later if you decide to stick with playing. I am going to do just that to see just how far I can take the Rockler Custom -1 Unfinished Electric Guitar Kit. They give you all of the basics in one box at a very reasonable price for what you get. Then you let your interest determine how far you go! Click Here to see my Hot-Rodding a Kit Guitar story!
The Rockler Custom -1 Unfinished Electric Guitar Kit has a street price of $224.95 (9-21-2012) but they also carry several other guitar kits with prices as low as $124.95. See the link below for Rockler's guitar Kit page.
Video Tour |
Visit Rockler's Guitar Kit Page - Click Here
Have a comment on this review? - Email Me!
All written, photographic and drawn materials are property of and copyright by NewWoodworker.com LLC 2000-2019. Materials may not be used in any way without the written permission of the owner.