
This is a Veteran Owned site

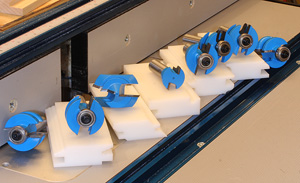 |
All of the Rockler Router Bit Setup Jigs are very accurate, easy to use and save a bunch of time and wasted effort, not to mention wasted wood. Click image to enlarge |
Rockler Router Bit Setup Jigs
The quick way to the right setup
Text, photos and video by Tom Hintz
Posted – 3-26-2013
Router bit setup jigs (blocks) have been around for a long time yet there are a surprising number of woodworkers who continue down the hit-and-miss eyeball technique road when trying to get their router bits at the correct height. That frequently results in frustration, wasted time and wasted wood, not to mention bad joints. There is a better and considerably easier way.
The Basics
The Rockler Router Bit Setup Jigs shown here have been precisely machined to make getting the perfect bit height fast and very easy. Because they are made using a full-depth cut you can also get the fence setting right the first time when that is crucial as with the 45-degree lock joint. These setup blocks also eliminate those seemingly endless test cuts that just waste time and wood. We always have to make a final test cut to confirm a setup or tweak it to perfection but the Rockler Router Bit Setup Jigs make getting to that point easy.
The Rockler Router Bit Setup Jigs are machined from super tough HDPE and measure 2" x 3-7/8" x 3/4". Most have profiles cut on two edges to allow for the two most common material thicknesses used with that type of router bit. However, jigs meant for bit sets such as the rail-and-stile cutter set have the rail profile on one edge and the stile profile on the opposing edge. Rockler includes setup use information with the Rockler Router Bit Setup Jigs that walks you through the setup procedure to get the best results from that block.
 |
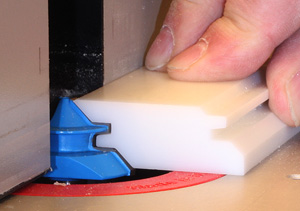 |
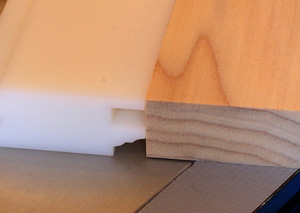
The Rockler Router Bit Setup Jigs are made to match 3/4"-thick stock (left) to be certain the joints come out right. some of the Rockler Router Bit Setup Jigs like the 45-degree lock miter joint (right) are also used to set the fence position. Bits with bearings usually match the fence faces to the front of the bearing. Click images to enlarge |
|
One of the misconceptions about tools like the Rockler Router Bit Setup Jigs is that they can only be used when resting on a router table surface. However, they can be used to set up router bits when the job calls for using a router table sled as well. I will look at sleds in the video and In the Shop below.
Because the bit profiles and diameters these setup jigs are designed for the routers are always mounted in a table rather than hand held. These bits are too large and generate too much force to safely use in a hand held router. It is also important to note the wood thickness that the Rockler Router Bit Setup Jigs are designed to work with. The good news here is that the ¾” and ½” thicknesses are very common in woodworking and make the Rockler Router Bit Setup Jigs effective in most situations.
In the Shop
As you should with any powered machine, unplug the router whenever you are working on or near the bit! You only think you are fast enough to get your fingers out of the way if the router somehow starts. Also remember that the bit is never turning when the setup blocks are used.
Using the Rockler Router Bit Setup Jigs is really very easy. But like most easy stuff you can mess it up if you are not paying attention. For jobs using a sled on the router table you simply put the setup jig on the sled surface where the wood will be secured. Everything else about setting up the bit remains the same as when the Rockler Router Bit Setup Jigs is placed on the table surface. See the video for a demonstration of using the setup jigs on a sled.
With the bit secured in the router, raise it above the table surface a little and set the Rockler Router Bit Setup Jig next to it. You can get the setting relatively close by eye first. Then with one of the cutting edges pointed 90-degrees to the fence try fitting the Rockler Router Bit Setup Jigs over the cutter and adjust the bit height accordingly. When you start getting close, where the jig almost fits over the bit fully, the changes needed are going to be very small so go slow. The goal is to get the bit height to where the Rockler Router Bit Setup Jigs can slide over it fully without riding up or under an edge on the bit.
 |
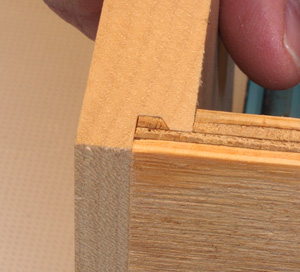 |
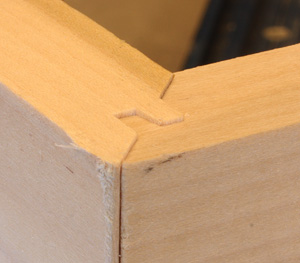
I am holding the 45-degree joint (left) off center slightly so you can see how closely the profiles match up. The locking drawer joint (right) also came out perfect the first time. and you can make overlapping drawer faces with the same bit by just moving the fence back the distance needed when cutting the drawer front. Click images to enlarge |
|
Some setup blocks will fit so close all of the internal surfaces will be in light contact with the bit. On others all of the bits cutting surfaces will just barely miss all of the bocks internal surfaces when the height is perfect. In either case we want the same level of clearance or contact on all upper and lower surfaces within the setup jig.
When with the bit height is perfect you can set the fence. Usually the fence is set so that its faces are flush with the bearing on the bit that controls the depth of the cut. Be sure to check the instructions that came with the router bit for special fence alignments. With some profiles, like the 45-degree lock joint bit you can use the setup jig to adjust the fence position as well. With the setup jig fit around the bit itself the back edge of the bit should just touch the fence. This is an important feature of setting up this type of bit and it must be confirmed with a test cut to be sure it is right.
Using wood that is the same thickness as your project material cut a sample to confirm your settings. It is important that the test wood be identical to your project pieces or this test is worthless. I know that sounds like a no brainer but people forget this all of the time. I think they just get caught up in being “almost ready” to cut the joint and simply forget. Take your time and be sure the wood is right or you will never get the bits right!
If you find a setup jig that you consistently have to raise or lower the bit slightly to get a clean joint, note that on the block or on a piece of paper you keep with the block. With the quality of CNC machining these days tools like the Rockler Router Bit Setup Jigs are rarely off but pay attention anyway.
Conclusions
The Rockler Router Bit Setup Jigs are nicely made and fit the specified router bit profiles perfectly. Though I cut multiple joints after setups with each setup block I never had to vary from the bit height set by the block.
Video Tour |
All of the Rockler Router Bit Setup Jigs carry a street price of just $7.69 (3-22-2013) which is dirt cheap to me for something that saves so much effort and time not to mention wasted material. Remember that there is nothing to wear out on the Rockler Router Bit Setup Jigs and they don’t get rusty or rotten. If you remember to put them away after using them there is no good reason for them not to outlive you, by a bunch. That is very short money for something that will always be there and always be a time saver.
Click Here to visit the Rockler Router Bit Setup Jigs web page
Have a comment on this review? –Email Me!
All written, photographic and drawn materials are property of and copyright by NewWoodworker.com LLC 2000-2019. Materials may not be used in any way without the written permission of the owner.